

Creative designs with a focus on unique combinations of mixed-media - You'll find them "Behind These Eyes..."
Saturday, March 31, 2012
Faux Mulberry Paper with Rit Liquid Dye
Tuesday, March 27, 2012
Jelly Bean Tree - Sizzix Spring Linky Party!

Each spring we love to make an Easter Egg tree with plastic eggs hung on a small tree in our yard. For a fun miniature version of this tree, I thought it would be fun to use real jelly beans. The Sizzix
 Scoreboards XL Vase 3-D Die from designer Eileen Hull made creating this Easter jelly bean tree quick & simple! It was first cut with Sizzix matboard, then a second vase was cut from the floral side of TaDa Creative Studio’s Mommy’s Closet paper. The vase was assembled according to the instructions and then wrapped with the floral paper vase. The vase was filled with sand, and a small branch from our yard was inserted to form the tree. Real jelly beans were strung from the branches using an embroidery needle and “Blossom,” “Caribbean,” and “Honeydew” twine from the Twinery. Multiple strands of each color twine were also tied around the vase in a decorative bow. Extra jelly beans were used to fill in the top of the vase over the sand. Visit Eileen Hull's blog for links to all the other amazing Spring creations being featured in this Sizzix Spring Linky Party!
My guys are 13 and 11 today and it's hard to get them to stop long enough to help with our tree now, but back in 2008 they were still enjoying helping mom with this yearly tradition!


Friday, March 23, 2012
An Altered Necktie - All Things Altered Block Hop
 | |
 Copper Metallic Multi-Surface Craft Paint using haphazard strokes to add texture and sheen, yet the darker base color of the fabric still resonates through the paint.
 When paired with a vintage cufflink & tie bar set, a gentleman who accents his outfit with this vintage style altered tie is sure to feel dapper.
Be sure to hop through the 12 other participating designer's links and see what they have shared. You are sure to find some inspiration to do a bit of creative altering yourself!
 |
| Here's a peak at the true colors of the papers in the collection |
Wednesday, March 21, 2012
Crafting a Fungus - A Mushroom Tale

 costumes a bit of a wood grain. The most challenging assignment I undertook this year was the giant mushroom. I found out last Monday they needed a very big mushroom for a scene in the play. It needed to be 3-dimensional, carried by some of the kids onto
 the stage. The only problem was the dress rehearsal was Wednesday, and the sets were being delivered on Tuesday. That gave me one day to create a funky fungus. As with all crafting experiences, things don’t always go as planned. The mushroom had 3 incarnations before I reached the final result.
  | ||
| Failure #1 - Umbrella, extended, stuffed with bags, - too flimsy |
 |
| Failure #2 - A patio umbrella with fabric sewn on, then stuffed - too heavy. |
 |
| Almost right - stem complete but still tippy, glittering spots |
Monday, March 12, 2012
Floating Chalk Backgrounds

Colorful floating chalk backgrounds are very easy to create! While you may start with the same colors, no two pieces of this unique paper will ever be identical. The way the colors blend and swirl is just beautiful.

Colored chalks
X-Acto craft knife
Shallow baking dish
Water
White card stock cut to fit in baking dish
Instructions:
- Place approximately ½” of water into the baking dish. Set aside.
- Choose 2-3 shades of complementary colored chalks. Use X-Acto blade to gently scrape first color of chalk onto the top of the water. Be careful not to “chunk” it – as the larger pieces will simply sink. You want a fine powder of chalk floating on the surface of the water.
- Repeat with 2nd and 3rd colors.


- Place cardstock face down onto water and press gently. Do not push onto the bottom of the baking dish. Just let the cardstock float on the surface. Wait about 5 seconds - it will begin to curl back from the water. Gently lift out of the water and set aside to dry. To speed up drying time, use a heat tool. If cardstock is curled, iron on low setting to flatten.
 No fixative is needed.
Repeat steps 2-3 to create additional pieces of background paper.- Add a bit of Pearl-Ex powders or use shimmering chalks for a sparkling effect. Try interference shades of Pearl-Ex powders on dark cardstock for a “galaxy” background. Layer with coordinating cardstocks, stamp directly over the background, let your creative muse guide you!


Friday, March 9, 2012
Coupon Holder – Outback Style

Today's post is another of my favorite projects for March is National Craft Month! This first appeared as a Cindi's Simple Solutions project for When Creativity Knocks. This custom made coupon holder was created with a bit of Australian style in mind. When visiting San Francisco with Ana Araujo, we visited Britex Fabrics – It was a world of inspiration and I was overwhelmed at all the fabric choices. I just couldn’t resist purchasing some of their faux alligator material – it has a fabulous alligator texture and a beautiful, subtle gold luster over the green. I have a few more projects in mind for this fabric, but this is the first creation! As with many of my projects, it also has a touch of “repurposing.” An old fabric napkin is used as the lining. I am lucky enough to have a few Echidna quills I received from a fellow designer who lives in Australia as part of a circle journal project several years ago. I’ve used one as a finishing touch on the front of this “Outback Style” coupon holder.
Materials:
- Faux alligator fabric – Britex Fabrics
- Decorative ribbon trim – Britex Fabrics
- Fabric napkin in coordinating color
- Thread
- Sewing machine
- Scissors
- Small button with shank (Blumenthal Lansing)
- Australian Echidna Quill
Instructions:
- Measure and cut faux alligator fabric to 11 1/2” x 7 1/2”.

- Place alligator rectangle onto fabric napkin, with top edge on stitched edge of napkin. Trace and cut napkin.
- Place napkin rectangle onto back side of faux alligator and machine stitch approximately ¼” from all edges around all sides.

- Measure and cut two pieces of decorative ribbon trim, approximately 7” long – one to fit along bottom edge of flap and one to fit along top inside edge of pocket.
- Determine placement of quill or other decorative embellishment. Cut two small holes approximately ¼” apart, measure over approximately 1 ½” and cut 2 small holes approximately ¼” apart.

- Place ribbon with holes onto top bottom edge of flap, stitch to first set of holes on left. Stitch from right edge to 2nd set of holes (leave space between holes unstitched).
- Stitch 2nd piece of trim along bottom edge of leather.
- Fold bottom edge up 3“ and stitch sides to close.
- Use scissors to randomly cut along edges of faux leather to create a ragged edge.
- Cut strip of faux alligator 6 ½” x ¾”. Use scissors to randomly cut along edges of strip.
- Place one edge on back of pouch approximately 1”from top edge and hand stitch in place using overlapping X stitch.
- Bring strip over flap and push beneath ribbon strip on edge.
- Bring strip down and over bottom edge up to back of pouch. Mark place where strip ends for button placement.
- Hand stitch button in place.
- Carefully cut slit in faux alligator strip for button to pass through to hold pouch shut.

- Pass quill through first hole, then out through 2nd hold, across front and repeat on right side.
- Add coupons! To keep organized, create custom tabs for your coupon categories using index cards or card stock. Jazz them up a bit with patterned paper to coordinate with your coupon holder fabric.


Wednesday, March 7, 2012
"Wings" Mixed-Media Pendant & Ring

Sharing another project as part of National Craft Month! Beautiful image sheets I received from B-Muse inspired this matching pendent and ring set I originally designed for Rubber Road Adventures ezine (http://rubberroadadventures.ning.com/page/wings-pendant-and-ring) . As I love to “mix things up a bit” as often as possible, I combined portions of images from separate sheets to come up with the unique image on the pendent. Then I let my mad scientist muse loose to dabble with clay, paints, beads, epoxy.....
Supplies:
B-Muse Butterfly Wings – 2 CS-BW2 image sheet and
Vintage Cat Ads – CS-VCA image sheet
White Makin’s Clay ®
and Makin's Clay ® Cutters, square and rectangle
Krylon Silver Metallic spray paint
JudiKins Soleil Sunlight Curing Epoxy
Silver findings (unknown brands)
Elmer’s Craft Bond Adhesive
Darice black glass bugle beads
We R Memory Keepers Cropodile Punch
Westcott Titanium Bonded Non-Stick Scissors
Instructions
- Roll out white Makin’s Clay ® to approximately 1/8” thickness. Use clay cutters to cut one 1 ½” square, and one 1” long rectangle (or cut to appropriate sizes to fit your ring blank, desired pendent size, etc.) Let dry (12-24 hours).
- Place dry Makin’s Clay ® square and rectangle onto newspaper or scrap paper in well ventilated area. Spray with Krylon Silver Metallic paint. Let dry.
- Select cat image from Vintage Cat Ads sheet and carefully cut out. Select wings from Butterfly Wings sheet and cut out 3 wings. Arrange cat and wings as desired on silver clay square and single side of wings onto rectangular silver clay square. Use a small amount of Elmer’s Craft Bond adhesive to mount.
- Use adhesive to mount rectangular piece in ring blank.
- Use adhesive to mount a row of black bugle beads around inside edges of ring and outside top edges of pendent. Let dry.
- Arrange ring and pendent on flat surface in sunlight. (Tip: use a paper or Styrofoam cup with a hole cut in the bottom for the ring – slip the back of the ring through the hole and it will lie flat for the next step). Fill remaining inside area of ring with Sunlight Curing Epoxy. Fill area inside bead edge on pendant with Sunlight Curing Epoxy. Any bubbles can be popped using a pin before epoxy is dry. Let dry according to manufacturer directions.
- Use Cropodile punch to punch hole in top of pendent. Add jewelry findings.
Tuesday, March 6, 2012
Tuesday Creativity with Cindi's Simple Solutions & WCK!

Faux mulberry paper and rubber stamping with Rit Liquid Dye - find it here
A bonus project features Ana Araujo's I Heart Crafts tattoo pattern - a simple shrink plastic magnet (and introducing the adorable Henry Quinn King - my cousin's new son!)

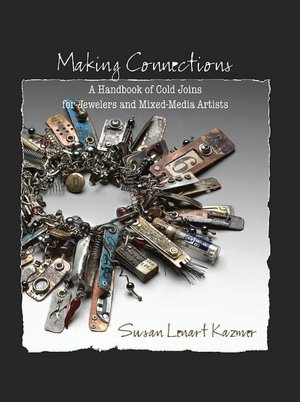 My book review for this week is Making Connections by Susan Lenart Kazmer - this book is full of some truly UNIQUE artwork!
Ana Araujo shares another fun project made with her tattoo pattern in Ana's Creative Chaos
 And our episode this week is the premiere episode of Creative Nostalgia with Laura Bray! Laura shares her adorable appliance cozies!
 And for a bit more creativity - My artwork is again featured on the Rit Liquid Dye site - this time it's St. Patrick's Day inspired projects.
March is National Craft Month - and I am just exploding with creative ideas I want to share!
Faux "Delft" Technique

As National Craft Month marches on, I am inspired to share many of my favorite techniques and projects with everyone!
I love old china dishes – especially anything blue and white. I’m drawn to the beautiful Delft blue patterns found on a variety of pieces ranging from tiles to teacups and have amassed quite a collection over the years. This was my inspiration for the creation of this “Faux Delft” technique I discovered last year and shared as one of Cindi's Simple Solutions on the When Creativity Knocks site.
I love old china dishes – especially anything blue and white. I’m drawn to the beautiful Delft blue patterns found on a variety of pieces ranging from tiles to teacups and have amassed quite a collection over the years. This was my inspiration for the creation of this “Faux Delft” technique I discovered last year and shared as one of Cindi's Simple Solutions on the When Creativity Knocks site.
To learn more about the history of Delft Blue china visit: http://www.holland.nl/uk/holland/sights/delftblue-history.html
 My version is quite simple – yet it gives you the feeling of Delft china. It requires just a few products.
White Makin’s Clay®, a blue inkpad (I prefer chalk as they give a softer effect, more like true Delft), a rubber stamp, and EarthSafe Finishes Marine Varnish.
A Sizzix Scoreboards Teacup Die designed by Eileen Hull serves as the base for my Delft technique project – but it would work on clay sheets, clay mounted onto wood or any other surface. Makin’s Clay® air dries so you don’t have to worry about discoloration in the baking process, and it is flexible when dry so you could make up sheets of this faux Delft and then mount it to any surface, even a curved surface.
I began by rolling out a small amount of White Makin’s Clay® using the Makin’s Professional® Ultimate Clay Machine set on #5 (very thin).


I then placed the die cut teacup onto the clay sheet and cut around it with an X-Acto craft knife. A small amount of Elmer's Craft Bond Adhesive tacky glue was placed over the teacup and the clay cut outs were placed onto the mattboard pieces while wet. The edges were gently smoothed by hand. The stamp was then inked with deep blue chalk ink and stamped onto the wet clay. The clay was allowed to dry according to manufacturer instructions (a few hours when used this thin), and the teacup die was assembled according to the manufacturer instructions.
 |
Here’s an original piece of Delft which shows how it is often “blurred” yet still beautiful! |
A plastic lunch bag was filled with potting soil and the top portion approximately ½” above the soil was cut off. A
flowering annual plant was placed into the bag of soil, which was then placed into the teacup.
flowering annual plant was placed into the bag of soil, which was then placed into the teacup.
A bit of wide satin blue ribbon tied to the handle of the cup front, and the tag stamped with “We Love You” finished off this special "card" which would be great for Mother's Day, a birthday, to say thank you to a special friend, or to share get well wishes.
Monday, March 5, 2012
Hummingbird Feeder
 Have you heard? March is National Craft Month! Many of the talented artists who are part of the Designer Craft Blog Connection want to share their creative projects with you. Some are even offering give away opportunities so don't miss your chance for creative inspiration and prizes! Follow the link on the right to see what each of them is sharing as we add new projects for this first Monday in March!
 Among the reasons I love spring so much are the song of spring peeper frogs in the woods behind our home, the pops of brightly colored daffodils, crocuses, and black raspberry ice cream colored Redbud trees here in NC, and the reappearance of my tiny feathered friends - HUMMINGBIRDS!
In this episode of When Creativity Knocks shot on site at Maker Faire in San Mateo, CA, Ana Araujo, Megan Araujo and I get get a bit silly as I share a way to repurpose water bottles with a few simple supplies and create a colorful hummingbird reader for your yard. Having a clean hummingbird feeder is very important to the health of the birds, so this project is designed so the bottles themselves can be removed when they become dirty, making it easy to add a new clean bottle to feed our buzzing feathered friends.
WCK even has affordable kits available if you decide you'll give this project a try and watch these little flying jewels of nature flock to your yard for refreshment!
 |
| http://whencreativityknocks.com/mycraftspace/m/videos/view/Hummingbird-Feeder |
Sunday, March 4, 2012
Polished "Blarney" Stone Technique

Polished Stone (or as I call it the Polished "Blarney Stone") Technique
I couldn’t resist a little play on words with this one – sorry! Must be the Irish in me coming to the surface as St. Patrick's Day approaches! “Blarney” or not – polished stone background paper is a beautiful, custom made addition to your paper crafting projects. This simple layout I created when I first began scrapbooking explains why our family loves this Irish lullaby. The title block and stamped & embossed pieces on the bottom all have polished stone backgrounds created using this simple technique. They were also edged with gold leafing pen and stamped and embossed in gold.
While it may not be a new technique, it's still a great effect and worth sharing as we celebrate March is National Craft Month! Here is what I find to be the easiest way to create this effect.
Cut a piece of glossy cardstock to desired size. It is best to work with smaller, half or quarter sheet sections than to try to do a whole sheet at once. Take a Krylon Leafing Pen (gold, silver, copper, etc.) and gently draw crooked lines randomly across the paper. This will start to create your “veins” in the “marble”. Next, wet a cotton ball with alcohol and add 3 drops of dye based ink pad refill ink onto a cotton ball. It is best to use 2 shades, with 2 drops of light shade and one of a darker color. Use the cotton ball to “dab” all over the cardstock repeatedly. The alcohol causes the ink to run and bleed together, and causes your metallic “veining” to dissolve somewhat and add shimmering touches to your finished marble.
Saturday, March 3, 2012
March is National Craft Month!

WCK will also be posting extra episodes this month featuring some fun Manufacturer Must Have items we found at CHA and hosting a challenge where you can win prizes from top manufacturers! Stay tuned!
Subscribe to:
Posts (Atom)