

Creative designs with a focus on unique combinations of mixed-media - You'll find them "Behind These Eyes..."
Showing posts with label ImpressArt Metal Stamps. Show all posts
Showing posts with label ImpressArt Metal Stamps. Show all posts
Wednesday, May 15, 2013
Mother's Day Bracelet
Today I'm sharing a bracelet I designed for ICE Resin®, also featuring Connie Crystal and ImpressArt Metal Stamps - the instructions are available on the ICE Resin blog® - Cindi


Sunday, October 28, 2012
Tin Type Tyle Coaster with KellyCraft's Get-it-Straight Laser Square

My latest project was featured on October 8th at their blog - You can find the complete instructions here.

The Get-it-Straight™Laser Square really makes it so much easier to align your crafts - no matter what medium you work with - give it a try! - Cindi
Saturday, October 13, 2012
DCC Makin’s Clay® Blog Hop: Adaptable Napkin Rings

This month the Designer Craft Blog Connection group hosted a designer challenge featuring Makin’s Clay®. As a long time fan of the extreme versatility of Makin’s Clay®, I was excited to have other designers use it in their creations and share them with all of you. Each participant received an assortment of clay, tools, cutters, texture sheets and push molds. Be sure to click through the DCC link on the right to see what they’ve whipped up with their products from Makin’s Clay®! For more ideas on creating with Makin's Clay®, visit the new Makin's Clay® Blog, Facebook Page, and Pinterest Board.
I loved the adorable napkin rings fellow designer Ann Butler created from a repurposed paper towel roll, so I knew just what to start with when I created these “adaptable” napkin rings! The brown tone of the clay, along with the texture provided from the texture sheet results in what I think looks a bit like leather. By sticking with a simple color palette, these adaptable rings will coordinate with almost any color or pattern of napkin, for any theme or holiday. The metal stamped embellishment serves as a holder for silk flowers, dried flowers, colorful autumn leaves, long stems of grasses, or any other embellishment you’d like to tuck behind it to customize your rings for the occasion. The verses stamped on each are basic enough that they too are versatile.

Materials:
Makin’s Clay® - Earth Tones multi pack (If creating 4 rings of the same colors, 2 multi-packages of clay will be needed)
Makin’s Professional® Ultimate Clay Machine® Makin’s Clay® Texture Sheet - Set A "Sand"
ImpressArt® Metal Stamps - Lowercase Newsprint
ImpressArt® brass stamping hammer, steel stamping plate, & Stamp Straight Tape™
Copper sheet
Westcott Craft Titanium Bonded Non-Stick Scissors
Sharpie marker, soft cloth
Small copper brads
Brown flat fiber trim
Elmer’s Craft Bond Adhesive
Small hole punch, tapestry needle (optional)
Instructions:
 Begin by cutting a paper towel roll into desired number of 1 1/2” rings, then cut through each ring to create napkin ring.
Remove clay from box, remove from outer sealed plastic wrapping. Cut individual wrapped piece of tan clay in half and remove inner wrapping from one half. Makin’s Clay® is ready to use right from the package - no conditioning is needed.
Use Ultimate Clay Machine® to roll on #3 setting. This will create a piece large enough to cover your chipboard ring. Repeat with 2nd half.


Place a light coat of Craft Bond adhesive onto inside of chipboard ring. Place clay onto ring, using fingers to gently ensure entire surface is covered with clay. Remove any access clay extending off of chipboard. Repeat on second ring.
Place texture sheet over clay on ring. Press into clay to transfer texture.

Cut individual wrapped piece of dark brown clay in half and remove inner wrapping from one half.
Use Ultimate Clay Machine to roll on #3 setting. This will create a piece large enough to cover your chipboard ring. Repeat with 2nd half.
Place a light coat of Craft Bond adhesive onto outside of chipboard ring. Place clay onto ring, using fingers to gently ensure entire surface is covered with clay, extending slightly over edges onto back. Repeat on second ring.
Place texture sheet over clay on ring. Press into clay to transfer texture.


 Reform rings, supporting sides as needed, and let dry overnight.
Measure and cut flat brown fiber trim to fit along inside edges of ring where two colors of clay meet. Mount to cover edge.
To create metal plates, cut two pieces of copper sheet approximately 2” long by 1/2” wide.
 Use ImpressArt® Stamp Straight Tape™ on bottom of first piece to
  hold in place on steel stamping block. Use lowercase Newsprint metal stamps and brass stamping hammer to stamp “be thankful” on first piece, and “be grateful” on second piece.
 Distress edges of each piece by lightly tapping with stamping hammer.
Color each stamped verse with Sharpie marker. Gently rub marker from copper sheet with soft cloth.
 Ink will remain in stamped areas to highlight text.
Punch small hole in each end of each metal plate.
 Determine placement on clay napkin rings. Do not mount flush to ring, bring ends in a about 1/8” to allow metal plate to bend outward to accommodate embellishment inserted behind.
 Use tapestry needle, or small point of scissors, to gently push holes through clay and chipboard where needed.
Mount plates to rings using copper brads.
To add embellishment, slip behind stamped metal plate.
- Enjoy using these faux leather, adaptable napkin rings at a special dinner soon! - Cindi
Makin's Clay is also offering a price package valued at just over $111.00 with products including clay, tools and a Memory Frame Kit.....to enter leave a comment on the Makin's Clay® Blog telling us which project you liked best on the blog hop. The winner will be randomly drawn from all entries
on or about October 24th. We will announce the winner on the Makin's Clay® Blog so check back Thursday October 25 to see if you have won!

Thursday, September 27, 2012
Autumn Pendant with ImpressArt Metal Stamps & Connie Crystal

I'll be wearing this piece this weekend at the ImpressArt booth at Maker Faire, NY.
Try to find the time to create something unique to add to your fall wardrobe soon! - Cindi
Sunday, August 12, 2012
Industrial Chic Blog Hop - "Love Is" Book Pendant

 The minute I opened my surprise package for the Industrial Chic Blog Hop, I knew I wanted to create a book pendant with these great metal hearts! For a tutorial on how to create a heart-shaped book pendant of your own with these fun pieces from the Industrial Chic collection, view my latest episode of Creatively Crafty with Cindi Bisson here.
> 10 Barbe St. John http://barbesaintjohn.blogspot.com/
> 11 Cheryl Bodkin Waters http://blog.artsyfindings.com/
> 12 Cindi Bisson http://fatcatcreations.blogspot.com/
> 13 Gretchen McHale http://www.studio320jewelry.com/blog/
> 14 Jenny Barnet Rohrs http://www.crafttestdummies.com/
> 15 Kari McNight http://backporchartessa.blogspot.com/
> 16 Lindsay Obermeyer http://loops.typepad.com/
> 17 Seth Apter http://thealteredpage.blogspot.com/
> 18 Suze Weinberg http://suzeweinberg.typepad.com/
> 19 Tami Bayer http://www.tamibayer.com/
> 20 Theresa Cifali http://theresacifali.com/
> 21 Tracie Stivers Lampe http://www.radicalrecycks.com/BlogRetrieve.aspx?BlogID=7528
> 22 Traci Bautista http://kollaj.typepad.com/
> 23 Jen Crossley http://amarkintime.blogspot.com/
> 24 Eileen Hull http://www.eileenhull.blogspot.com/
> 25 Pam Carriker http://pamcarriker.com/blog/
> 26 Sandy Martin http://sweetpeajewelry1.blogspot.com/
If you missed any of July's projects, you'll find them here!
> 6 Ken Oliver http://vertigographic.com/TurnHeads/projects-and-blog/
> 7 Vicki O'Dell http://www.vickiodell.com/
> 8 Cindy Cima Edwards http://www.cindycima.com/
> 9 Elena Lai Etcehverry http://thetravelingprincess.blogspot.com/
> 10 Jen Osborn http://www.themessynest.com/
> 11 Wanda Eas http://craftymule.blogspot.com/
> 12 Terri O http://www.supersimplewithterrio.com/
> 13 Susan Weckesser http://mysweetearth.blogspot.com/
> 14 Tracy Weinzafel http://www.tracywburgos.typepad.com/

I hope you enjoy the projects in the hop and are inspired to get creative yourself! Industrial Chic products are found at Michael's stores and the selection is truly eclectic and amazing!
Sunday, July 22, 2012
Faux Metal Stamping - New Episode of Behind These Eyes

Friday, June 29, 2012
ICE Resin + Spellbinders = a Purse with Personality


Saturday, May 12, 2012
ImpressArt® Metal Stamps - Designer Craft Blog Connection Hop
 I am so excited to be a part of this ImpressArt® Metal Stamps Designer Craft Blog Connection hop! I received my product from ImpressArt®, opened the box and became almost immediately obsessed. I have been adding metal stamped accents to almost every creative project I've made since receiving my product. Today I'm sharing three jewelry projects featuring the lowercase Newsprint set of metal stamps, and assorted stamping blanks. There are 3 projects, and I've included instructions and supplies for each - so I appreciate your patience with this long post :0). Also, ImpressArt is hosting a great opportunity for you to win a fantastic prize package - The Grand Prize is valued at up to $120.00 and contains:
 1- ImpressArt alphabet set of the winner's choice
1- ImpressArt Steel Stamping Block, small
1- ImpressArt Metal Stamping Hammer
1- ImpressArt Stamp Straight Tape
An Assortment of metal discs
To enter the contest, you must go to the following link and follow the directions:
https://www.facebook.com/pages/ImpressArt/155664424487844?sk=app_194975693850063
I can promise you'll be seeing a lot more of my projects with metal stamping. In the meantime, be sure to follow the Designer Craft Blog Connection link at the right to see what other creative projects have been shared by fellow designers!

Cobalt and Copper Pendant
Featuring Metal Stamps and Copper Offset Oval Washer Blank from ImpressArt®
Materials:
ImpressArt® Design Stamp, Whimsy Heart Metal Stamp - Item #SC158-K-3MM
ImpressArt® Metal Stamping Blank, Offset Oval Washer w/Ring, 2” - Copper - Item #IAD12261
ImpressArt® Brass Metal Stamping Hammer - Item #SC711
ImpressArt® Stamp Straight Tape™ - Item #BC21-1520
ImpressArt® Steel metal stamping block
Cobalt glass beads, brown glass beads
ART Glitter - Cobalt Vintage Glass Glitter
Copper jewelry wire
Lumiere 3D Dimensional Metallic Paint and Adhesive from Jacquard Products - #219 Blue
Jewelry pliers, wire cutters, copper colored fiber, copper necklace closure finding, soft cloth


 Instructions:
 Cut two small pieces of Stamp Straight Tape™ and align on bottom of Copper Offset Oval Washer. Holding upside down, stamp Whimsy Heart Metal Stamp radiating out from center opening in space repeatedly between tape. From there, move each piece of tape in a radiating fashion and repeat stamping heart “upside down”.


 Use fingertip to apply small amount of blue Lumiere 3D Dimensional Metallic Paint & Adhesive over metal stamped hearts. While paint is still wet, gently rub surface of copper with soft cloth, allowing blue paint to enhance stamped hearts.
 Use round end of hammer to gently distress outside edge of metal and around inner opening.
 Apply thin lines of blue Lumiere 3D Dimensional Metallic Paint & Adhesive between each row of stamped hearts. While wet, add cobalt blue vintage glass glitter. Let dry.
 Measure and cut copper colored fiber to desired pendant length. Loop through ring on top of oval to hold in place. String large blue glass bead onto fibers and directly to ring, tie large knot in fiber over glass bead. Add copper necklace closure. Add 3 smaller descending sizes of cobalt and brown glass beads to a piece of copper wire. Arrange in opening and wrap around ring to hold in place.
© All images - Cindi Bisson - Behind These Eyes™
And on to Project #2 -
 BLOOM Ring
Featuring Metal Stamps and Floral Stamping Blanks from ImpressArt®
Materials:
ImpressArt® Alphabet Stamp Set, Newsprint Lowercase Stamp Set - Item #SC1316-3MM
ImpressArt® Metal Stamping Blank, 5 Petal Flower with Ring Stamping Blank - Brass: IAD12130 - TWO
ImpressArt® Brass Metal Stamping Hammer - Item #SC711
ImpressArt® Steel metal stamping block
Black Sharpie Marker
We R Memory Keepers Cropo-A-Dile Punch
Pearl Dew Drop embellishment from The Robin’s Nest
Jewelry pliers, wire cutters, soft cloth, E-6000 adhesive
Instructions:
 Use lowercase Newsprint metal stamps to stamp two brass flower blanks - one letter on each petal, spelling out “BLOOM”.
 Use wire tool to cut hanging ring from each charm.
 Color stamped lettering with black Sharpie marker. Gently rub
from surface of brass with soft cloth, allowing black to enhance
stamped lettering

Use jewelry pliers to gently bend petals upward and outward on one flower.
 Gently bend petals of second flower backward.
Trace ring back onto scrap paper. Cut circle of paper to cover ring back, adhere. This ensures the silver toned metal from ring back doesn't show around brass flower.
 Use E-6000 Adhesive to mount flower with petals bent backward onto ring base, then mount flower with upward bent petals so that all petals show.
 Add pearl Dew Drop accent for center of flower.
© All images - Cindi Bisson - Behind These Eyes™
And lastly, at least for today - Project #3 -
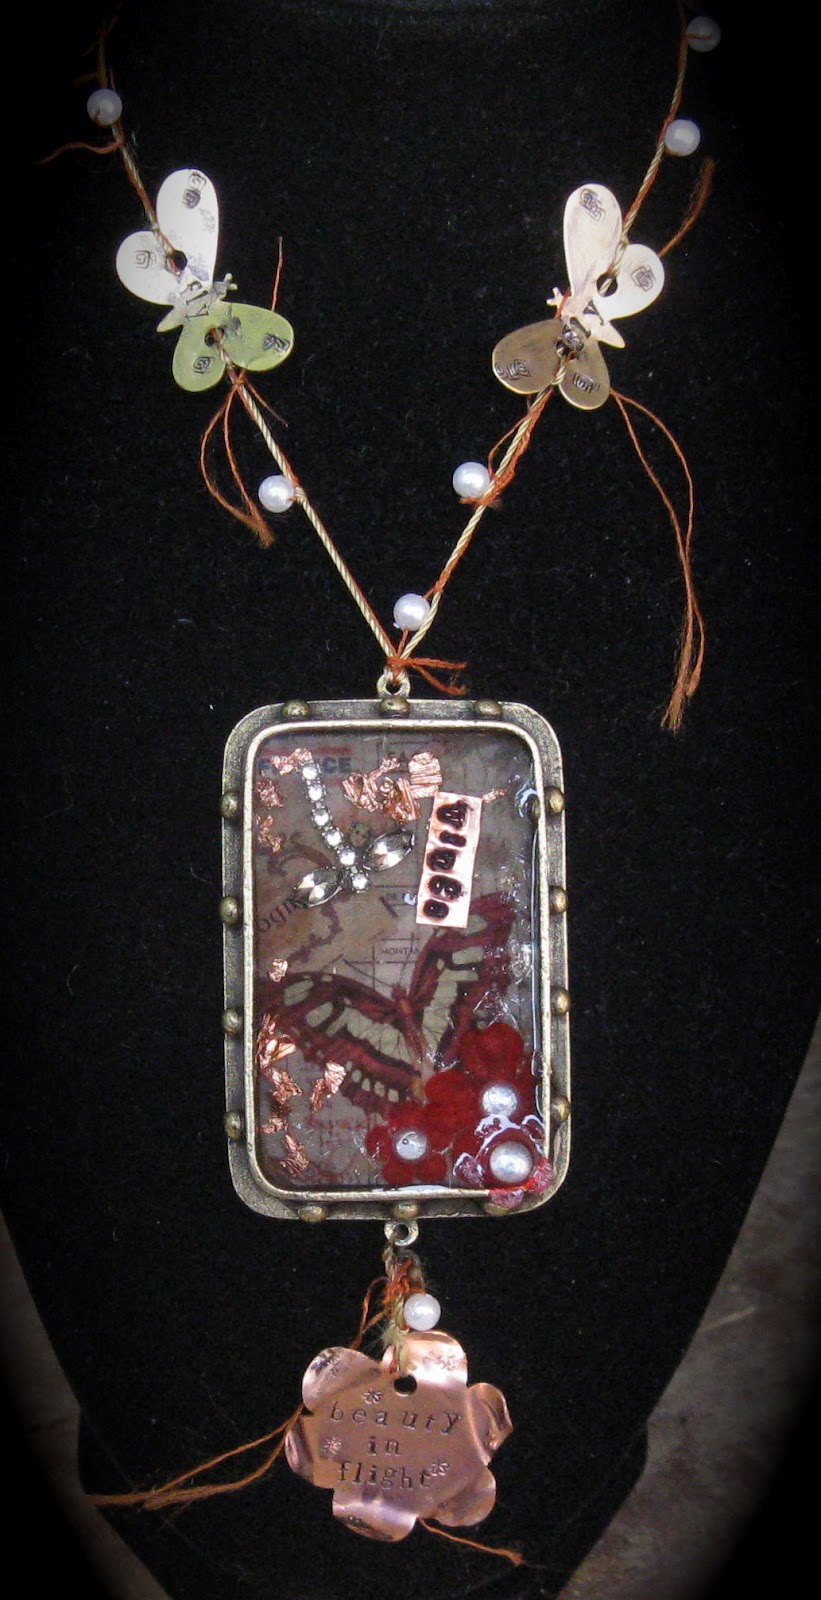
Take Flight Mixed-Media Pendant
Featuring Metal Stamps & Copper and Brass Stamping Blanks from ImpressArt®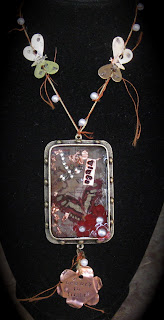
Materials:
ImpressArt® Alphabet Stamp Set, Newsprint Lowercase Stamp Set - Item #SC1316-3MM
ImpressArt® Design Stamp, Square Swirl Stamp - Item #SC1510-P-3MM
ImpressArt® Design Stamp, Whimsy Flower Stamp - Item #SC1514-K-3MM
ImpressArt® Metal Stamping Blank, Butterfly, 1 5/16” Brass - Item #IAD12142 - TWO
ImpressArt® Metal Stamping Blank, 6 Petal Flower, 1” Copper - Item #IAD12222
ImpressArt® Brass Metal Stamping Hammer - Item #SC711
ImpressArt® Steel metal stamping block
We R Memory Keepers Crop-A-Dile Punch
Black Sharpie Marker
Rectangular Brass Hobknob bezel from ICE Resin
ICE Resin
Pattered paper from Belles Dames Francaise flip book from ICE Resin
Pearl Dew Drops embellishments from The Robin’s Nest
Jewelry pliers, wire cutters, copper colored fibers, gold/brass toned floss/fibers, small pearl beads, repurposed rhinestones, mica flakes, copper flakes, small paper flowers, copper necklace closure finding, soft cloth
Instructions:
Featuring Metal Stamps & Copper and Brass Stamping Blanks from ImpressArt®
Materials:
ImpressArt® Alphabet Stamp Set, Newsprint Lowercase Stamp Set - Item #SC1316-3MM
ImpressArt® Design Stamp, Square Swirl Stamp - Item #SC1510-P-3MM
ImpressArt® Design Stamp, Whimsy Flower Stamp - Item #SC1514-K-3MM
ImpressArt® Metal Stamping Blank, Butterfly, 1 5/16” Brass - Item #IAD12142 - TWO
ImpressArt® Metal Stamping Blank, 6 Petal Flower, 1” Copper - Item #IAD12222
ImpressArt® Brass Metal Stamping Hammer - Item #SC711
ImpressArt® Steel metal stamping block
We R Memory Keepers Crop-A-Dile Punch
Black Sharpie Marker
Rectangular Brass Hobknob bezel from ICE Resin
ICE Resin
Pattered paper from Belles Dames Francaise flip book from ICE Resin
Pearl Dew Drops embellishments from The Robin’s Nest
Jewelry pliers, wire cutters, copper colored fibers, gold/brass toned floss/fibers, small pearl beads, repurposed rhinestones, mica flakes, copper flakes, small paper flowers, copper necklace closure finding, soft cloth
Instructions:
 Punch small hole near top of copper flower using Crop-A-Dile punch.
 Use lowercase Newsprint letter stamps to stamp “beauty in flight”, somewhat centered, onto copper flower. Randomly stamp flower with Whimsy Flower stamp.

Punch two small holes approximately 1/4” apart, centered on each brass butterfly using Crop-A-Dile punch.
Use lowercase Newsprint letter stamps to stamp “fly”, between punched holes.
On each butterfly top wing tip, stamp Square Swirl stamp three times in a row, radiating upward, allowing to overlap slightly. Stamp each bottom wing once in lower corner.
Use black Sharpie to color each stamped blank, wipe with soft cloth to remove from face of blank, allowing black to enhance stamped areas.
Use jewelry pliers to gently bend the wings of each butterfly upward. Also bend the petals of the copper flower randomly upward and downward to add depth.
 Line rectangular bezel with patterned paper. Sprinkle in copper flakes on left edge and mica flakes on right lower edge. Arrange repurposed rhinestones into dragonfly shape above butterfly image on patterned paper. Set two small paper flowers in lower right corner, with pearl Dew Drop centers.
On copper strip of metal, use lowercase Newsprint stamps to stamp “wings”. Trim around word, color with black Sharpie and rub with soft cloth to remove ink from surface of copper strip. Place into collaged bezel as shown.
Mix ICE Resin according to manufacturer instructions, pour into bezel. While wet, add 3rd small paper flower, coated with resin, with Dew Drop center onto lower right outside corner of bezel, extending beyond the center. Cure overnight.
Measure and cut fibers to desired length. String copper fiber with pearl bead accents approximately 1” apart, knotting to hold in place. Add stamped butterfly accents to hanging fibers. Add jewelry closure. Measure and
cut fibers to hold copper flower beneath collaged pendant. Add pearl bead, tie to stamped flower and tie to ring on filled bezel.
© All images - Cindi Bisson - Behind These Eyes™
Monday, May 7, 2012
Chunky Makin's Clay® Necklace - Designer Craft Blog Connection
 One of the themes for May's Designer Craft Blog Connection hop is Quick and Easy Jewelry Anyone Can Make - While this project was originally created as a lanyard for CHA - it would also make a unique accent necklace. It’s chunky, rich toned colors and bit of fiber fringe would be great layered over a cozy sweater. Create it in pastel or bright tones, use a bit of cheerful ribbon instead of fiber, and it would be a funky accent over a spring or summer t-shirt. The best part is it could not be easier to create. All you need is a multi-color package of Makin’s Clay®, good sharp heavy scissors like Westcott Titanium Non-Stick scissors, and fiber or ribbon. I used clay that was actually old, outdated and had been accidentally left in storage in my attic. I could have reconstituted it with water (another great thing about Makin’s Clay®), but instead I used it in the brick form it was already dried in and sliced it into beads with the heavy scissors. The fiber was strung onto an upholstery needle and then pushed through the center of the square beads. To re-create this technique if you don’t happen to
  have old, outdated, dried clay bricks (gee, who wouldn’t have those around in their creative stash?) first open the box of clay, and remove the individual colors from the outside packaging. Carefully remove packaging from individual colors (if clay sticks to packaging during removal, you can hand form your bricks again - I liked the random effect on the sides of the dried clay so don’t create perfectly smooth bricks unless you desire that effect. Let dry at least overnight. Carefully slice into chunks using heavy scissors. String onto ribbon or fiber in desired pattern, allowing space between each cluster of beads so ribbon/fiber shows. Add closure mechanism and your finished.
 Follow the Designer Craft Blog Connection link to the right to see the many creative projects my fellow designers will be sharing with you as part of this month's hop!

Subscribe to:
Posts (Atom)