1 Cindi Bisson McGee - Behind These Eyes : CHA
Showing posts with label CHA. Show all posts

Wednesday, February 18, 2015

Birdhouse Table & Chicken Wire Bird - FaveCrafts® Best Blogger Craft 2015 Challenge!


It was an honor to attend the recent FaveCrafts® Blogger Event at CHA in January!   When my box of swag from some of the event sponsors arrived, it was like Christmas all over again!  I received fabulous products from MD® Hobby & Craft - which are EXACTLY my style - a great assortment from Plaid®, items from Simplicity®, Clover®, and Prima® Bead.  

When I found out about this awesome Best Blogger Craft 2015 challenge to use products from one of the sponsors to create a unique creative project and submit it FaveCrafts - my mind instantly began to turn and churn and I knew I wanted to create something unique, and functional!

I love birds and birdhouses, so this Birdhouse Table & Chicken Wire Bird were a natural choice.    The table could be a functioning birdhouse, but it also works as a great side accent table for a plant, or on a porch next to a comfortable chair to hold a cool beverage, etc.  The little chicken wire bird is a totally unique accent piece to set on the table, or in pot with a pretty plant indoors or outside on a porch. 

I built this birdhouse from scratch and have included measurements - but of course you could buy a large pre-made birdhouse, cut the top off flat and create something similar for an easier option!  

Voting in this challenge/contest begins on February 25th and runs through March 4th.  I encourage you to visit the FaveCrafts site and vote for your favorite project - there are sure to be many amazing creative projects to choose from!!!   Here's the link - http://www.favecrafts.com/contest/Blogger-Contest

Materials: (items in GREEN were included in my swag package from FaveCrafts!)

Plaid® FolkArt® Home Decor Chalk Paint- Seaside Villa 
Plaid® Martha Stewart Crafts™ Multi-Surface Satin Acryilc Paint - Sandcastle 
Plaid® Outdoor Mod Podge®
EKSuccess® Inkadinkado® Stamp Set - Flower Icons 
Wrights® 5/8” Black ric-rac from Simplicity
MD® Hobby & Craft Metal Working Gloves 
MD® Hobby & Craft Brass Rolled Metal 
MD® Hobby & Craft Chicken Wire 
MD® Hobby & Craft Hobby Shears 
KellyCraft™ Get-it-Straight™ Laser Square & Multi-Mat™
Westcott® Titanium Bonded Non-Stick Scissors 
Craft Attitude™ Printable Craft Film 
Staz-On ink pad - Jet Black
Jax® Pewter Black 
Beacon® 527 Adhesive 
Repurposed wood 1/2” thick (I used old fence boards to create this birdhouse). 
Assorted carpentry tools - saw, staple gun, drill, safety glasses, large hammer, rag 
Paintbrushes 
Permanent glue stick

Instructions: 

Cut 4 pieces of repurposed wood (approximately 1/2” thick for all wood) 5” x 21”.  Nail
together to create center of birdhouse.  

Cut 2 pieces of repurposed wood 7” x 10”.

Cut 2 pieces of wood 4 1/2” x 5”.  

Cut 2 triangles 8” x 6 1/2” x 5.  Assemble  to create side portions of “roof”.  

Cut piece of wood 11” x 11”. 

Cut piece of brass metal 12” x 12” and 2 pieces 8” x 11”.
Place brass metal pieces on hard surface, hit with large hammer to distress.  

Apply Jax Pewter Black to all brass to add patina to age
distressed metal.   


Fold edges of each piece back 1/2” and use staple gun to mount to two slanted roof pieces. 

Mount 11” x 11” piece to top of birdhouse to create table top.  Fold edges of 12” x 12” metal piece back 1/2” and use staple gun to mount to flat 11” x 11” table top (staples on folded edge). 

Drill 3 evenly spaced 1 1/2” holes in center of birdhouse, and one in each slanted side roof piece. 

Drill 3/8” holes beneath each large hole.

Paint birdhouse with FolkArt® Home Decor Chalk paint.  Let dry. 

Paint 2 1/2” band of Sandcastle paint beneath each hole on
center of birdhouse.  Let dry.   


Ink birds on a branch stamp with permanent black ink.  Place Craft Attitude film onto Multi-Mat  and use Get-it-Straight™ Laser Square to help align separate rows of stamped bird images as shown.  

Cut into strips.  

Use permanent glue stick to mount stamped Craft Attitude to Sandcastle sections.


Cut black ric-rac and mount to top and bottom of each painted strip.  

Cut twigs and use Beacon 527 to mount in 3/8” holes.   

Coat all wood surfaces with outdoor Mod Podge.  


I first saw a chicken wire bird on Pinterest.  When I received the chicken wire from MD® Hobby & Crafts I knew I had to try to create
one myself.  I used several photos for reference, then hand molded/formed the bird. 


Wednesday, July 24, 2013

Creating & Connecting with CHA in Las Vegas!

The show has officially began and the creating and connecting is underway!   I've met up with a lot of my creative peeps already, which is one of the best things about these events - getting to see and spend time with so many people who "GET IT" about our passion for creating!  Here are just a few - Margie Higuchi, Ken Oliver, Ann Butler, Wendy Crafts, Eileen Hull, Jonathan Fong, Lisa Fulmer, Joe Rotella, Jen Cushman, Donna Salazar...... and more to come!!! 
Joe Rotella and I went head to head in the Charity Wings Mystery Box Challenge with Elena Lai Etcheverry  and had a blast with lots of laughs (Dumpster Diving Rocks - right Joe!?) 
 
Today I'm in the Trim-A-Rim booth sharing this fun new product with attendees!   Tomorrow I'll be at the KellyCraft booth - an amazing tool and some amazing new stamps to share too!!   Lots more of what caught my eye in new products coming soon!  

Saturday, February 2, 2013

“Escape” Lanyard Holder


Designed for Connie Crystal 

by Cindi Bisson 
Behind These Eyes™
www.fatcatcreations.blogspot.com


Tropical colors, flowers, and a reminder to “Escape” adorn this sparkling mixed-media badge holder I wore at the recent CHA trade show in Anaheim. 

Supplies:

Connie Crystal - 2.5” rectangle crystal, quartz rosebud beads, aquamarine rectangular seashell beads, 8mm red crystal beads,
ICE Resin Silk Ribbons
Graphic 45 Tropical Travelogue Seaside Holiday paper
JudiKins Diamond Glaze
Jump rings, eye pins, alligator clasp for badge holder, jewelry pliers, brass leaf charms, brass chandelier charm, scissors, needle

Instructions:

Measure and cut silk ribbons to desired length.

Trace rectangle crystal over “Escape” on patterned paper.  Cut out and mount to flat back of crystal using JudiKins Diamond Glaze.  Seal outside of paper with glaze.  Let dry.

Use pin to push through holes in crystal and paper.

Add large jump ring to bottom of rectangle crystal, add alligator clasp.

String red crystal, aquamarine seashell bead, then quartz rosebud onto eye pin.   Repeat to create 2.

Place 4 small brass leaf charms onto 4 small jump rings, mount beneath rosebud.

Add jump ring to top of rectangle crystal, add brass chandelier charm. 

Mount two beaded pieces to chandelier charm. 

Add jump ring to end of each beaded piece, and add to silk ribbons.

Sunday, January 20, 2013

Cre8time Window Display at CHA

Busy, busy, like the bees...would definitely describe these past few weeks as I finalized preparations for the winter Craft & Hobby Association trade show in Anaheim! One of the projects was this window display for the Cre8time area on the showroom floor. My concept was to create a bright, bold, eye-catching display of a sunflower field of mixed-media flowers, and I'm happy to say that Ana Araujo and I succeeded! It was fabulous! I hand-painted the 3 backdrop panels, created 6 different patterned paper & mixed-media sunflowers, and made the Elmer's foam board picket fence, complete with crackle finish using Elmer's, and easily re-assembled thanks to Velcro! FloraCraft supplied foam for the base of the garden, as well as moss to cover our ground. Ana created fun mixed-media fabric sunflowers, recycled water bottle bees, and felt squirrels holding the "Cre8time to make the flowers" sign which she hand embroidered.
 
To learn more about the Cre8time movement - follow the link on the side panel.  I encourage you to CREATE TIME to bring crafting into your world this year!  - Cindi

Monday, September 3, 2012

"Vintage Crafting" with Designer Craft Blog Connection

It's time for the September Designer Craft Blog Connection hop and this month our theme is "Vintage Crafting."   I seem to almost endlessly be crafting via repurposing - but just how old does a an item need to be before it's considered vintage?  Do the old clothes I've been crafting with that once belonged to my grandmother count as vintage (like in my first episode of Behind These Eyes with Cindi Bisson)?  When it comes to the many vintage furniture pieces and home decor accents I have in my home, I prefer them with their aged appearance and am hesitant to consider altering them.  My studio supplies are even stored in a wide variety of "vintage" containers - ranging from old steamer trunks and suitcases, to old shipping crates. I've created many scrapbook layouts with a vintage feel, using vintage photos and vintage themed papers and embellishments.   The one that stands out in my mind as actually having vintage memorabilia actually included, and was made with "old" scrapbooking products I've had in my stash for many years, is this collage style layout of my grandfather and his brothers in their WWII uniforms.

Creating a memorial collage is a great way to remember loved ones who have served in the military – past or present!  An official definition of “collage” is:  a technique of composing a work of art by pasting on a single surface various materials not normally associated with one another, as newspaper clippings, parts of photographs, theater tickets, and fragments of an envelope. 

However, I believe a true definition of the art of collage is “anything goes!”  Dare to use elements you might otherwise never consider – whether you use the actual ephemera or scans/photographs of the pieces – the sky is the limit.  Being a texture junkie, I love the dimension and depth that actual elements add rather than photos. 

Whether you choose to create your collage for a family scrapbook, create a framed piece or canvas art, set your creative muse free!  One technique I often incorporate into my collage work is dimensional embellishments & ephemera – in this case I used actual buttons, pins and patches from my grandfather’s WWII uniform.  I scanned the vintage photos of he and his three brothers who also served, both front and back to capture the handwritten names and dates on each, and the actual military documents we have saved throughout the years.  This text was then used to label some of the photos and as an element of the collage.    I wanted all of the elements of this project to have a vintage feel, so even the “new” materials used were aged using walnut ink – the Jolee’s Boutique microbeaded flag and the flag printed vellum were both given a healthy application of spray walnut ink and allowed to set for approximately 1 minute before they were gently rinsed and allowed to dry.  Some papers were torn & rumpled before application on the background, metal tags were stamped with names using black Staz-On ink and small alphabet stamps, and metallic eyelets were added as accents to the tags.  All the assorted elements were then arranged and mounted as shown using Elmer’s Craft Bond Adhesive. Collage is most often about applying multiple materials in a random fashion rather than a linear format – but as I said – anything goes – if you want your “collage” to be composed of multiple images lined up neat and clean – it is not wrong as long as you are happy with the finished project!

Follow the Designer Craft Blog Connection link on the right to view the other creativity projects being shared as part of this hop.

I hope this month's hop inspires you to pull out some of your "old supplies", perhaps repurpose an "old" decorative item, or even use new supplies to create something unique with a vintage feel.  And always remember, it's okay to "Dare to be Different!" - Cindi Bisson

But wait, there's MORE!  
The Prize!
 
Crafty KT is sponsoring The KOOL TAK™ Manufacturer Challenge: Fabulously-Fall Blog Hop.

September 8th to September 18th

Join us and visit the blogs of 12 professional and creative craft designers (I'm participating!) as they show you how to create some great fall projects with Kool Tak™ products. 

Make sure to enter the The Kool Tak™ giveaway, which is valued at about $70.00

Kool Tak™ 1 Layer Perfect (Use it for centering, piercing, and edge stitching) Tool
Kool Tak™ 1 Shiny Transfer Foil Sheets (Earth Tones)
Kool Tak™ Clear Foam tape ¼ x ¼ x 1/32” thick
Kool Tak™ Clear Foam tape 3/16 x 1/16 thick by 1.6 yards
Kool Tak™ Premium EXTREME 2 ½ x 27 yards

We will choose one lucky giveaway winner from those who sign up for our newsletter.  You only need to enter once.

Only those with a mainland USA shipping address are eligible to win the giveaway.

Link: http://craftykt.com/suscribe-to-newsletter


Saturday, September 1, 2012

Adding Sparkle & Getting it Straight!

I've got two announcements to share that I'm very excited about - I've recently joined two new Design Teams.  I'm always looking for new materials and tools to experiment with in my art, and with these two new manufacturers I'll be getting things a lot straighter when necessary, and adding a bit of bling!

KellyCraft is the manufacturer of the amazing Get-it-Straight™ Laser Square  - this tool makes it so simple to align things when creating - whether it's paper crafting, sewing & quilting, or other types of crafts.   I really didn't realize how much this tool could simplify things until I had a chance to work with it on my first project for the team which will be shared on their blog soon!  


Connie Crystal's booth has always been an eye catcher at CHA - I've shared pictures from the show of their booth in past post-show reports.  The sparkle from the products, and from Connie herself just draws you in.   The first time I met her, she gav me this beautiful necklace she had created just because it matched the blouse I was wearing perfectly! 

I just received my first box of bling from Connie Crystal and am excited to share a variety of mixed-media projects featuring her products in the coming months.  

I hope you take some time to be creative today - and remember to always "dare to be different!" - Cindi

Saturday, August 4, 2012

Dress Details - A Closer Look at CHA Crafty Couture Gown


Roses in the Garden was the theme I chose for my gown this year.   From there I challenged myself to create a gown that was primarily made from repurposed materials, at a minimal cost, with hand made embellishments.   Little did I know that "challenge" would end up being a key word throughout this adventure.  From creating the dress without a true dressmaker's dummy to ensure it would fit the needed measurements (hey, I got creative  - meet "Beatrice" my personal mannequin), to transporting the gown to Chicago, to attempting to repair the extensive damage that occurred in transit on the hotel room floor, I persevered.  The result was this gown and coordinating pieces I think Mother Nature would be proud to have her daughter wear to the prom or a special event. 

A perfect color match!
The bodice was made from newspaper panels, layered with Plaid Mod Podge to seal and add structure.  The inside was lined with pink Duck Tape to add sturdiness.  After a layer of white paint was added, I began hand painting the freestyle climbing roses using blended shades of Plaid’s acrylic paints.  The colors of the roses themselves perfectly matched the colors of the actual climbing roses I have in my own garden.    When I was finished layering the roses, I enhanced each rose and leaf with Jacquard Lumiere 3-D Metallic Dimensional Paint & Adhesive for added shimmer and depth.   A light coat of Plaid Martha Stewart Sugar Cube paint added a tiny bit of sparkle all over to the finished painted bodice.   Makin’s Clay leaves were made with a push mold and added to the top and bottom edges.   The bodice was closed in the back and held in place on the mannequin using Velcro Brand Adhesive strips.

For the trellis skirt, individual strips of layered newspaper were Mod Podged, then woven to create the desired effect.   The trellis was spray painted with white paint.   The skirt liner was created from an old repurposed white sheet, and green floral organza material from a clearance rack at a fabric store.   The skirt was held closed, and held on the mannequin, with Velcro.
The vines for the climbing roses were made with jute rope and jute string painted with Krylon spray paint.    The vines were woven through the trellis skirt and hot glued in place.  Push molded Makin’s Clay leaves were mounted using Beacon Adhesives Felt Glue.   The individual roses were created from custom mixed shades of Makin’s Clay.  Each rose and rose bud is made from numerous tiny hand made petals, layered to create a cluster to mimic the actual tiny climbing roses in my garden.  Once dry, each rose was lightly accented with Lumiere 3-D paint for a bit of shimmer.  The complete roses were mounted to the vines and stems using Beacon Adhesive. 

Rubber stamped butterflies, embossed on vellum, were painted with USArtquest Pearl-Ex watercolor paints, then embellished with Darice beads using Judikins Diamond Glaze as an adhesive and sealant.   Diamond Glaze was also used to lightly coat the wings of each butterfly.  The butterflies were added as accents to the front of the top of the bodice, and on the trellis. 

The small clutch purse was also made from Mod Podged newspaper, lined with pink Duck Tape.  It was painted in the same manner as the bodice and has the same clay leaf accents.


The coordinating shoes began with an old pair of silver shoes.  Several coats of white paint altered them to a more subtle background for painted rose accents and clay rose accents.  In the trend of colorful soles, the bottoms were painted with the same yellow as the roses on the gown. The painted shoes were also given a coat of the Plaid Martha Stewart Sugar Cube paint for a tiny bit of sparkle. 

Laslty, here's a shot of the gown before I disassembled it into pieces for transportation to Chicago..... luckily I packed a fully stocked repair kit so I was able to apply some triage techniques before it hit the CHA Showroom floor!

I hope you enjoyed this behind the scenes information on what went into the creation of my gown.  I can tell you first hand that all the gowns on display were amazing - I can only imagine the time and effort that went into each one and would love to hear the stories behind each creation in the Summer 2012 Crafty Couture display!

Until next time, happy crafting and remember to "Dare to be Different!"
- Cindi

Wednesday, July 25, 2012

A Book Review, CHA's Hot 20 and More from WCK


This week on WCK I reviewed Kristen Robinson's Tales of Adornment - find out what I thought of here.

For my Simple Solutions article this week, I share my thoughts of CHA's Hot 20 from the Innovations Sneak Peek event. 

Ana shares a cute birdhouse project featuring Elmer's decorative tapes and foam board in the latest episode.   And she reviews episode 4 and 5 of TLC's Craft Wars.

Until next time.... remember to "Dare to be Different!" 
- Cindi

Sunday, July 22, 2012

CHA Summer - Craft Inspiration Galore


My vintage luggage Designer Showcase display


CHA Summer in Rosemont, IL, offered lots of inspiration in many forms.    Products aplenty - for a wide range of creativity, were available to view.  Absolutely amazing project samples and displays awaited at every turn.   

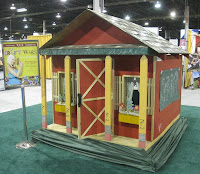
The winning playhouse - impressive in person!
This year’s event for me was packed full of workshops and seminars - both as an instructor and a student, I participated in the Designer Crafty Couture Display, was one of the many designers interviewed by Charity Wings, demonstrated at the Art Clay World booth, and was featured in the Designer Showcase.  I also hosted The Next Iron Crafter challenge along with Theresa Cifali and Terri O.  My time to view the actual showroom floor was limited, so my coming reports this time won’t as extensive as they have been in the past, but I’ll also be sharing links from many of my fellow designers as they bring you their reports and photos from the showroom floor.

For now, here's a glimpse at some of the amazing gowns created for the Crafty Couture display.

Until next time.... remember to "Dare to be Different!"  

- Cindi 


Saturday, July 14, 2012

CHA Summer - Here I come!

Tomorrow is the day I fly to Chicago for Summer CHA!  My schedule is packed hour to hour, and my suitcases (3!) are packed from inch to inch - just under the 50 lb limit each (well, the carry on is more than 50, but they don't weigh those lol!)  Here's a peak at a few of the new projects I've been working on for display at CHA.   I'll also be sharing posts from the showroom floor throughout the week next week.   If you're attending CHA, I'll be demo'ing in booths, hosting a CHA Iron Crafter segment, am being interviewed by Charity Wings, am co-teaching a class on Monday night for Flower Soft, and am teaching a Demo-nar on Wednesday at noon.  I'll be all over the show room floor and would love to say hello!


Monday, June 25, 2012

Monday, February 6, 2012

More Things that Caught My Eye at CHA Winter 2012

A wall of boldly colored
metallic florals
FloraCraft's message
 made me smile
Although my time exploring the showroom floor was limited due to demonstrations in booths, teaching classes, and taping with WCK - I did spot what I would say were a few trends to share.    Bold, bright colors seem to be back.   The vintage tones and grunge/steampunk themes are still popular, but I noticed pops of vibrancy in almost every isle of the showroom floor.  

A fun set of working faux
doors made from canvas - and there's
that bold color splash front and center again
"Holy Giant Purple Die-Cut Flowers Batman!"
Now THAT's a bold archway
Rose Meyer's hanging display had bold
colors, metallic shimmer, and an interesting
combination of elements -
 unique and eye-catching


Antiquity Mosaics had a pop of color
nestled amongst their earthy offerings.
Beach Bloomers Banners - a fun frilly booth definitely
different than most of the booths!


Banners are also in - punches, die cuts, patterned papers, home decor projects - banners are big this seasonBanners are also in - punches, die cuts, patterned papers, home decor projects - banners are big this season


Mixed-media dresses are still showing up all over the showroom floor - paper dresses, flower dresses, duck tape dresses and a tux, wire dresses, dresses made from sparkling crystals, fashion made from unexpected items is still a trend when it comes to eye-catching displays. 

DCWV won first prize for Displaying with Excellence -
 their booth featured multiple versions of amazing trees and
 birds crafted from colorful shimmering materials - all were gorgeous!
Birds are still in the forefront too - but I noticed more of them being displayed in bolder brighter hues - and peacocks were definitely popping up in patterned papers, displays, fabric, embellishments and more.

Bold colors, dimensional elements,
and a peacock feather


In Saturday's post, I shared my observation that the Eiffel Tower seems to be popping up EVERYWHERE - check out some examples here: http://www.fatcatcreations.blogspot.com/2012/02/travel-as-trend-winter-cha-observation.html

Overall, I thought the booth displays showed even more variety and imaginative ideas than I’ve seen at past shows.   For additional glimpses from the CHA show follow the Designer Craft Blog Connection link to the right - and visit Julie McGuffee's blog at www.juliemcguffee.blogspot.com to find out about this month's great prize giveaway.