A PATRIOTIC CELEBRATION WITH
CRAFT ATTITUDE™!
Creating a wide variety of patriotic themed serving pieces and decorations is easy with Craft Attitude™ products!
I'm honored to be part of a group of amazing designers sharing their
Patriotic creations featuring Craft Attitude™! Here's a complete
list with links of everyone participating, so be sure to check out what
they've shared too!
Who & Where - Find Your Patriotic Craft Attitude™ Inspiration here!
June 10: Jonathan Fong & Candie Cooper
www.jonathanfongstyle.com/blog/
http://candiecooper.typepad.com
June 13: Terri Sproul
http://terrisproul.blogspot.com
June 17: Eileen Hull
http://eileenhull.blogspot.com
June 20: Cindi Bisson
http://fatcatcreations.blogspot.com
June 24: Jen Goode
http://www.jgoode.com
June 27: Aunt Peaches
http://www.auntpeaches.com
July 1: Lorine Mason
http://lorinemason.com/blog/
Follow the Craft Attitude link in the right column of my blog to purchase Craft Attitude™
products and get free shipping!
Materials:
Decor Attitude™!
Quilt Attitude™!
Scrapbooking Attitude™!
Inkjet printer
Basket
Plate
Muslin
Burlap
Jute
Blumenthal Lansing star buttons
Elmer's Craft Bond Spray Adhesive
Elmer's Craft Bond Glue Stick
Westcott Titanium Bonded scissors
Preprinted historical documents (optional)
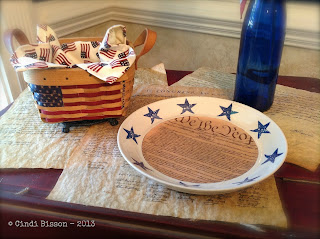
"America" Serving Basket
A plain, inexpensive basket gets some patriotic pizazz with Decor Attitude! When I added this finished basket to my “collectable” brand name basics, it looked just as good!
Determine width of horizontal basket slats. Size American flag image so that stripes are the same size as the basket slats. Size lettering to spell out AMERICA with approximately 1/4” between letters. REVERSE FLAG IMAGES AND TEXT and print onto Decor Attitude!
Note: When designing this basket, I found it easier to work section by section, cutting as I went rather than cutting all pieces before beginning to mount.
Beginning with stars, cut strips to fit each basket section, peel from backing, mount onto individual sections using glue stick. Continue until blue area is desired size.
Cut red stripes from flag image, cut into individual sections and mount to basket using glue stick.
Cut AMERICA lettering and mount vertically to right of flag on individual basket slats using glue stick.
“We the People” Snack Plate
Although this plate came with the blue stars already around the edges, a solid plate would work too.

Determine circumference of area of plate you wish to cover with
Declaration of Independence text. For this plate, inner circle was 7 1/2” in diameter.
Size
Declaration of Independence image to needed width. REVERSE IMAGE and print onto Decor Attitude!
Trace plate, bowl or other round item the same circumference as the area to be covered, cut out.
Apply spray adhesive, peel from backing and mount to center of plate.
Vintage Flag Pennant Banner
Images of vintage flags, printed onto Quilt Attitude™!, and mounted onto muslin and burlap give this patriotic banner an old fashioned feel.
Choose flag images, size to desired size (flag images on this banner are 5" across top, and point is 5 1/2" from center of top.)
REVERSE IMAGES and print onto Quilt Attitude™!
Create template for pennants, trace onto desired area of each flag image. Cut out.
Cut muslin pennants approximately 1/2” larger on all sides than flag images. Fray edges.
Cut burlap pennants approximately 1/2” larger on all sides than muslin pennant. Fray edges.
Apply spray adhesive to flag pennants, peel from backing and mount onto muslin pieces.
Mount muslin pieces to burlap pieces.
Carefully
(I say carefully, because I did not follow this advice, and although blood coordinates nicely with the vintage colors of these flags, I don’t recommend adding it as an accent to your pennants...) use scissors to make holes approximately 1/2” from top left and right corners of each pennant. Place jute through hole, tie knot in front. Continue connecting pieces using jute, leaving approximately 1” space between each pennant.
To add “America” accents to alternating pennants, size text to desired size and type number needed for your banner. REVERSE IMAGE and print onto Quilt Attitude™!
Cut each word and mount to piece of muslin. Fray edges. Mount muslin with text onto piece of burlap, fray edges. Mount to bottom center area of alternating pennants. Add tan star button accents
as shown.
Historical Documents Placemats or
Table Runners
Use purchased copies of historical documents or print images (search (Declaration of Independence, Abe Lincoln....) onto parchment vellum or lightweight parchment paper. Mount unprinted sheets of Scrapbooking Attitude! over surface of each document, front and back, to protect against tearing, minor spills or stains. Save your historical documents for future celebrations.


