1 Cindi Bisson McGee - Behind These Eyes : burlap
Showing posts with label burlap. Show all posts

Monday, December 1, 2014

Decoupaged Ornaments Cluster Swag

The theme for this month's Designer Craft Connection blog hop is "last minute" holiday decorations.  This simple cluster swag is easy to make with just a few materials.  You can use patterned paper, fabric, or decorative holiday napkins like these I found in the $1
bin at the local craft chain store!   

Be sure to click through the Designer Craft Connection link in the right column to see what other projects participating designers are sharing! 

Materials:

Three 4" Smoothfoam™ balls
FloraCraft SimpleStyle™ Burlap Garland
Beacon Adhesives® Fast Finish Decoupage 
Aleene's® Fast Grab Tacky Glue 
Jute 
Foam brush


Instructions: 

1) Tear decorative napkins into assorted pieces about 2".   Pour Fast Finish Decoupage in bowl and use foam brush to apply to each Smoothfoam™ ball, then apply napkin pieces to ball, leaving hole in ball open, overlapping to cover the balls.  Coat surface each covered ball with Fast Finish Decoupage to seal.  Let dry. 

2) Cut 3 strands of jute 16", 3 strands 13" and 3 strands 10".  
Squeeze Fast Grab Tacky Glue into hole in ball, twist ends of each group of jute strands, insert into hole (use tip of scissor if needed to push strands into hole).  Let dry. 


3) Make large bow from burlap garland.   Insert piece of wire through back of bow loop and twist to create hanger loop.  Tie ends of jute together and tie to wire loop on back of bow.   


Tuesday, October 14, 2014

Smoothfoam™ Burlap Pumpkin Door Banner

Find the full instructions on how I combined Smoothfoam™, Rit Dye, BurlapFabric.com and Ad-Tech to create this dimensional pumpkin door banner here on the Smoothfoam blog! 

Sunday, September 7, 2014

"Cow Country" Table Runner with Kunin® Group, Buttons Galore & More & Beacon Adhesives


I was happy to have the chance to be a part of the Kunin™ Group, Buttons Galore & More and Beacon® Adhesives Designer Craft Connection blog hop!   My felt package arrived and I couldn’t have been happier - our kitchen & dining room has a “farm animal” theme with cows, chickens and more as accents.  The cow patterned felt was a perfect fit!  Paired with BurlapFabric.com fabric, I was able to create a table runner for our table that fits right in with our country decor.  Be sure to follow the DCC link in the right column to see what other creative projects our designers are sharing.  

Don't forget to enter here for a chance at a great give-a-way package too!


Materials: 

Kunin™ Group:  Fancifelt™ - Cowpoke, Embossed Felt - Black Alligator, Creatology™ felt - Antique White  
Buttons Galore & More - assorted blue buttons 
Beacon® Fabri-Tac Adhesive 
KellyCraft™ Get-it-Straight™ Laser Square
Westcott® Handheld Titanium Bonded Paper Cutter with Safety Shield 
Westcott® Stainless Steel Ruler 
Westcott® Craft Self-Healing Cutting Mat 
Blue embroidery floss, needle


Instructions: 

Step 1:  Use Westcott® self-healing mat, ruler and handheld cutter to measure and cut six 4” x 4” squares from Cowpoke, Black  Alligator and Antique White Kunin™ felt. 

Step 2:  Cut BurlapFabric.com burlap to 18” x 30”.   Remove some threads from all edges to create frayed edge. 

Step 3:  Use Get-it-Straight™ Laser Square to align felt squares, centered on burlap, and adhere with Beacon® Fabri-Tac adhesive.  


Step 4:  Stitch blue Buttons Galore & More buttons to all corners of squares with embroidery floss.  


Thursday, July 17, 2014

Burlap Door Monogram

This week in my Cindi's Simple Solutions article for When Creativity Knocks I am showing you how to create this Burlap Door Monogram.  Find the full instructions here.

http://whencreativityknocks.com/mycraftspace/m/articles/view/Simple-Solution-Burlap-Door-Monogram

Sunday, July 13, 2014

Burlap Apples & Display Bowl


BurlapFabric.com is sponsoring this amazing blog hop featuring projects from 20 Designer Craft Connection designers - Be sure to follow the links below to visit their blogs and see what they are sharing too, and sign up to win the amazing prize package BurlapFabric.com is offering!

I decided to try making burlap apples with the red burlap I received in my box of burlapy goodness from BurlapFabric.com - and a decorative "bowl" to display them in (I like the "bowl" so much I plan to display other seasonal goodies in it too!).   Don't let the multiple steps overwhelm you - it's easier than it looks to create your own burlap apples!

Materials: 

BurlapFabric.com red burlap, regular burlap, frayed edge 1" burlap ribbon, 3 1/2" burlap ribbon with black stripe top and bottom
Smoothfoam™ balls - 3 7/8"
Westcott® Craft Knife, Self-Healing Cutting Mat, Titanium Bonded® Non-Stick Scissors
AdTech® Glue Gun & Glue Sticks
DecoArt® Americana Multi-Surface Craft Paint - Apple Green
Spanish moss, paintbrush
Real apple for reference and mid-project snack (optional lol!)

Instructions:

1) Use craft knife to cut approximately 2" circle, then add 4 cuts inside.

2) Remove foam from top of ball.

3) Use craft knife to carefully trim/scrape away around edges of removed portion to create curve of top of apple.

4) Use craft knife to cut approximately 1" circle from bottom of ball, remove foam.

5) Use craft knife to create 4 small arcs/curves around hole on bottom of ball (like the arcs on the bottom of a real apple).

6) Carefully use end of scissor to create hole inside top and bottom openings on ball (you will tuck burlap ends into these holes).

7) Cut 5 petal shaped pieces from red burlap, approximately 5" x 2" in the center (I used my cutting mat as a guide for sizing each petal).

8) Add small amount of hot glue to one end of first petal, tuck into hole on top of apple.

9) Bring bottom of petal to base of apple, add small amount of glue and tuck into hole at bottom of apple.  Add small amount of hot glue on each side and adhere to foam ball.

10) Add small amount of glue to second petal, tuck into top of foam ball, slightly overlapping first piece of burlap.

11) Turn apple over, add small amount of hot glue to sides of petal, and mount to foam ball overlapping first piece of burlap.

12-13) Add small amount of hot glue to bottom point and tuck into bottom of apple.
Repeat with remaining petals until Smoothfoam™ ball is completely covered and your apple is ready for the stem & leaf.

14) Cut 3" piece of frayed edge burlap ribbon.   Tightly roll and use small amount of hot glue to adhere to create stem.

15) Use hot glue to mount stem into hole at top of apple.

16) From plain burlap, cut leaf shapes.

17) Paint both sides with Apple Green multi-surface paint and let dry.

18) Use hot glue to mount leaves to stems on top of apples.

To create the display bowl - I upcycled!   I used a clean chipboard potato stick can (and sadly, I had to eat the rest of the potato sticks in order to empty the can - it was a hard sacrifice but worth it for the finished project), but any sized can would work depending on how big you want your finished display bowl to be.

19) Use Westcott® Titanium Bonded® scissors (I love these scissors!  They are STRONG enough to cut through almost anything!) to remove top of can and leave 3" sides from base of can.

20) Use hot glue to mount burlap ribbon around can (it will extend about 1/2" off the top edge of the can).  Add Spanish moss.


Here are the links to the blogs for the other participating designers:

Carmen Flores Tanis   http://www.florestanisstudio.com
Jennifer Priest   http://www.hydrangeahippo.com
Lisa Fulmer    http://www.lisalizalou.com
Sue Eldred   http://www.sueeldred.com
Susan Brown   http://www.sbartist.com

And here's how you can win the fabulous prize package valued at $100 that includes a really nice variety of natural and colored burlap yardage, ribbons, embellishments and totes.  They have several ways to enter by leaving a comment on my blog and by following the DCC, BurlapFabric.com and Craft Foxes on social media. - http://www.rafflecopter.com/rafl/display/73bd0b11/


Monday, July 7, 2014

Country Style Luau Mason Jars


Summer is here and it's time for backyard barbecues and parties!  This month's Designer Craft Connection theme is Party Decor - so it's a perfect time for me to share these Country Style Luau Mason Jars I'm using to hold silverware and straws for our country style backyard luau!   Be sure to follow the DCC clickable link in the right column of my blog to see what other creative Party Decor projects our amazing designers are sharing to inspire you!

Materials:

Ball Mason Jars - Heritage Green pint size (you could use regular - but I love the combination of the green glass with the red & yellow - seemed more tropical to me!)
BurlapFabric.com Red Burlap
Westcott® Titanium Bonded® Non-Stick Scissors, Self-Healing Cutting Mat
DecoArt® Americana® acrylic paint - White Wash
Small paintbrush
Yellow ribbons (I used 3 different styles)
Wood Attitude® printable craft film
Conputer & printer
Wooden tags, string
AdTech Glue Gun & Glue Sticks
Elmer's Craft Bond Glue stick

Instructions:

Use cutting mat as a guide to measure out 4" x 11" strips of red burlap - cut with scissors.

Use small paintbrush and white acrylic paint to paint hibiscus flowers onto red burlap (I found an image of a hibiscus flower online to use as a guide).  Let dry.

Following manufacturer instructions, type and print Hawaiin words onto sheet of Wood Attitude® printable craft film (I googled Hawaiin words, then printed off words to create a custom message on my tags….. can you figure out what the message says?)

Trim words and mount to small wooden tags using glue stick, add string to tags.

Fray edges of painted red burlap by removing threads about 1/4" in on top and bottom edges.  Wrap around mason jars and adhere with small amount of hot glue.  Add decorative ribbons to top rim of jars, tie on wooden tags.


Be sure to come back on July 13th for 20 more creative projects featuring burlap products in a DCC Blog Hop sponsored by BurlapFabric.com - and enter to win their fabulous prize package valued at $100 that includes a really nice variety of natural and colored burlap yardage, ribbons, embellishments and totes.  They will have several ways to enter including leaving a comment on my blog and following the DCC, BurlapFabric.com, and Craft Foxes on social media!  


Monday, April 21, 2014

Craft Attitude™ Mother's Day Blog Hop - "Bee Happy"


I am thrilled to be a part of the Craft Attitude™ Mother's Day Blog Hop!  Be sure to follow the links below to see what other creative projects these amazing designers are sharing featuring Craft Attitude™ Film.   And now. let' me "bee-gin" sharing project ..

Remind mom to “Bee Happy” this Mother’s Day with this framed mixed-media home-decor accent featuring Craft Attitude™! 

Materials: 

Craft Attitude! Decor Attitude™ Printable Film 

Wooden picture frame 4” x 6”
Burlap 
Black & tan checked/gingham patterned paper 
Bee print cotton ribbon (Michael’s) 
Black paint, paintbrush 
Sandpaper 
Scissors 
Glue stick

Instructions: 

Paint frame with black paint and let dry. Lightly sand painted frame to achieve distressed/shabby chic effect.  (One of my favorite places to get picture frames to repurpose is my local Goodwill store - great assortment for great prices and  you are helping out those in need!) 

Cut 4” x 6” piece of black & tan checked paper. 


Cut 3 1/2” x 5” piece of burlap.  Gently remove some threads from left and right edges for a frayed effect. 


Download vintage bee image and size to 3 x 4 1/2”.  Follow manufacturer’s instructions and print onto Craft Attitude™ Decor Attitude™ film.  *Note - if printing text, be sure to reverse image before printing! Let dry 2 hours before proceeding to next step.

Coat printed image with glue stick, mount to center of burlap and let dry. 


Mount burlap with bee image to center of black & tan paper. 


Cut two strips of 4" bee ribbon. 

Mount bee ribbon at top and bottom of burlap, overlapping burlap, just above “Bee” and just below “Happy”.

Insert into distress painted frame. 

Check out more great projects featuring Craft Attitude™ from these Designers - 

Tues. April 22 - Amy Bowerman, http://pluckingdaisies.com 
Wed. April 23 - Lyneen Jesse, http://dreamingofcastles.blogspot.com
Thu. April 24 - Lindsay Obermeyer, http://loops.typepad.com/serendipity/
Fri. April 25 - Cheryl Boglioli, http://cherylswindow.com
Mon. April 28 - Debra Quartermaine, http://www.debraquartermain.com/ceoblog
Tue. April 29 - Jonathan Fong, http://jonathanfongstyle.com
An InLinkz Link-up

Monday, December 9, 2013

Burlap & Wooden Snowflake Ornament

I love burlap!  The rustic, country feeling it brings, the texture, and the neutral color that goes with any color scheme.   I've been having fun creating holiday ornaments this year with burlap and Smoothfoam™ - here's my latest creation!


Rustic Burlap Snowflake Ornaments 

Add these rustic burlap ornaments to your country Christmas tree for a homespun holiday feel. 

Materials: 

Smoothfoam™ ball 
Blumenthal Lansing Favorite Findings™ - Wooden Snowflakes 
Burlap
1” brown grossgrain ribbon
Jute ric-rac trim 
Twine
Hot glue gun & hot glue sticks
Scissors 

Instructions: 

Cut burlap square approximately 8” x 8”.  

Place Smoothfoam™ ball in center of square with hole on top.  Add hot glue around hole, fold four corners of burlap upward and mount to ball.  Fold remaining burlap over and glue to side of ball.  

Cut piece of twine for hanging ornament, hot glue ends into hole in top of ball. 

Gather edges of burlap, tie together tightly around twine loop with additional piece of twine. 

Mount brown ribbon around center of ball.  

Mount jute ric-rac centered on brown ribbon. 

Mount wooden Blumenthal Lansing snowflake in center over ric-rac. 

Tuesday, December 3, 2013

Burlap & Twine Holiday Tree Decorations


This week I'm sharing two ornaments with a rustic, country Christmas feel.  You can find instructions for this first one on the Smoothfoam blog.     Instructions for the smaller twine ornament with the cute Blumenthal Lansing snowflake button can be found in Cindi's Simple Solutions at When Creativity Knocks.  


Monday, July 1, 2013

Designer Craft Blog Connection Hop - Celebrations!


It's July 1st!  Time for the Designer Craft Blog Connection Hop!  This month our theme was Celebrations - and although I originally shared these projects several days ago - they just fit so perfectly with this theme I just had to share them again here for new readers to discover!    Be sure to click the Designer Craft Connection blog hop button in the column on the right to see what the other talented participating designers are sharing with you this month!   Take time to CELEBRATE life! - Cindi


A PATRIOTIC CELEBRATION WITH
 CRAFT ATTITUDE™!

Creating a wide variety of patriotic themed serving pieces and decorations is easy with Craft Attitude™ products! 

I'm honored to be part of a group of amazing designers sharing their Patriotic creations featuring Craft Attitude™!   Here's a complete list with links of everyone participating, so be sure to check out what they've shared too!


Who & Where - Find Your Patriotic Craft Attitude™ Inspiration here!
 June 10: Jonathan Fong & Candie Cooper
www.jonathanfongstyle.com/blog/
http://candiecooper.typepad.com

June 13: Terri Sproul
http://terrisproul.blogspot.com

June 17: Eileen Hull
http://eileenhull.blogspot.com

June 20: Cindi Bisson
http://fatcatcreations.blogspot.com

June 24: Jen Goode
http://www.jgoode.com

June 27: Aunt Peaches
http://www.auntpeaches.com

July 1: Lorine Mason
http://lorinemason.com/blog/
Follow the Craft Attitude link in the right column of my blog to purchase Craft Attitude™
 products and get free shipping!

Materials:

Decor Attitude™!
Quilt Attitude™!
Scrapbooking Attitude™!
Inkjet printer
Basket
Plate
Muslin
Burlap
Jute
Blumenthal Lansing star buttons
Elmer's Craft Bond Spray Adhesive
Elmer's Craft Bond Glue Stick
Westcott Titanium Bonded scissors
Preprinted historical documents (optional)

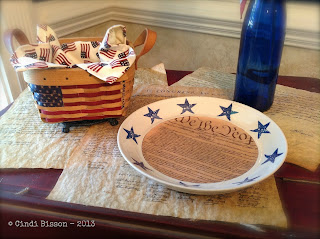
"America" Serving Basket


A plain, inexpensive basket gets some patriotic pizazz with Decor Attitude!   When I added this finished basket to my “collectable” brand name basics, it looked just as good!

Determine width of horizontal basket slats.   Size American flag image so that stripes are the same size as the basket slats.  Size lettering to spell out AMERICA with approximately 1/4” between letters.   REVERSE FLAG IMAGES AND TEXT and  print onto Decor Attitude! 

Note:  When designing this basket, I found it easier to work section by section, cutting as I went rather than cutting all pieces before beginning to mount. 

Beginning with stars, cut strips to fit each basket section, peel from backing, mount onto individual sections using glue stick.  Continue until blue area is desired size.   

Cut red stripes from flag image, cut into individual sections and mount to basket using glue stick.  

Cut AMERICA lettering and mount vertically to right of flag on individual basket slats using glue stick.


“We the People” Snack Plate 

Although this plate came with the blue stars already around the edges, a solid plate would work too. 

Determine circumference of area of plate you wish to cover with Declaration of Independence text.    For this plate, inner circle was 7 1/2” in diameter.

Size Declaration of Independence image to needed width.  REVERSE IMAGE and print onto Decor Attitude!

Trace plate, bowl or other round item the same circumference  as the area to be covered, cut out. 

Apply spray adhesive, peel from backing and mount to center of plate.


Vintage Flag Pennant Banner


Images of vintage flags, printed onto Quilt Attitude™!, and mounted onto muslin and burlap give this patriotic banner an old fashioned feel.

Choose flag images, size to desired size (flag images on this banner are 5" across top, and point is 5 1/2" from center of top.)
REVERSE IMAGES and print onto Quilt Attitude™! 

Create template for pennants, trace onto desired area of each flag image.  Cut out.

Cut muslin pennants approximately 1/2” larger on all sides than flag images.  Fray edges.

Cut burlap pennants approximately 1/2” larger on all sides than muslin pennant.  Fray edges.

Apply spray adhesive to flag pennants, peel from backing and mount onto muslin pieces.

Mount muslin pieces to burlap pieces. 

Carefully (I say carefully, because I did not follow this advice, and although blood coordinates nicely with the vintage colors of these flags, I don’t recommend adding it as an accent to your pennants...) use scissors to make holes approximately 1/2” from top left and right corners of each pennant.   Place jute through hole, tie knot in front.  Continue connecting pieces using jute, leaving approximately 1” space between each pennant.

To add “America” accents to alternating pennants, size text to desired size and type number needed for your banner.  REVERSE IMAGE and print onto Quilt Attitude™!

Cut each word and mount to piece of muslin.  Fray edges. Mount muslin with text onto piece of burlap, fray edges.  Mount to bottom center area of alternating pennants.   Add tan star button accents as shown.


Historical Documents Placemats or 
Table Runners

Use purchased copies of historical documents or print images (search Declaration of Independence, Abe Lincoln....) onto parchment vellum or lightweight parchment paper.  Mount unprinted sheets of Scrapbooking Attitude! over surface of each document, front and back, to protect against tearing, minor spills or stains.  Save your historical documents for future celebrations.

Tuesday, June 25, 2013

A Patriotic Celebration with Craft Attitude™!


A PATRIOTIC CELEBRATION WITH
 CRAFT ATTITUDE™!

Creating a wide variety of patriotic themed serving pieces and decorations is easy with Craft Attitude™ products! 

I'm honored to be part of a group of amazing designers sharing their Patriotic creations featuring Craft Attitude™!   Here's a complete list with links of everyone participating, so be sure to check out what they've shared too!


Who & Where - Find Your Patriotic Craft Attitude™ Inspiration here!

 June 10: Jonathan Fong & Candie Cooper
www.jonathanfongstyle.com/blog/
http://candiecooper.typepad.com

June 13: Terri Sproul
http://terrisproul.blogspot.com

June 17: Eileen Hull
http://eileenhull.blogspot.com

June 20: Cindi Bisson
http://fatcatcreations.blogspot.com

June 24: Jen Goode
http://www.jgoode.com

June 27: Aunt Peaches
http://www.auntpeaches.com

July 1: Lorine Mason
http://lorinemason.com/blog/

Follow the Craft Attitude link in the right column of my blog to purchase Craft Attitude™
 products and get free shipping!

Materials:

Decor Attitude™!
Quilt Attitude™!
Scrapbooking Attitude™!
Inkjet printer
Basket
Plate
Muslin
Burlap
Jute
Blumenthal Lansing star buttons
Elmer's Craft Bond Spray Adhesive
Elmer's Craft Bond Glue Stick
Westcott Titanium Bonded scissors
Preprinted historical documents (optional)

"America" Serving Basket


A plain, inexpensive basket gets some patriotic pizazz with Decor Attitude!   When I added this finished basket to my “collectable” brand name basics, it looked just as good!

Determine width of horizontal basket slats.   Size American flag image so that stripes are the same size as the basket slats.  Size lettering to spell out AMERICA with approximately 1/4” between letters.   REVERSE FLAG IMAGES AND TEXT and  print onto Decor Attitude! 

Note:  When designing this basket, I found it easier to work section by section, cutting as I went rather than cutting all pieces before beginning to mount. 

Beginning with stars, cut strips to fit each basket section, peel from backing, mount onto individual sections using glue stick.  Continue until blue area is desired size.   

Cut red stripes from flag image, cut into individual sections and mount to basket using glue stick.  

Cut AMERICA lettering and mount vertically to right of flag on individual basket slats using glue stick.


“We the People” Snack Plate 


Although this plate came with the blue stars already around the edges, a solid plate would work too. 

Determine circumference of area of plate you wish to cover with Declaration of Independence text.    For this plate, inner circle was 7 1/2” in diameter.

Size Declaration of Independence image to needed width.  REVERSE IMAGE and print onto Decor Attitude!

Trace plate, bowl or other round item the same circumference  as the area to be covered, cut out. 

Apply spray adhesive, peel from backing and mount to center of plate.


Vintage Flag Pennant Banner


Images of vintage flags, printed onto Quilt Attitude™!, and mounted onto muslin and burlap give this patriotic banner an old fashioned feel.

Choose flag images, size to desired size (flag images on this banner are 5" across top, and point is 5 1/2" from center of top.)
REVERSE IMAGES and print onto Quilt Attitude™! 

Create template for pennants, trace onto desired area of each flag image.  Cut out.

Cut muslin pennants approximately 1/2” larger on all sides than flag images.  Fray edges.

Cut burlap pennants approximately 1/2” larger on all sides than muslin pennant.  Fray edges.

Apply spray adhesive to flag pennants, peel from backing and mount onto muslin pieces.

Mount muslin pieces to burlap pieces. 

Carefully (I say carefully, because I did not follow this advice, and although blood coordinates nicely with the vintage colors of these flags, I don’t recommend adding it as an accent to your pennants...) use scissors to make holes approximately 1/2” from top left and right corners of each pennant.   Place jute through hole, tie knot in front.  Continue connecting pieces using jute, leaving approximately 1” space between each pennant.

To add “America” accents to alternating pennants, size text to desired size and type number needed for your banner.  REVERSE IMAGE and print onto Quilt Attitude™!

Cut each word and mount to piece of muslin.  Fray edges. Mount muslin with text onto piece of burlap, fray edges.  Mount to bottom center area of alternating pennants.   Add tan star button accents as shown.


Historical Documents Placemats or 
Table Runners

Use purchased copies of historical documents or print images (search (Declaration of Independence, Abe Lincoln....) onto parchment vellum or lightweight parchment paper.  Mount unprinted sheets of Scrapbooking Attitude! over surface of each document, front and back, to protect against tearing, minor spills or stains.  Save your historical documents for future celebrations.

Sunday, September 30, 2012

Shades of Amber Frame - Creating with Connie Crystal


Autumn is upon us and that means it's time for warm, cozy, Autumn decor.    Today my first project for Connie Crystal is live - a mixed-media frame featuring unique shell beads from their line.  You can find the full tutorial to create your own version of this frame at the Connie Crystal Blog.