1 Cindi Bisson McGee - Behind These Eyes : Designer Craft Blog Connection
Showing posts with label Designer Craft Blog Connection. Show all posts

Monday, June 2, 2014

Glamour Girl Monogram Mirror - Designer Craft Connection Blog Hop

This Glamour Girl Monogram Mirror would make a great gift for any girl who wants to celebrate there inner princess!  Sparkling crystal accents, etched glass fleur-de-lys, a glittered monogram letter, and coordinating ribbons bring it all together.  Be sure to click the Designer Craft Connection Blog button to see what other creative hand-made gifts are being shared today as part of this month's blog hop!

Materials:

12" Round Darice Mirror
Connie Crystal white crystal sheets
DecoArt® Americana® Gloss Enamels® Stick-On Stencils™ - Fleur de lys
etchall® Etching Cream
Chipboard glittered monogram letter
Beacon Adhesives Quick Grip™ Adhesive
Coordinating ribbons, scissors, foam brush
Command™ mounting strip


Instructions:

Place fleur-de-lys stencil onto lower right area of mirror.  Apply etchall® cream and let set 15 minutes.

Remove and place etchall® cream back into bottle for re-use.
Clean and dry mirror.  Repeat with stencil above and to the right of first image, then repeat again to create 3 diagonal images.

Cut three strips of 3 crystals from Connie Crystal sheet.  Use Beacon Adhesives Quick Grip™ to mount to straight area in center of each fleur-de-lys.

Use Quick Grip™ to mount glittered monogram letter centered on fleur-de-lys.

Use Quick Grip™ to mount single strip of crystals around outer edge of mirror.

Cut multiple pieces of coordinating ribbon about 2" long.  Fold each piece in half to create slightly-off centered loops.  Use Quick Grip™  to back edge of mirror to create ruffle around mirror.


For easy mounting anywhere, use a removable mounting strip.

Monday, July 1, 2013

Designer Craft Blog Connection Hop - Celebrations!


It's July 1st!  Time for the Designer Craft Blog Connection Hop!  This month our theme was Celebrations - and although I originally shared these projects several days ago - they just fit so perfectly with this theme I just had to share them again here for new readers to discover!    Be sure to click the Designer Craft Connection blog hop button in the column on the right to see what the other talented participating designers are sharing with you this month!   Take time to CELEBRATE life! - Cindi


A PATRIOTIC CELEBRATION WITH
 CRAFT ATTITUDE™!

Creating a wide variety of patriotic themed serving pieces and decorations is easy with Craft Attitude™ products! 

I'm honored to be part of a group of amazing designers sharing their Patriotic creations featuring Craft Attitude™!   Here's a complete list with links of everyone participating, so be sure to check out what they've shared too!


Who & Where - Find Your Patriotic Craft Attitude™ Inspiration here!
 June 10: Jonathan Fong & Candie Cooper
www.jonathanfongstyle.com/blog/
http://candiecooper.typepad.com

June 13: Terri Sproul
http://terrisproul.blogspot.com

June 17: Eileen Hull
http://eileenhull.blogspot.com

June 20: Cindi Bisson
http://fatcatcreations.blogspot.com

June 24: Jen Goode
http://www.jgoode.com

June 27: Aunt Peaches
http://www.auntpeaches.com

July 1: Lorine Mason
http://lorinemason.com/blog/
Follow the Craft Attitude link in the right column of my blog to purchase Craft Attitude™
 products and get free shipping!

Materials:

Decor Attitude™!
Quilt Attitude™!
Scrapbooking Attitude™!
Inkjet printer
Basket
Plate
Muslin
Burlap
Jute
Blumenthal Lansing star buttons
Elmer's Craft Bond Spray Adhesive
Elmer's Craft Bond Glue Stick
Westcott Titanium Bonded scissors
Preprinted historical documents (optional)

"America" Serving Basket


A plain, inexpensive basket gets some patriotic pizazz with Decor Attitude!   When I added this finished basket to my “collectable” brand name basics, it looked just as good!

Determine width of horizontal basket slats.   Size American flag image so that stripes are the same size as the basket slats.  Size lettering to spell out AMERICA with approximately 1/4” between letters.   REVERSE FLAG IMAGES AND TEXT and  print onto Decor Attitude! 

Note:  When designing this basket, I found it easier to work section by section, cutting as I went rather than cutting all pieces before beginning to mount. 

Beginning with stars, cut strips to fit each basket section, peel from backing, mount onto individual sections using glue stick.  Continue until blue area is desired size.   

Cut red stripes from flag image, cut into individual sections and mount to basket using glue stick.  

Cut AMERICA lettering and mount vertically to right of flag on individual basket slats using glue stick.


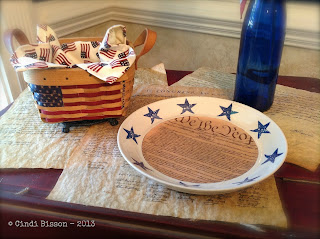
“We the People” Snack Plate 

Although this plate came with the blue stars already around the edges, a solid plate would work too. 

Determine circumference of area of plate you wish to cover with Declaration of Independence text.    For this plate, inner circle was 7 1/2” in diameter.

Size Declaration of Independence image to needed width.  REVERSE IMAGE and print onto Decor Attitude!

Trace plate, bowl or other round item the same circumference  as the area to be covered, cut out. 

Apply spray adhesive, peel from backing and mount to center of plate.


Vintage Flag Pennant Banner


Images of vintage flags, printed onto Quilt Attitude™!, and mounted onto muslin and burlap give this patriotic banner an old fashioned feel.

Choose flag images, size to desired size (flag images on this banner are 5" across top, and point is 5 1/2" from center of top.)
REVERSE IMAGES and print onto Quilt Attitude™! 

Create template for pennants, trace onto desired area of each flag image.  Cut out.

Cut muslin pennants approximately 1/2” larger on all sides than flag images.  Fray edges.

Cut burlap pennants approximately 1/2” larger on all sides than muslin pennant.  Fray edges.

Apply spray adhesive to flag pennants, peel from backing and mount onto muslin pieces.

Mount muslin pieces to burlap pieces. 

Carefully (I say carefully, because I did not follow this advice, and although blood coordinates nicely with the vintage colors of these flags, I don’t recommend adding it as an accent to your pennants...) use scissors to make holes approximately 1/2” from top left and right corners of each pennant.   Place jute through hole, tie knot in front.  Continue connecting pieces using jute, leaving approximately 1” space between each pennant.

To add “America” accents to alternating pennants, size text to desired size and type number needed for your banner.  REVERSE IMAGE and print onto Quilt Attitude™!

Cut each word and mount to piece of muslin.  Fray edges. Mount muslin with text onto piece of burlap, fray edges.  Mount to bottom center area of alternating pennants.   Add tan star button accents as shown.


Historical Documents Placemats or 
Table Runners

Use purchased copies of historical documents or print images (search Declaration of Independence, Abe Lincoln....) onto parchment vellum or lightweight parchment paper.  Mount unprinted sheets of Scrapbooking Attitude! over surface of each document, front and back, to protect against tearing, minor spills or stains.  Save your historical documents for future celebrations.

Monday, September 3, 2012

"Vintage Crafting" with Designer Craft Blog Connection

It's time for the September Designer Craft Blog Connection hop and this month our theme is "Vintage Crafting."   I seem to almost endlessly be crafting via repurposing - but just how old does a an item need to be before it's considered vintage?  Do the old clothes I've been crafting with that once belonged to my grandmother count as vintage (like in my first episode of Behind These Eyes with Cindi Bisson)?  When it comes to the many vintage furniture pieces and home decor accents I have in my home, I prefer them with their aged appearance and am hesitant to consider altering them.  My studio supplies are even stored in a wide variety of "vintage" containers - ranging from old steamer trunks and suitcases, to old shipping crates. I've created many scrapbook layouts with a vintage feel, using vintage photos and vintage themed papers and embellishments.   The one that stands out in my mind as actually having vintage memorabilia actually included, and was made with "old" scrapbooking products I've had in my stash for many years, is this collage style layout of my grandfather and his brothers in their WWII uniforms.

Creating a memorial collage is a great way to remember loved ones who have served in the military – past or present!  An official definition of “collage” is:  a technique of composing a work of art by pasting on a single surface various materials not normally associated with one another, as newspaper clippings, parts of photographs, theater tickets, and fragments of an envelope. 

However, I believe a true definition of the art of collage is “anything goes!”  Dare to use elements you might otherwise never consider – whether you use the actual ephemera or scans/photographs of the pieces – the sky is the limit.  Being a texture junkie, I love the dimension and depth that actual elements add rather than photos. 

Whether you choose to create your collage for a family scrapbook, create a framed piece or canvas art, set your creative muse free!  One technique I often incorporate into my collage work is dimensional embellishments & ephemera – in this case I used actual buttons, pins and patches from my grandfather’s WWII uniform.  I scanned the vintage photos of he and his three brothers who also served, both front and back to capture the handwritten names and dates on each, and the actual military documents we have saved throughout the years.  This text was then used to label some of the photos and as an element of the collage.    I wanted all of the elements of this project to have a vintage feel, so even the “new” materials used were aged using walnut ink – the Jolee’s Boutique microbeaded flag and the flag printed vellum were both given a healthy application of spray walnut ink and allowed to set for approximately 1 minute before they were gently rinsed and allowed to dry.  Some papers were torn & rumpled before application on the background, metal tags were stamped with names using black Staz-On ink and small alphabet stamps, and metallic eyelets were added as accents to the tags.  All the assorted elements were then arranged and mounted as shown using Elmer’s Craft Bond Adhesive. Collage is most often about applying multiple materials in a random fashion rather than a linear format – but as I said – anything goes – if you want your “collage” to be composed of multiple images lined up neat and clean – it is not wrong as long as you are happy with the finished project!

Follow the Designer Craft Blog Connection link on the right to view the other creativity projects being shared as part of this hop.

I hope this month's hop inspires you to pull out some of your "old supplies", perhaps repurpose an "old" decorative item, or even use new supplies to create something unique with a vintage feel.  And always remember, it's okay to "Dare to be Different!" - Cindi Bisson

But wait, there's MORE!  
The Prize!
 
Crafty KT is sponsoring The KOOL TAK™ Manufacturer Challenge: Fabulously-Fall Blog Hop.

September 8th to September 18th

Join us and visit the blogs of 12 professional and creative craft designers (I'm participating!) as they show you how to create some great fall projects with Kool Tak™ products. 

Make sure to enter the The Kool Tak™ giveaway, which is valued at about $70.00

Kool Tak™ 1 Layer Perfect (Use it for centering, piercing, and edge stitching) Tool
Kool Tak™ 1 Shiny Transfer Foil Sheets (Earth Tones)
Kool Tak™ Clear Foam tape ¼ x ¼ x 1/32” thick
Kool Tak™ Clear Foam tape 3/16 x 1/16 thick by 1.6 yards
Kool Tak™ Premium EXTREME 2 ½ x 27 yards

We will choose one lucky giveaway winner from those who sign up for our newsletter.  You only need to enter once.

Only those with a mainland USA shipping address are eligible to win the giveaway.

Link: http://craftykt.com/suscribe-to-newsletter


Monday, July 2, 2012

Designer Craft Blog Connection July Hop - Vacation Crafting!

Welcome to the July Designer Craft Connection Blog Hop!  This month’s theme is Vacation Crafting.   While many of us may use vacations as a time to sit back, relax, and actually not craft, for many of us it’s a time to spend MORE of our time crafting.   Whether you are on a trip to the mountains, a lake, the beach, a theme park, or are exploring a new state or country, if you look closely I promise you will begin to notice creative inspiration everywhere.  It’s in the color palettes of the scenic views, the textures and unique architecture of the buildings and clothing of the people around you, the wonderful tiny found elements to incorporate into your projects.   If you are enjoying a vacation in your own home and yard - take the time to notice all the details that make it special to you too, capture them and let them inspire your creativity!

Beach vacations tend to be popular - and who hasn’t come home with a bit of beach sand, and a few (hundred) seashells to help remember the good times along with fun photographs?     These Beach Memory bottles were a project I shared on an early episode of When Creativity Knocks - You can view the full episode here.    I repurposed shampoo bottles from hotel rooms, along with beach sand, tiny shells, assorted embellishments, and a tiny memory message in a bottle to create these pretty little reminders of fun beach vacations.   It’s a craft you can start working on while you are enjoying your vacation and helps you remember the good times in a unique way.   And, they look so pretty on my studio windowsill with the sunlight shining off of them and through the colored bottles.

Be sure to click through the Designer Craft Blog Connection link on the right to see the other creative vacation crafts being shared by this amazing group of talented designers.  There is always, literally, something for almost everyone in these hops and one of the best parts is seeing everyone’s interpretation of the monthly theme. 

Monday, June 4, 2012

Designer Crafts Connection Blog Hop - Summer Picnics


Popsicle-itis - A common ailment in our yard during the summer.
This month’s theme for the Designer Crafts Connection Blog Hop is summer picnics!   When I started thinking about a project to share I decided it would be fun to go back and look through some of my older scrapbook layouts to see if anything summer picnic related caught my eye.   While browsing my books, I was glad to notice that I hadn’t only focused on capturing the summer memories focused on trips to the pool or beach, but also those captured some of  the sweet tasting joys of summer and the unexpected fun activities the boys have enjoyed through the years.  Here is a peak at a few of those to hopefully inspire you to capture a few summer memories that may seem “out of the box” and scrapbook them for your family’s future reminiscing!

For lots more summer picnic inspiration visit the blogs of the participating designers by clicking on the Designer Crafts Blog Connection link in the column to the right! 

Ahhhhh waterlmelon - sweet, juicy summer picnic fun!


Strawberries - more summer yummy fun!
Water Wars!  Squirt guns, water balloons, buckets & hoses - add together with a yard full of mischievous boys and you get one fine (soaking wet!) day!

Monday, May 7, 2012

Chunky Makin's Clay® Necklace - Designer Craft Blog Connection


One of the themes for May's Designer Craft Blog Connection hop is Quick and Easy Jewelry Anyone Can Make - While this project was originally created as a lanyard for CHA - it would also make a unique accent necklace.  It’s chunky, rich toned colors and bit of fiber fringe would be great layered over a cozy sweater.    Create it in pastel or bright tones, use a bit of cheerful ribbon instead of fiber, and it would be a funky accent over a spring or summer t-shirt.   The best part is it could not be easier to create.  All you need is a multi-color package of Makin’s Clay®, good sharp heavy scissors like Westcott Titanium Non-Stick scissors, and fiber or ribbon.   I used clay that was actually old, outdated and had been accidentally left in storage in my attic.  I could have reconstituted it with water (another great thing about Makin’s Clay®), but instead I used it in the brick form it was already dried in and sliced it into beads with the heavy scissors.  The fiber was strung onto an upholstery needle and then pushed through the center of the square beads.  To re-create this technique if you don’t happen to have old, outdated, dried clay bricks (gee, who wouldn’t have those around in their creative stash?) first open the box of clay, and remove the individual colors from the outside packaging.  Carefully remove packaging from individual colors (if clay sticks to packaging during removal, you can hand form your bricks again - I liked the random effect on the sides of the dried clay so don’t create perfectly smooth bricks unless you desire that effect.   Let dry at least overnight.   Carefully slice into chunks using heavy scissors.  String onto ribbon or fiber in desired pattern, allowing space between each cluster of beads so ribbon/fiber shows.  Add closure mechanism and your finished.  

Follow the Designer Craft Blog Connection link to the right to see the many creative projects my fellow designers will be sharing with you as part of this month's hop!

Be sure to visit again this Saturday, May 12th when the ImpressArt Metal Stamps Designer Craft Blog connection hop goes live - you'll find a multitude of creative ways to use ImpressArt metal stamps on your projects!