1 Cindi Bisson McGee - Behind These Eyes : ribbon
Showing posts with label ribbon. Show all posts

Monday, February 9, 2015

ADORNit® Blog Hop - Illuminated Spring Flower Blossoms


I'm excited to be a part of the ADORNit® Blog Hop!  I received an amazing box of product from AdornIt and the hardest part was to first decide WHAT I wanted to work with.  I decided for this first project I would focus on the Blender Basics paper pack.  But, I've also been working on several other projects with some of the fabric and other papers they sent - so stay tuned!

These Illuminated Spring Blossoms are a pretty way to usher in warmer spring days.  Display them near a sunny window for a little springtime cheer, and when the sun goes down and the day starts to darken - turn on the lights in the centers and watch the warm sunny glow illuminated from within the flowers themselves!

Be sure to follow through and see what the other participating designers are sharing.   The next person's blog to visit on your journey is Jennifer Priest.  ADORNit® is also offering a great prize package to a lucky winner who visits all the projects on this hop!  Your Give-Away Clue for this post is: "Y".

Materials:

ADORNit® Blender Basics Paper Pack
FloraCraft® Design It:® SimpleStyle® LED Lighted Branch
Sizzix® Big Shot™, Eileen Hull Bigz™ Flower 3-D Wrapped, Flourish & Leaf
Makin's Clay® - 120g White, Floral Push Mold
DecoArt® Americana® Decor™ Chalky Finish Paint - New Life
Clearsnap® ColorBox® Crafter's Ink Pad - Sweet Pea, Jungle
Earth Safe Finishes™ Ann Butler Designs™ Iridescents - Sunshine
Offray® Ribbon - 7/8" Glitter Pink
Westcott® Titanium-Bonded Non-Stick Scissors
Beacon® Tacky Glue
Vintage Blue Mason Jar
Paintbrush, craft sponge

Instructions:

Paint LED lighted branch with green Chalky Finish paint.  Let dry.

Use Big Shot™ Machine and Flower 3-D Wrapped die to cut multiple From pink patterned papers in ADORNit® Blender Basics pack.  Number of flowers cut will depend on number of finished flowers. For the 7 flowers I made, I cut 10 large size, and 11 small.

Use Big Shot™ Machine and Flourish & Leaf die to cut multiple leaves from assorted green patterned papers in ADORNit® Blender Basics pack.

Sponge edges of pink flowers with Sweet Pea ink, edges of leaves with Jungle ink.

Assemble flowers per instructions on die - for five I used 2 large flowers and one small for the centers; for two of the flowers I layered 3 of the small.

Mount flowers, using Tacky Glue, to the end of each branch with the light in the center of the flower.

Mount leaves randomly to each branch and to the stem.

Open 120g white Makin's Clay® and cut about 1/4" of package.  Place remaining clay in zip lock bag with damp paper towel for later use.  Use floral push mold to create 7 flowers for centers of paper flowers.  Carefully push end of paint brush through the center of each clay flower while wet to create hole for the light.

Paint flowers with Sunshine Iridescents paint.  Let dry.

Carefully insert each clay flower over the light, use Tacky Glue to hold in center of flowers.

Add batteries per instructions and insert floral branch into blue mason jar, add white tissue paper to cover the wire and battery pack.

Tie glitter pink ribbon around rim of jar and tie bow.

Thursday, July 17, 2014

Burlap Door Monogram

This week in my Cindi's Simple Solutions article for When Creativity Knocks I am showing you how to create this Burlap Door Monogram.  Find the full instructions here.

http://whencreativityknocks.com/mycraftspace/m/articles/view/Simple-Solution-Burlap-Door-Monogram

Monday, June 2, 2014

Glamour Girl Monogram Mirror - Designer Craft Connection Blog Hop

This Glamour Girl Monogram Mirror would make a great gift for any girl who wants to celebrate there inner princess!  Sparkling crystal accents, etched glass fleur-de-lys, a glittered monogram letter, and coordinating ribbons bring it all together.  Be sure to click the Designer Craft Connection Blog button to see what other creative hand-made gifts are being shared today as part of this month's blog hop!

Materials:

12" Round Darice Mirror
Connie Crystal white crystal sheets
DecoArt® Americana® Gloss Enamels® Stick-On Stencils™ - Fleur de lys
etchall® Etching Cream
Chipboard glittered monogram letter
Beacon Adhesives Quick Grip™ Adhesive
Coordinating ribbons, scissors, foam brush
Command™ mounting strip


Instructions:

Place fleur-de-lys stencil onto lower right area of mirror.  Apply etchall® cream and let set 15 minutes.

Remove and place etchall® cream back into bottle for re-use.
Clean and dry mirror.  Repeat with stencil above and to the right of first image, then repeat again to create 3 diagonal images.

Cut three strips of 3 crystals from Connie Crystal sheet.  Use Beacon Adhesives Quick Grip™ to mount to straight area in center of each fleur-de-lys.

Use Quick Grip™ to mount glittered monogram letter centered on fleur-de-lys.

Use Quick Grip™ to mount single strip of crystals around outer edge of mirror.

Cut multiple pieces of coordinating ribbon about 2" long.  Fold each piece in half to create slightly-off centered loops.  Use Quick Grip™  to back edge of mirror to create ruffle around mirror.


For easy mounting anywhere, use a removable mounting strip.

Friday, June 28, 2013

Patriotic Basket Embellishment with ICE Resin®


My latest design for ICE Resin® is this patriotic basket embellishment!  Find out how I created this piece on the ICE Resin® blog - http://iceresin.com/icequeen/2013/06/patriotic-basket-embellishment/

Happy Fourth of July! - Cindi

Wednesday, March 27, 2013

Captured Ocean Pendant

The latest episode of my series "Behind These Eyes" is now live on the When Creativity Knocks website - learn how I made this "Captured Ocean" pendant with ICE Resin®, Rit Liquid Dye and more - http://whencreativityknocks.com/mycraftspace/m/videos/view/Behind-These-Eyes-Ocean-Pendant


Wednesday, December 12, 2012

Ombre Onesies with Rit Liquid Dye & Spellbinders!

In this episode of When Creativity Knocks - we transform Rit Liquid Dye, Spellbinders and JudiKins products into adorable ombre onesies!  (And we say "Ombre" a lot - hey, we like that word.)  Enjoy! - Cindi

Friday, December 7, 2012

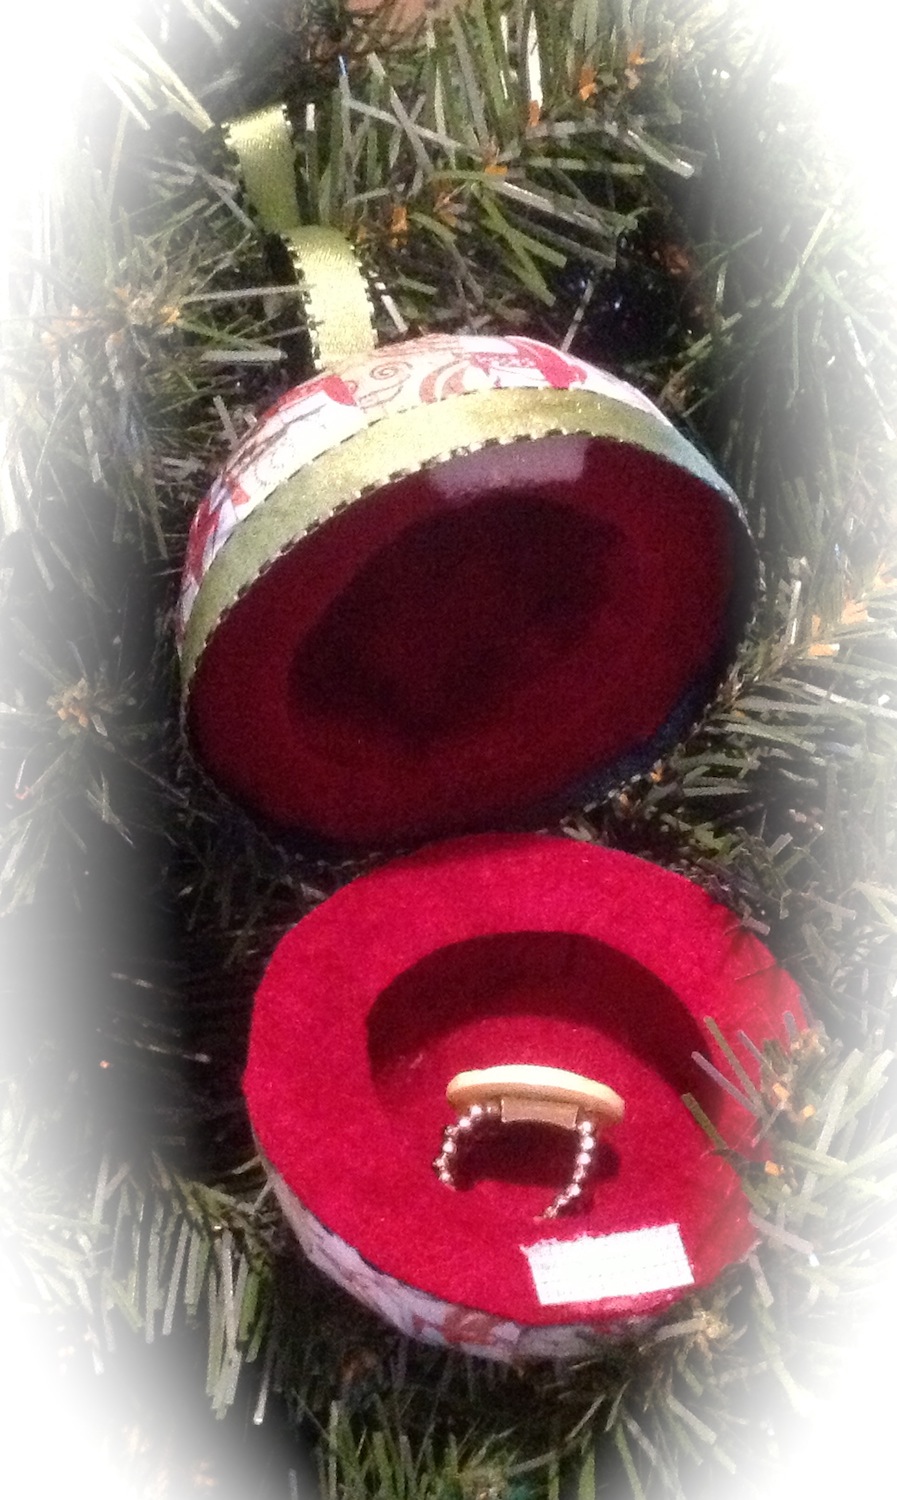
Holiday Ornament Gift Box


A 3” Smoothfoam ball is the base of this ornament which also serves as a gift box for a small treasure.

 Materials: 

Smoothfoam 3” ball
Plaid Mod Podge
Connie Crystals - blue, red
Silver wire
Foam brush
1/4” Ribbon
Spoon
Reindeer paper from BasicGrey Blitzen Collection
Westcott Premium TrimAir Titanium Paper Trimmer
Westcott Craft Titanium Bonded Non-Stick Scissors
Westcott Craft Hobby Knife
Red felt
Velcro Brand Sticky Back Fasteners

Instructions:


Carefully cut ball in half with craft knife.

Use a spoon (grapefruit spoon makes it easier as it has a grooved edge) to hollow out inside of both halves of ball.

Cut 1/2”  x 2” strips of patterned paper and Mod Podge onto top and bottom outsides of ball, overlapping each piece slightly.  Let dry. 

Cut 1 1/2” strip of wire, add small blue crystal bead and medium red crystal bead and insert through bottom center of ball.

Cut 4” strip of wire, add medium red crystal bead, medium green crystal bead, and small blue crystal bead.  Insert through top center of ornament.  Create loop at end to attach ribbon.

Cut felt to fit in bottom of both halves, mount.  Cut strips of felt to fit around inside of balls, mount against base piece of felt in each half.

Cut ribbon to wrap around center of ornament.  Glue ribbon in place on bottom of TOP of ornament,
extending downward so it will cover the edge of the bottom half when the ornament is “closed." 

Mount 1" strip of ribbon vertically along back center of ball (this will be your “hinge").


Mount small piece of sticky backed Velcro to inside center front of box to hold ornament closed. 


Creating hand-made ornaments each year is part of our family tradition - why not start your own tradition, and collection, this year? - Cindi

Wednesday, November 14, 2012

Tie-Dyed Baby Onesie & T-Shirt Skirt


More fun from I Love to Create!   One of their Tulip Tie-Dye sets, Tulip Fabric markers, ribbon and buttons jazz up a baby onesie and a simple adjustable skirt made from a t-shirt.   Find out how in the new project published on FaveCrafts!  http://www.favecrafts.com/Tie-Dye/Tie-Dye-Baby-Onesie-and-Skirt

I hope you'll try and make something special and one-of-a-kind for a new little one coming into your life.  - Cindi

Thursday, November 1, 2012

Mixed-Media Mirror with Connie Crystal Pearls

Connie Crystal pearls, Graphic 45 papers, Earth Safe Finishes and JudiKins Diamond Glaze are combined and a dollar discount store mirror gets a transformation perfect for a special little girl.  Find the full tutorial on the Blog link via the Connie Crystal website - http://www.conniecrystal.com/

*The original Connie Crystal blog is experiencing some difficulties - you can access it by linking through the website.  Hopefully, all projects will be transferred to the new blog - http://conniecrystalsparkle.blogspot.com/ soon! 

Tuesday, October 16, 2012

Warm Wishes with Connie Crystal and Tombow

Connie Crystal, Tombow Adhesives, Spellbinders dies, and Tombow Irojiten Color Dictionary pencils are combined for a mixed-media Autumn toned card to send warm wishes to someone special.  Find a full tutorial on how to recreate this project at the Connie Crystal Blog. 


I

Wednesday, June 13, 2012

Cherry Blossoms in ICE Resin!

I've got a new project featured on the ICE Resin blog today featuring two of the most versatile mediums I enjoy designing with - ICE Resin and Makin's Clay.  I used a bezel and ribbons from the ART Mechanique line, combined with Makin's Clay cherry blossoms on a real twig, ICE Resin and Asian coins.

Wednesday, May 2, 2012

ICE Resin - Tweetly Preserved


My first official post for ICE Resin® is now live on their ICE Resin blog!    Here's a peak at the project - hop on over to the ICE Resin blog to find out how I created this piece using ICE Resin products, Makin's Clay® and more....