1 Cindi Bisson McGee - Behind These Eyes : Plaid
Showing posts with label Plaid. Show all posts

Tuesday, October 6, 2015

Haunted Mausoleum Birdhouse

This week for my Cindi's Simple Solutions project on When Creativity Knocks - I'm sharing this creepy fun project.....

Just in time for Halloween, add a little spooky glow to your mantle this season with this Haunted Mausoleum Birdhouse!  


Materials:

Plaid® - Wooden birdhouse 
            - FolkArt® Home Decor Chalk Paint - Maui Sand, Rich Black
            - FolkArt® Home Decor Antique Wax
                - Cutting Mat 
                - Ultimate Clay Machine™
                - Professional® Clay tools 
                - Texture Sheet Set D - Woodgrain Sheet 
                        - Easter Clay Cutter - Cross Cutter
Beacon Adhesives® Tacky Glue 
Spellbinders® Grand Calibur™ Machine - Graveyard Scene & Shapes Die 
X-Acto craft knife 
Skull mold (special thanks to my Fairy Craftmother for mine!
Skull bead 
Paintbrush 
Paper towels 
Spanish Moss
Charcoal grey paper/card stock 
Battery operated votive 
Spiderwebbing 
Plastic wrap 

Instructions: 

1. Paint entire birdhouse with Plaid® FolkArt® Home Decor Maui Sand Chalk Paint.  Let dry. 

2. Roll black Makin’s Clay® with Ultimate Clay Machine™ to setting #7 (or hand roll very thin - about 1/16”).   Use Woodgrain texture sheet to gently impress texture onto rolled clay.  Using cutting mat as a guide, use cutter to cut 2 x 2cm squares.  Apply Beacon® Tacky Glue to surface of roof, then begin applying squares, overlapping some, to create look of shingles.  Let dry. 

3. Dry brush shingles with Maui Sand chalk paint.  

4. Use black clay in skull push mold to create skull. 


5. Flatten piece of black clay (I used my fingers, as I wanted an uneven appearance) to about 1/4”.  Place plastic wrap over clay, and cut cross using clay cutter. (Tip - Plastic wrap makes it easy to remove the clay from the clay cutter!) 

6.  Dry brush skull and cross with Maui Sand chalk paint.

7.  Use Tacky Glue to mount skull to front top of birdhouse, over opening, and cross to roof peak.

8. Flatten piece of black clay (I used my fingers, as I wanted an uneven appearance) to about 1/4”.  Use clay tool to write/etch desired word into clay.  Trim around word.  Dry brush with Maui Sand chalk paint.  Use Tacky Glue to mount to birdhouse beneath skull. 

9. Mix small amount of Rich Black and small amount of Maui Sand chalk paint to create darker grey.  Paint door onto front of birdhouse over hole on bottom.  Outline door in black, and paint center line to divide door.    

10. Use paper towel to apply small amount of Antique Wax to all surfaces except roof.  Wipe to remove excess.   

11.  Use Spellbinders® Grand Calibur™ and Graveyard Scene & Shapes die to cut 4 graveyards from charcoal paper.

12.  Apply Tacky Glue to top of bottom piece of birdhouse, mount Spanish moss.  

13.  Apply Tacky Glue to outside edge of bottom piece of birdhouse, mount graveyard scenes over edge around base, leaving a space for the “front step” of the mausoleum. 

14.  Add skull bead accent to front step. 

15.  Add spiderwebs as desired. 

16.  Optional:  To make your Haunted Mausoleum glow - use a sturdy craft knife to cut an opening in the bottom of the birdhouse.  The birdhouses are made from lightweight wood so this is possible if do with caution. (or else your mausoleum will come complete with blood stains!) 


Wednesday, February 18, 2015

Birdhouse Table & Chicken Wire Bird - FaveCrafts® Best Blogger Craft 2015 Challenge!


It was an honor to attend the recent FaveCrafts® Blogger Event at CHA in January!   When my box of swag from some of the event sponsors arrived, it was like Christmas all over again!  I received fabulous products from MD® Hobby & Craft - which are EXACTLY my style - a great assortment from Plaid®, items from Simplicity®, Clover®, and Prima® Bead.  

When I found out about this awesome Best Blogger Craft 2015 challenge to use products from one of the sponsors to create a unique creative project and submit it FaveCrafts - my mind instantly began to turn and churn and I knew I wanted to create something unique, and functional!

I love birds and birdhouses, so this Birdhouse Table & Chicken Wire Bird were a natural choice.    The table could be a functioning birdhouse, but it also works as a great side accent table for a plant, or on a porch next to a comfortable chair to hold a cool beverage, etc.  The little chicken wire bird is a totally unique accent piece to set on the table, or in pot with a pretty plant indoors or outside on a porch. 

I built this birdhouse from scratch and have included measurements - but of course you could buy a large pre-made birdhouse, cut the top off flat and create something similar for an easier option!  

Voting in this challenge/contest begins on February 25th and runs through March 4th.  I encourage you to visit the FaveCrafts site and vote for your favorite project - there are sure to be many amazing creative projects to choose from!!!   Here's the link - http://www.favecrafts.com/contest/Blogger-Contest

Materials: (items in GREEN were included in my swag package from FaveCrafts!)

Plaid® FolkArt® Home Decor Chalk Paint- Seaside Villa 
Plaid® Martha Stewart Crafts™ Multi-Surface Satin Acryilc Paint - Sandcastle 
Plaid® Outdoor Mod Podge®
EKSuccess® Inkadinkado® Stamp Set - Flower Icons 
Wrights® 5/8” Black ric-rac from Simplicity
MD® Hobby & Craft Metal Working Gloves 
MD® Hobby & Craft Brass Rolled Metal 
MD® Hobby & Craft Chicken Wire 
MD® Hobby & Craft Hobby Shears 
KellyCraft™ Get-it-Straight™ Laser Square & Multi-Mat™
Westcott® Titanium Bonded Non-Stick Scissors 
Craft Attitude™ Printable Craft Film 
Staz-On ink pad - Jet Black
Jax® Pewter Black 
Beacon® 527 Adhesive 
Repurposed wood 1/2” thick (I used old fence boards to create this birdhouse). 
Assorted carpentry tools - saw, staple gun, drill, safety glasses, large hammer, rag 
Paintbrushes 
Permanent glue stick

Instructions: 

Cut 4 pieces of repurposed wood (approximately 1/2” thick for all wood) 5” x 21”.  Nail
together to create center of birdhouse.  

Cut 2 pieces of repurposed wood 7” x 10”.

Cut 2 pieces of wood 4 1/2” x 5”.  

Cut 2 triangles 8” x 6 1/2” x 5.  Assemble  to create side portions of “roof”.  

Cut piece of wood 11” x 11”. 

Cut piece of brass metal 12” x 12” and 2 pieces 8” x 11”.
Place brass metal pieces on hard surface, hit with large hammer to distress.  

Apply Jax Pewter Black to all brass to add patina to age
distressed metal.   


Fold edges of each piece back 1/2” and use staple gun to mount to two slanted roof pieces. 

Mount 11” x 11” piece to top of birdhouse to create table top.  Fold edges of 12” x 12” metal piece back 1/2” and use staple gun to mount to flat 11” x 11” table top (staples on folded edge). 

Drill 3 evenly spaced 1 1/2” holes in center of birdhouse, and one in each slanted side roof piece. 

Drill 3/8” holes beneath each large hole.

Paint birdhouse with FolkArt® Home Decor Chalk paint.  Let dry. 

Paint 2 1/2” band of Sandcastle paint beneath each hole on
center of birdhouse.  Let dry.   


Ink birds on a branch stamp with permanent black ink.  Place Craft Attitude film onto Multi-Mat  and use Get-it-Straight™ Laser Square to help align separate rows of stamped bird images as shown.  

Cut into strips.  

Use permanent glue stick to mount stamped Craft Attitude to Sandcastle sections.


Cut black ric-rac and mount to top and bottom of each painted strip.  

Cut twigs and use Beacon 527 to mount in 3/8” holes.   

Coat all wood surfaces with outdoor Mod Podge.  


I first saw a chicken wire bird on Pinterest.  When I received the chicken wire from MD® Hobby & Crafts I knew I had to try to create
one myself.  I used several photos for reference, then hand molded/formed the bird. 


Sunday, June 16, 2013

The Queen's Crown with Connie Crystal

My latest project for the Connie Crystal blog is regal.... find out the details on their blog!   http://sparklebycc.com/the-queens-crown/


Saturday, June 15, 2013

Cindi’s Adventures with Etchall


Etchall® Etching Cream is an amazing product with a long history of use on glass, mirrors, and ceramic glazes.  It's easy to use, and the product is re-usable so there is very little waste.   Be sure to visit http://www.Etchall.com to learn more about their variety of products, for a project gallery, and for how-to videos.   And, of course be sure to follow the Designer Craft Blog Connection post on the left to see what the other participating designers have created with Etchall®!

Those of you who follow my creative work know I tend to be a bit of a mad scientist sometimes when crafting.   When I received my Etchall® for this Designer Craft Blog Connection Hop, I immediately began scheming and dreaming up new things I wanted to try with it. First, I'm going to share my finished project, then I'll share my experiments.....

The Plaid® Martha Stewart stencils I used for these glasses are made of sturdy plastic and therefore would not bend well to mold to the shape of the wine glass.  So I traced the stencil onto Etchall® Etchmask, and used a sharp craft knife to cut out the open areas. 


The finished sticker stencil was mounted to the glass and I followed the manufacturer’s instructions for applying the Etchall® - and it worked wonderfully - I was able to easily create four seaside themed wine glasses.  (*Note... I found when etching a curved surface like this, it was better to apply the cream to small areas at a time, rather than the entire image to eliminate the issue of the cream running off the curved edge on to the area of the glass you don't want etched...)

And even though the different designs would make it easy for those using the to determine which glass was there, I like to be optimistic and think that several sets might be in use at a fabulous beachside party.... causing confusion as to whose glass was whose.    My answer - quick and easy wine glass charms made from gold hoop earrings, 4 different colored Connie Crystal pearls, and some sparkling Connie Crystal accents. 

And now... cue the bubbling vials and beakers of steaming green and brown goo in the laboratory....

First Experiment: 

Polished marble door stop......  I am lucky to have access to some great assorted chunks of gorgeous marble and have been wanting to create something unique with a piece for a while.  

I whipped out my KellyCraft Get-it-Straight™ Laser Square and lined up some Plaid® Martha Stewart alphabet stencils to spell out a favorite verse.   Applied the Etchall® and waited not so patiently for the required time.  When I removed the Etchall®, then the stencils, I discovered...... nothing.   Apparently, the manufacturers are correct in not claiming their product works on polished marble - lol......


Second Experiment: 

(Yes, the inner “Beaker” in me... anybody remember him from The Muppet Show?..... persevered and had to keep on pushing the limits beyond the product’s recommended uses...)

Etched luggage tag......... I love the clear acrylic Mod Podge Acrylic shapes, especially the tags, from Plaid®.   Out came my Get-it-Straight™ Laser Square again and those same Plaid® Martha Stewart stencils..... I spelled out my name and was planning to add my phone number too and a pretty little flower design.  

Guess what?  Apparently, the manufacturer was also correct in not claiming the product would etch plastic.  

Was there a third experiment?  Well of course there was.   I took a sheet of rolled, dried Makin’s Clay®, added a stencil and added some Etchall® just to see what would happen.  I bet you can guess what the result was.

With all of that shared, I want to reiterate that the Etchall® cream was very easy to use, and I had good results, when I followed the manufacturer's instructions and used it for it's intended use!  I'm glad I got a chance to discover this product and I already have ideas on ways to use it for future projects! - Cindi

Wednesday, March 27, 2013

Captured Ocean Pendant

The latest episode of my series "Behind These Eyes" is now live on the When Creativity Knocks website - learn how I made this "Captured Ocean" pendant with ICE Resin®, Rit Liquid Dye and more - http://whencreativityknocks.com/mycraftspace/m/videos/view/Behind-These-Eyes-Ocean-Pendant


Sunday, March 24, 2013

Ladybug Tic-Tac-Toe with Smoothfoam!

I'm having a blast crafting with Smoothfoam!  My latest project is featured on their blog - Ladybug tic-tac-toe!  You can find the instructions here - http://www.smoothfoam.com/blog/national-craft-month-ladybug-tic-tac-toe-game/.

Saturday, March 16, 2013

Ice Cream Cone Garland with Smoothfoam!

 
I've been having a lot of fun designing with Smoothfoam lately - and my latest project is now on their blog -


 http://www.smoothfoam.com/blog/national-craft-month-ice-cream-cone-party-garland/

It's an ice cream cone party garland - and these little buggers look good enough to eat :0).   Want to find out how to make one of your own?  Check out the Smoothfoam blog!

Also -

Want a chance to WIN $100 worth of Smoothfoam sheets and shapes? Just leave on comment on this project post (click the “replies” link) - http://www.smoothfoam.com/blog/national-craft-month-ice-cream-cone-party-garland/ - and come back to the Smoothfoam blog to leave a comment on every post in March to enter! That’s up to 31 chances to win…good luck!


Monday, March 11, 2013

Tropical Topiary made with Smoothfoam!

I've got a new project posted on the Smoothfoam blog - find the instructions to make your own tropical hibiscus topiary at this link -

http://www.smoothfoam.com/blog/national-craft-month-tropical-hibiscus-topiary/

Plus - Want a chance to WIN $100 worth of Smoothfoam sheets and shapes? Just leave on comment on the Smoothfoam blog on the linked post (click the “replies” link below) and come back to their blog and leave a comment on every post in March to enter! That’s up to 31 chances to win…good luck!

Monday, January 21, 2013

Gargoyle Puzzle Box

The latest episode of Behind These Eyes on When Creativity Knocks is one of my favorite recent projects!  I couldn't wait to design something unique and fun with JudiKin's Gargoyle Cube stamp - and this puzzle and storage box was the result.  

Why not use your stamps to create something beyond a card or scrapbook page today? - Cindi

Friday, December 7, 2012

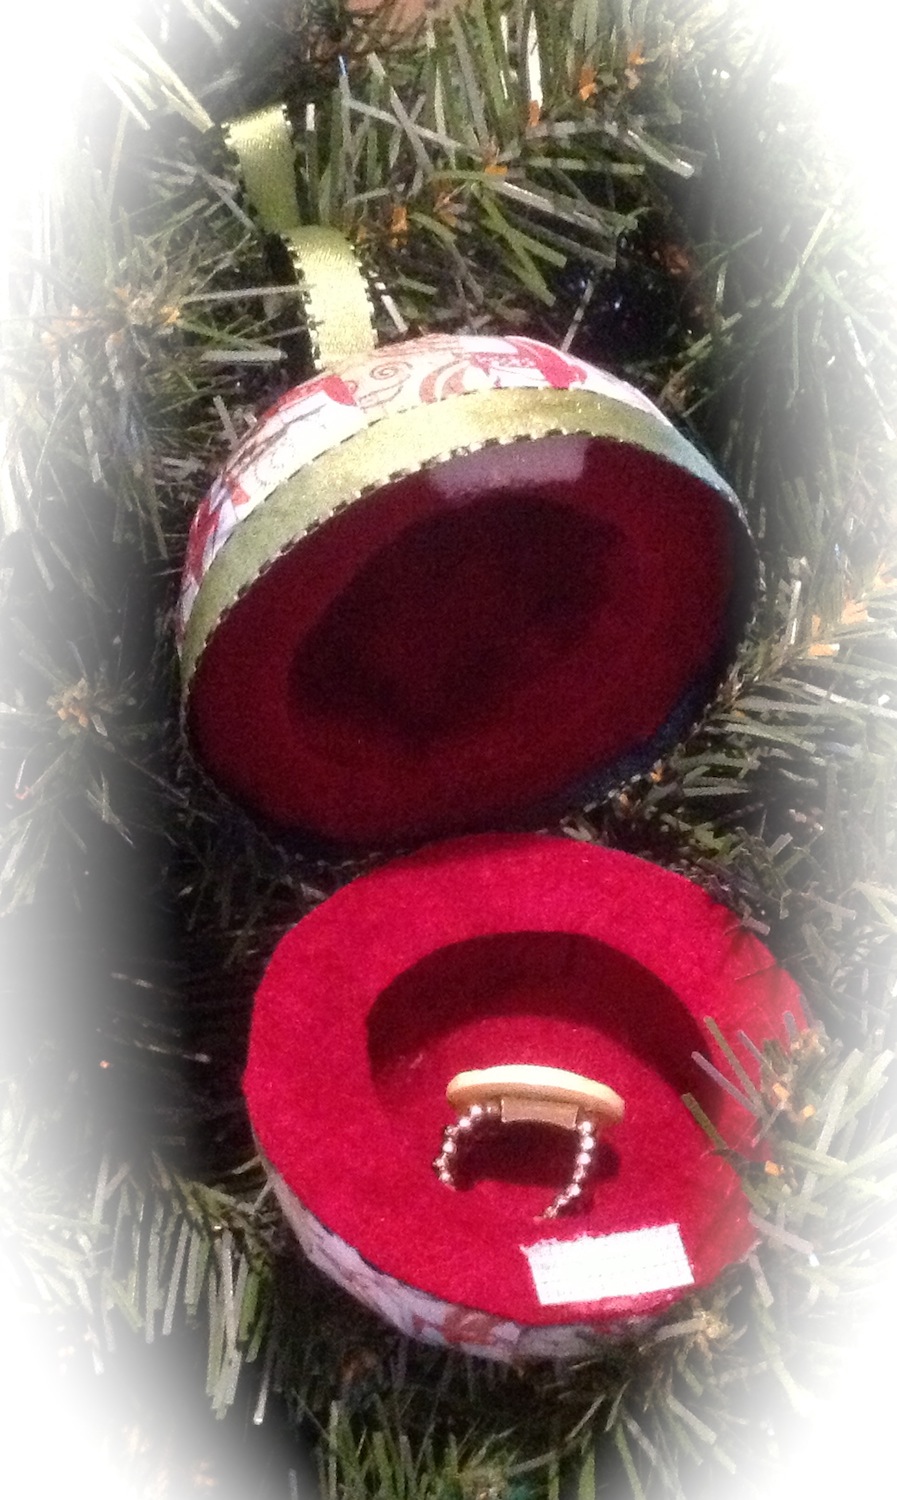
Holiday Ornament Gift Box


A 3” Smoothfoam ball is the base of this ornament which also serves as a gift box for a small treasure.

 Materials: 

Smoothfoam 3” ball
Plaid Mod Podge
Connie Crystals - blue, red
Silver wire
Foam brush
1/4” Ribbon
Spoon
Reindeer paper from BasicGrey Blitzen Collection
Westcott Premium TrimAir Titanium Paper Trimmer
Westcott Craft Titanium Bonded Non-Stick Scissors
Westcott Craft Hobby Knife
Red felt
Velcro Brand Sticky Back Fasteners

Instructions:


Carefully cut ball in half with craft knife.

Use a spoon (grapefruit spoon makes it easier as it has a grooved edge) to hollow out inside of both halves of ball.

Cut 1/2”  x 2” strips of patterned paper and Mod Podge onto top and bottom outsides of ball, overlapping each piece slightly.  Let dry. 

Cut 1 1/2” strip of wire, add small blue crystal bead and medium red crystal bead and insert through bottom center of ball.

Cut 4” strip of wire, add medium red crystal bead, medium green crystal bead, and small blue crystal bead.  Insert through top center of ornament.  Create loop at end to attach ribbon.

Cut felt to fit in bottom of both halves, mount.  Cut strips of felt to fit around inside of balls, mount against base piece of felt in each half.

Cut ribbon to wrap around center of ornament.  Glue ribbon in place on bottom of TOP of ornament,
extending downward so it will cover the edge of the bottom half when the ornament is “closed." 

Mount 1" strip of ribbon vertically along back center of ball (this will be your “hinge").


Mount small piece of sticky backed Velcro to inside center front of box to hold ornament closed. 


Creating hand-made ornaments each year is part of our family tradition - why not start your own tradition, and collection, this year? - Cindi

Saturday, November 10, 2012

Shimmering Candle Balls with Smoothfoam


Give your cakes a pop of colorful shimmer with re-usable, customizable candle balls.   Choose your colors, make up a batch of these fun accessories and you’ll be ready for any celebration!

Materials:

Smoothfoam™ 1” Balls
Plaid® Mod Podge® - Glossy
Tulip® Fashion Glitter™ Assortment - Neons
Scissors, small plates, wax paper
Optional:  alphabet stickers, birthday candles

Instructions:

  1. Place approximately 1 tablespoon of desired colors of glitter into separate plates (*Note - amount of glitter needed will depend on desired number of finished balls.)
  2. Use fingers (or a small foam brush) to apply a layer of Mod Podge® over entire 1” Smoothfoam ball.  
  3. Roll in glitter, set on wax paper to dry.
    Repeat until number of desired balls is achieved.  Let dry.
  4. When dry, apply another coat of Mod Podge® over glittered balls, and roll again.  Let dry.
  5. Repeat a 3rd time.  Let dry.
  6. When dry, apply a final coat of glossy Mod Podge® to seal the glitter and prevent it from dropping into the food, and to make it easy to clean the balls with a damp cloth after use.  Let dry.
  7. To make holes to insert candles, carefully place tip of scissors through top of ball and rotate slightly.  Once hole has been “started” with scissors, insert a bamboo skewer, end of a clean ink pen, or other item that is approximately the same diameter as the candles you will be using.  Push in approximately 1/4” and remove. 
  8. Insert candles, add alphabet stickers to customize a message if desired. 
  9. When ready to serve the cake, remove the glittered balls, wipe with a damp cloth and they are ready to use on your next project.  
Follow the Designer Craft Connection Blog Hop button in the right column to see what other fun projects the designer group has created with Smoothfoam™ products!

To enter to win a prize package, leave a comment on favorite projects on the designer's blog and say what you would make with Smoothfoam.  The more often you comment, the more chances you have to win.  All the projects will be posted on Pinterest so readers can comment there too.  The winner will be announced on November 19th.
- Cindi 


Thursday, November 1, 2012

Spooky Treats for the Season

This week on WCK we've got a fun purple people eater sleep mask we taped on site at Crafted at the Port of LA recently.  This was a fun project to design and Ana came up with a clever twist using a wash cloth - and thanks to Rit for sponsoring!

My latest book review is Bead Soup by Lori Anderson - tasty creative goodness! 

And thanks to my mom - who says she's not creative at all - but secretly has a creative side hiding somewhere in there - for this cute idea for a candy corn frame!   Find how how I used Makin's Clay, Plaid paints, and Judikin's Diamond Glaze to create this Cindi's Simple Solution project here! 

*Yes, that's my son in costume as Hannibal Lecter - and yes, I meant for the yellow wordsin the stamped title and text to say OR ME EAT! - I'm twisted that way hahaha ;-) - Hope everyone had a happy Halloween! - Cindi


Wednesday, August 29, 2012

Knitted Baby Caps, a 45 Record, and Purple Cows®

Gee, is that an eclectic enough mix of things for a blog post title?   What do these things all have in common?   They are all featured in this week's When Creativity Knocks Creative Journal!   

My Cindi's Simple Solutions article about Giving Back:  Knitted Baby Caps has a free downloadable .pdf with instructions. 

For my product review this week, I share my experience with using the Purple Cows® Craft Geek Punch It. 

And, Ana Araujo and I had a blast at Maker Faire in San Mateo this spring hosting make & take projects featuring this fun 45 record repurposed into a chalkboard using Plaid products.   You can see how we did it in the newest episode of When Creativity Knocks.

Don't forget to check out our library of over 200 craft videos to inspire your creativity!  -  Cindi 


Saturday, August 4, 2012

Dress Details - A Closer Look at CHA Crafty Couture Gown


Roses in the Garden was the theme I chose for my gown this year.   From there I challenged myself to create a gown that was primarily made from repurposed materials, at a minimal cost, with hand made embellishments.   Little did I know that "challenge" would end up being a key word throughout this adventure.  From creating the dress without a true dressmaker's dummy to ensure it would fit the needed measurements (hey, I got creative  - meet "Beatrice" my personal mannequin), to transporting the gown to Chicago, to attempting to repair the extensive damage that occurred in transit on the hotel room floor, I persevered.  The result was this gown and coordinating pieces I think Mother Nature would be proud to have her daughter wear to the prom or a special event. 

A perfect color match!
The bodice was made from newspaper panels, layered with Plaid Mod Podge to seal and add structure.  The inside was lined with pink Duck Tape to add sturdiness.  After a layer of white paint was added, I began hand painting the freestyle climbing roses using blended shades of Plaid’s acrylic paints.  The colors of the roses themselves perfectly matched the colors of the actual climbing roses I have in my own garden.    When I was finished layering the roses, I enhanced each rose and leaf with Jacquard Lumiere 3-D Metallic Dimensional Paint & Adhesive for added shimmer and depth.   A light coat of Plaid Martha Stewart Sugar Cube paint added a tiny bit of sparkle all over to the finished painted bodice.   Makin’s Clay leaves were made with a push mold and added to the top and bottom edges.   The bodice was closed in the back and held in place on the mannequin using Velcro Brand Adhesive strips.

For the trellis skirt, individual strips of layered newspaper were Mod Podged, then woven to create the desired effect.   The trellis was spray painted with white paint.   The skirt liner was created from an old repurposed white sheet, and green floral organza material from a clearance rack at a fabric store.   The skirt was held closed, and held on the mannequin, with Velcro.

The vines for the climbing roses were made with jute rope and jute string painted with Krylon spray paint.    The vines were woven through the trellis skirt and hot glued in place.  Push molded Makin’s Clay leaves were mounted using Beacon Adhesives Felt Glue.   The individual roses were created from custom mixed shades of Makin’s Clay.  Each rose and rose bud is made from numerous tiny hand made petals, layered to create a cluster to mimic the actual tiny climbing roses in my garden.  Once dry, each rose was lightly accented with Lumiere 3-D paint for a bit of shimmer.  The complete roses were mounted to the vines and stems using Beacon Adhesive. 

Rubber stamped butterflies, embossed on vellum, were painted with USArtquest Pearl-Ex watercolor paints, then embellished with Darice beads using Judikins Diamond Glaze as an adhesive and sealant.   Diamond Glaze was also used to lightly coat the wings of each butterfly.  The butterflies were added as accents to the front of the top of the bodice, and on the trellis. 

The small clutch purse was also made from Mod Podged newspaper, lined with pink Duck Tape.  It was painted in the same manner as the bodice and has the same clay leaf accents.


The coordinating shoes began with an old pair of silver shoes.  Several coats of white paint altered them to a more subtle background for painted rose accents and clay rose accents.  In the trend of colorful soles, the bottoms were painted with the same yellow as the roses on the gown. The painted shoes were also given a coat of the Plaid Martha Stewart Sugar Cube paint for a tiny bit of sparkle. 

Laslty, here's a shot of the gown before I disassembled it into pieces for transportation to Chicago..... luckily I packed a fully stocked repair kit so I was able to apply some triage techniques before it hit the CHA Showroom floor!

I hope you enjoyed this behind the scenes information on what went into the creation of my gown.  I can tell you first hand that all the gowns on display were amazing - I can only imagine the time and effort that went into each one and would love to hear the stories behind each creation in the Summer 2012 Crafty Couture display!

Until next time, happy crafting and remember to "Dare to be Different!"
- Cindi