1 Cindi Bisson McGee - Behind These Eyes : ICE Resin
Showing posts with label ICE Resin. Show all posts

Sunday, October 4, 2015

Vampire Blood/Faux Blood Necklace


My favorite season is here and I can't help myself - I just have to re-share some of my favorite spooky fun projects!  In this episode of my series Behind These Eyes™ on When Creativity Knocks, I share my recipe for creating faux blood using ICE Resin & Rit Dye

And to further add to the creep factor - here's my recipe for the GHOULISH version of faux blood!  


In the Vampire Blood Necklace episode of Behind These Eyes with Cindi Bisson, I share my recipe for faux blood that will last for years. As part of the instructions, I suggest you use a tiny bit of Rit Liquid Dye at a time to color the resin - because if too much dye is used, you get a different result. We didn’t share that result in the episode - but I wanted to show our viewers just what kind of ghoulish results you get with extra dye! It’s a creepy effect too which would work great for some applications - just not for the pendant I was sharing with you. So without further ado…add a teaspoon or more of Rit Liquid Dye (the amount depends on just how crusty you want the finished result to be) to your small amount of mixed ICE Resin and you get what I think looks like clotty, crusty, totally disgusting blood puddles! Which my two boys think are totally cool…Happy Halloween!  


Follow the original instructions and you get smooth, dense puddles of faux blood.

Alter the recipe as above and you get GHOULISH blood!


Friday, November 8, 2013

ICE Resin® Rue Romantique® Christmas Blog Hop - Floating Poinsettia Ornament


The beautiful bezels in the Rue Romantique collection make fabulous holiday ornaments.  For this one I combined an open backed bezel with a Spellbinders die cut poinsettia coated with ICE Resin for a unique holiday ornament.  Be sure to visit the other participating designers' blogs to see what lovely holiday projects they'll be sharing featuring the Rue Romantique line! - Cindi

Floating Poinsettia Ornament 

Materials:

Rue Romantique bezel - open backed 
Susan Lenart Kazmer ”Carnivale”  German Glass Glitter
Spellbinders® Layered Poinsettia die 
Spellbinders® Grand Calibur® machine 
Connie Crystal red crystal and antiqued silver metallic beads 
Red cardstock
Beacon Adhesives Zip-Dry™ Adhesive
Thin jewelry wire 
Jewelry pliers 


Instructions: 

Use Grand Calibur® and Layered Poinsettia die to cut and emboss 3 of the smallest poinsettia flowers from red cardstock.

Mix ICE Resin® according to instructions, coat back of each flower with resin and let cure.  Coat front of each flower with resin, adding gold German Glass Glitter to centers of two flowers, using a small amount of ICE Resin® over the glitter to seal it in place.  Let cure.   Add second layer of resin to front and back of each flower and let cure. 

Cut piece of thin jewelry wire approximately 5” long.  Tie to loop in bezel, leaving approximately 1 1/2” extending down into the open area of the bezel.  

Add red crystal bead right next to loop in bezel, then continue adding small metallic beads to end of wire, looping around and attaching to create hanging loop at end. 

Mount one flower front with glitter center to flower without glitter center so petals are alternating.  Mount to hanging piece of wire in open area of bezel, then mount second flower with glitter center to back of first two, covering wire.   This allows the poinsettia to “float” in the center of the bezel opening. 

Here are the links to the other amazing artists participating in this hop - 

Friday, Nov. 8
Saturday, Nov. 9
ICE Resin site  http://wp.me/p1MCno-2W3 
Jen Cushman  http://wp.me/p1lhEq-Gb
Sunday, Nov. 10
Lesley Venable 


Friday, June 28, 2013

Patriotic Basket Embellishment with ICE Resin®


My latest design for ICE Resin® is this patriotic basket embellishment!  Find out how I created this piece on the ICE Resin® blog - http://iceresin.com/icequeen/2013/06/patriotic-basket-embellishment/

Happy Fourth of July! - Cindi

Sunday, March 31, 2013

Faith is a Bird Mixed-Media Pendant


It is such an honor for me to be part of the ICE Resin® Special Projects Team.  I love creating with their resin and their other wonderful assortment of creative ephemera!   And I really enjoy how the resin works so well with some of other favorite products, like Makin's Clay which I used to create these tiny birds eggs for the nest. My latest project is a celebration of spring - it's a multi-dimensional, mixed-media pendant inspired by the quote from a Cosmo Cricket Tiny Text sticker verse - find the instructions here on the ICE Resin® blog - http://iceresin.com/icequeen/2013/03/faith-is-the-bird-a-mixed-media-pendant-by-cindi-bisson/


Wednesday, March 27, 2013

Captured Ocean Pendant

The latest episode of my series "Behind These Eyes" is now live on the When Creativity Knocks website - learn how I made this "Captured Ocean" pendant with ICE Resin®, Rit Liquid Dye and more - http://whencreativityknocks.com/mycraftspace/m/videos/view/Behind-These-Eyes-Ocean-Pendant


Sunday, February 17, 2013

Sea Turtle Pendant with Connie Crystal & ICE Resin

Find out how I combined products from some of my favorite manufacturers to create the sea turtle pendant - the tutorial is here on the Connie Crystal blog! 

P.S.... Yes, I am dreaming of summer days already! - Cindi

Saturday, February 9, 2013

Love Notes Keepsake Treasure Box


Mixed-media galore are used on this treasure box for special keepsakes - and check out the cute little poem ICE Resin® wrote to go with it on their blog post today!    ICE Resin®, mica, Bella Dames papers, Spellbinders™Imperial Gold dies, Expo International trim, Earth Safe Finishes Shimmer Opaque and Connie Crystals - This box has it all!  - Cindi

Monday, February 4, 2013

"Heart on Your Sleeve" Cuff Bracelet

Good bye January and hello February!  Another month closer to SPRING!  It's time for the monthly Designer Craft Blog Connection hop!  This month our theme is "Love".  Be sure to follow the link in the column on the right to see what other "lovely" projects the designers are sharing this month! Also, in celebration of March being National Craft Month, Julie McGuffee is going a giveaway of a selection of Fabscraps products featured on her show Scrapbook Soup!  And next Monday, be sure to pop in and see what the participating designers are sharing as part of the manufacturer challenge this month sponsored by Buttons Galore & More.  - Cindi

Materials:

Industrial Chic™ by Susan Lenart Kazmer™ changeable cuff bracelet
ICE Resin®, Jewelers Grade Molding Putty, Opaque Silk Ribbon
Earth Safe Finishes™ Gold Shimmer Opaque
ScraPerfect Best Glue Ever
Jacquard Pearl Ex Powdered Pigment - Micropearl
Filigree heart charm
Jewelry Pliers

Instructions:

ICE Resin’s® molding putty should come with a warning - it’s addictive!  One of my many molds was made by mixing two equal parts of the putty components and inserting a heart filigree charm.

Mix ICE Resin® according to manufacturer instructions.  Add Micropearl Pearl Ex Powdered
The result is a pearlized finish in your molded piece (this is the back)
Pigment in small amounts until desired opacity is achieved.  Pour into mold Let cure.


Use finger tip to apply gold Earth Safe Finishes™ Shimmer Opaque to the raised filigree areas on the molded heart.


Unscrew and remove elements from top of changeable cuff bracelet.  Set aside for another project.

Use jewelry pliers to cut screw back to approximately 1/8” from bracelet.

Cut length of wide red opaque silk ribbon to fit cuff.

Apply Best Glue Ever to center of bracelet, horizontally across entire surface.  Let dry until clear, yet still tacky. 

Mount ribbon, pushing screw through center.

Apply Best Glue Ever to center of bracelet around screw.  Let dry until clear, but still tacky.

Press molded heart onto center of bracelet, using light force to push screw into back of resin, and adhering to glue.


Saturday, February 2, 2013

Connie Crystal Valentine Key Ring

Find out how I used Connie Crystal and ICE Resin products to create this Valentine key ring (or pendant!) at the Connie Crystal blog:  http://sparklebycc.com/be-mine-valentine-key-ring/

“Escape” Lanyard Holder


Designed for Connie Crystal 

by Cindi Bisson 
Behind These Eyes™
www.fatcatcreations.blogspot.com


Tropical colors, flowers, and a reminder to “Escape” adorn this sparkling mixed-media badge holder I wore at the recent CHA trade show in Anaheim. 

Supplies:

Connie Crystal - 2.5” rectangle crystal, quartz rosebud beads, aquamarine rectangular seashell beads, 8mm red crystal beads,
ICE Resin Silk Ribbons
Graphic 45 Tropical Travelogue Seaside Holiday paper
JudiKins Diamond Glaze
Jump rings, eye pins, alligator clasp for badge holder, jewelry pliers, brass leaf charms, brass chandelier charm, scissors, needle

Instructions:

Measure and cut silk ribbons to desired length.

Trace rectangle crystal over “Escape” on patterned paper.  Cut out and mount to flat back of crystal using JudiKins Diamond Glaze.  Seal outside of paper with glaze.  Let dry.

Use pin to push through holes in crystal and paper.

Add large jump ring to bottom of rectangle crystal, add alligator clasp.

String red crystal, aquamarine seashell bead, then quartz rosebud onto eye pin.   Repeat to create 2.

Place 4 small brass leaf charms onto 4 small jump rings, mount beneath rosebud.

Add jump ring to top of rectangle crystal, add brass chandelier charm. 

Mount two beaded pieces to chandelier charm. 

Add jump ring to end of each beaded piece, and add to silk ribbons.

Friday, December 7, 2012

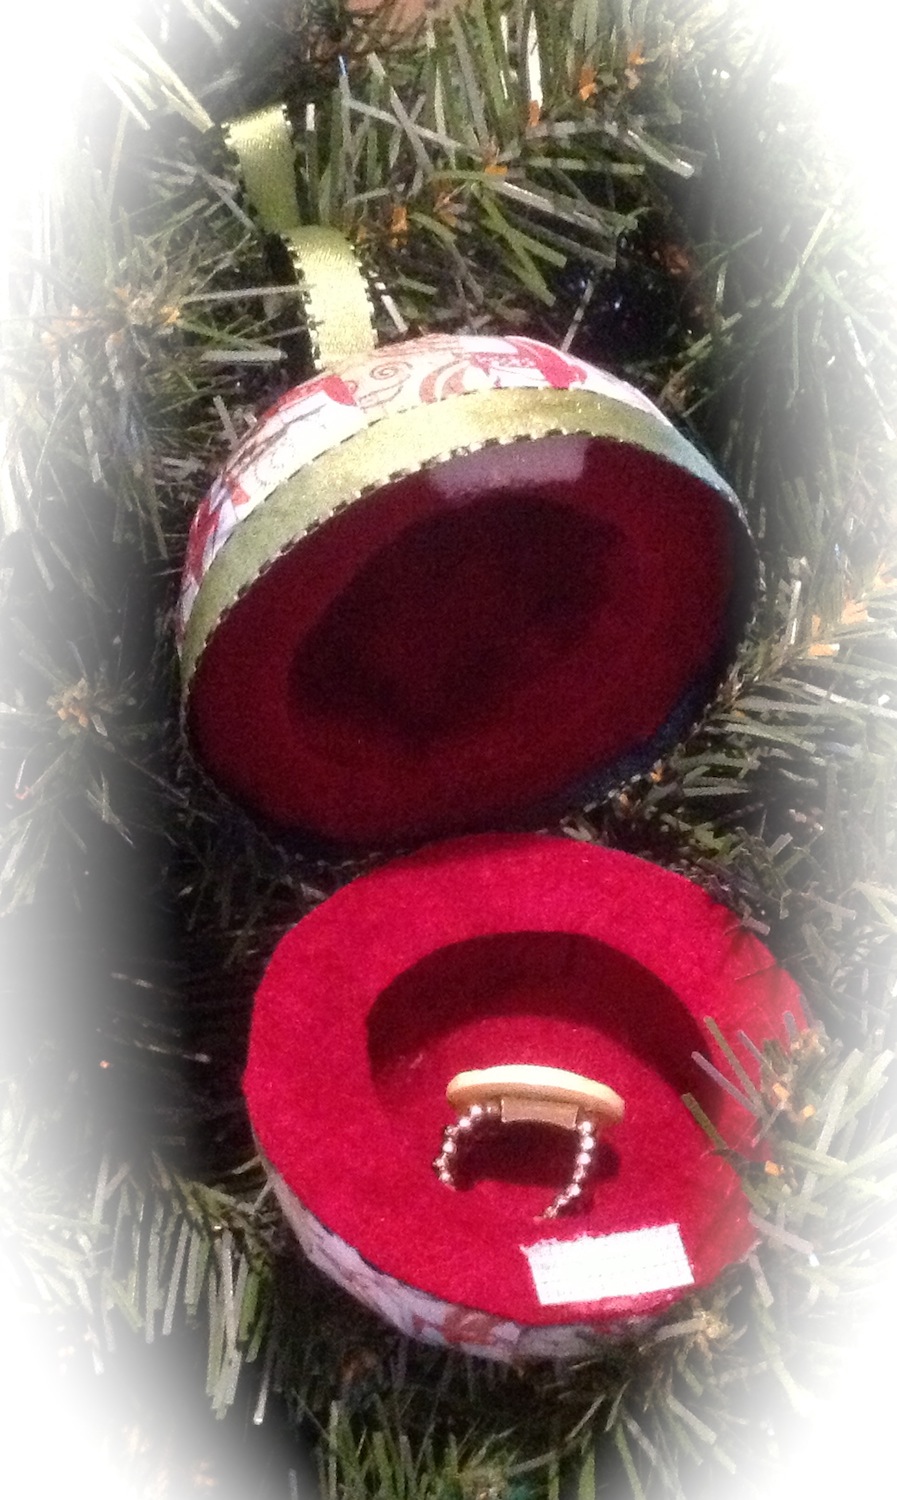
Holiday Ornament Gift Box


A 3” Smoothfoam ball is the base of this ornament which also serves as a gift box for a small treasure.

 Materials: 

Smoothfoam 3” ball
Plaid Mod Podge
Connie Crystals - blue, red
Silver wire
Foam brush
1/4” Ribbon
Spoon
Reindeer paper from BasicGrey Blitzen Collection
Westcott Premium TrimAir Titanium Paper Trimmer
Westcott Craft Titanium Bonded Non-Stick Scissors
Westcott Craft Hobby Knife
Red felt
Velcro Brand Sticky Back Fasteners

Instructions:


Carefully cut ball in half with craft knife.

Use a spoon (grapefruit spoon makes it easier as it has a grooved edge) to hollow out inside of both halves of ball.

Cut 1/2”  x 2” strips of patterned paper and Mod Podge onto top and bottom outsides of ball, overlapping each piece slightly.  Let dry. 

Cut 1 1/2” strip of wire, add small blue crystal bead and medium red crystal bead and insert through bottom center of ball.

Cut 4” strip of wire, add medium red crystal bead, medium green crystal bead, and small blue crystal bead.  Insert through top center of ornament.  Create loop at end to attach ribbon.

Cut felt to fit in bottom of both halves, mount.  Cut strips of felt to fit around inside of balls, mount against base piece of felt in each half.

Cut ribbon to wrap around center of ornament.  Glue ribbon in place on bottom of TOP of ornament,
extending downward so it will cover the edge of the bottom half when the ornament is “closed." 

Mount 1" strip of ribbon vertically along back center of ball (this will be your “hinge").


Mount small piece of sticky backed Velcro to inside center front of box to hold ornament closed. 


Creating hand-made ornaments each year is part of our family tradition - why not start your own tradition, and collection, this year? - Cindi

Sunday, October 28, 2012

Tin Type Tyle Coaster with KellyCraft's Get-it-Straight Laser Square


I have been having fun experimenting with my Get-it-Straight™Laser Square!  This time I combined products from ICE Resin®, Industrial Chic, ImpressArt® and Westcott®.
My latest project was featured on October 8th at their blog - You can find the complete instructions here.

The Get-it-Straight™Laser Square really makes it so much easier to align your crafts - no matter what medium you work with - give it a try!  - Cindi

Thursday, September 20, 2012

Jewels of Autumn Floral Broach on the Connie Crystal Blog

My first project featuring products from Connie Crystal has been posted on their blog.  As you know, I like to think outside the box a bit, and this broach is no exception.  Jewelry findings become part of the petals, burlap is die cut with an Eileen Hull Sizzix die, and shredded metallic ribbons from ART Mechanique fluff it up a bit..... find out more at the Connie Crystal Blog.  And while you are there - be sure to check out some of the other creative projects being shared by designers!   - Cindi

 LOVE this fun and spooky pendant created by Connie Crystal Design Team member Laura!   Check out their blog to find out how she created it!  

Tuesday, September 18, 2012

ICE Resin Layered Swirl Gothic Pendant


I've been having more creative fun with my ICE Resin and EarthSafe Finishes.  This time I've created a gothic style pendant for ICE Resin's Technique Tuesday series.  View the latest edition of Creatively Crafty with Cindi Bisson to find out how to recreate this technique at the ICE Resin blog.

Sunday, August 12, 2012

Industrial Chic Blog Hop - "Love Is" Book Pendant

The minute I opened my surprise package for the Industrial Chic Blog Hop, I knew I wanted to create a book pendant with these great metal hearts!   For a tutorial on how to create a heart-shaped book pendant of your own with these fun pieces from the Industrial Chic collection, view my latest episode of Creatively Crafty with Cindi Bisson here

This fabulously inspiring blog hop has been packed full of projects in July and beginning again on August 10th, and the next several days are no exception!   For a look at the pieces created by the artists participating this month, visit their blogs:

> 10 Barbe St. John http://barbesaintjohn.blogspot.com/
> 11 Cheryl Bodkin Waters http://blog.artsyfindings.com/
> 12 Cindi Bisson http://fatcatcreations.blogspot.com/
> 13 Gretchen McHale http://www.studio320jewelry.com/blog/       
> 14 Jenny Barnet Rohrs http://www.crafttestdummies.com/
> 15 Kari McNight http://backporchartessa.blogspot.com/
> 16 Lindsay Obermeyer http://loops.typepad.com/
> 17 Seth Apter http://thealteredpage.blogspot.com/
> 18 Suze Weinberg http://suzeweinberg.typepad.com/
> 19 Tami Bayer http://www.tamibayer.com/
> 20 Theresa Cifali http://theresacifali.com/
> 21 Tracie Stivers Lampe http://www.radicalrecycks.com/BlogRetrieve.aspx?BlogID=7528
> 22 Traci Bautista http://kollaj.typepad.com/
> 23 Jen Crossley http://amarkintime.blogspot.com/
> 24 Eileen Hull http://www.eileenhull.blogspot.com/
> 25 Pam Carriker http://pamcarriker.com/blog/
> 26 Sandy Martin http://sweetpeajewelry1.blogspot.com/

If you missed any of July's projects, you'll find them here! 

> 6 Ken Oliver http://vertigographic.com/TurnHeads/projects-and-blog/
> 7 Vicki O'Dell http://www.vickiodell.com/
> 8 Cindy Cima Edwards http://www.cindycima.com/
> 9 Elena Lai Etcehverry http://thetravelingprincess.blogspot.com/
> 10 Jen Osborn http://www.themessynest.com/
> 11 Wanda Eas http://craftymule.blogspot.com/
> 12 Terri O http://www.supersimplewithterrio.com/
> 13 Susan Weckesser http://mysweetearth.blogspot.com/
> 14 Tracy Weinzafel http://www.tracywburgos.typepad.com/

I hope you enjoy the projects in the hop and are inspired to get creative yourself!  Industrial Chic products are found at Michael's stores and the selection is truly eclectic and amazing!


Saturday, August 11, 2012

Spellbinders & ICE Resin - Technique Tuesday Tutorial!

I've been away for the week on vacation with my family, but I wanted to share a new Creatively Crafty video project shared on the ICE Resin blog on August 7th.  For this Technique Tuesday tutorial I combined Spellbinders dies, ICE Resin products, Blumenthal Lansing buttons and more to create unique molds and what I call 'Antiqued Resin'.   Find out how here:   http://iceresin.com/icequeen/2012/08/fantastique/

Until next time, happy crafting and remember to "Dare to be Different" - Cindi

Tuesday, July 24, 2012

Golden Glamour Brooch with Spellbinders & Ice Resin

I've got a new project posted on the ICE Resin blog!  I made molds using ART Mechanique Jewelers Grade Molding Putty and Spellbinders Nestabilities dies and then created jewelry using ICE Resin.  This gold leafed brooch with a large faux gemstone center from Plaid is the first of many projects I'll be sharing.  While you are at their site, be sure to check out the amazing creations from their Creative Team!

Until next time.... remember to "Dare to be Different!" 
- Cindi


Friday, June 29, 2012

ICE Resin + Spellbinders = a Purse with Personality


My latest project for ICE Resin is part of a special assignment..... Spellbinders and ICE Resin are now cross-promotional partners and we are thrilled to be using their products together in our creations.   And of course I had to incorporate my latest obsession, metal stamping with ImpressART metal stamps.   You can find complete instructions and photos of all sides, and the many techniques I used for this mixed-media, altered wooden purse here at the ICE Resin blog.

Wednesday, June 13, 2012

Cherry Blossoms in ICE Resin!

I've got a new project featured on the ICE Resin blog today featuring two of the most versatile mediums I enjoy designing with - ICE Resin and Makin's Clay.  I used a bezel and ribbons from the ART Mechanique line, combined with Makin's Clay cherry blossoms on a real twig, ICE Resin and Asian coins.