1 Cindi Bisson McGee - Behind These Eyes : Christmas
Showing posts with label Christmas. Show all posts

Thursday, December 18, 2014

Duck Commander® & Makin's Clay® Ornaments

Have friends or family that love to watch Duck Dynasty® or just love the Robertson family values? 
Make them a fun set of holiday ornaments to trim their tree with Makin's Clay® and Duck Commander® stamps from KellyCraft™.

Materials:

KellyCraft™
Duck Commander® Wood - Faith, Family, Ducks
Duck Commander® Wood - Duckaholics Anonymous        
Duck Commander® Clear Polymer Set 1
KellyCraft™- Get-it-Straight™ Laser Square
                     - Multi-Mat™
Makin's Clay® - White
Makin's Professional® Ultimate Clay Machine®
DecoArt® Metallic Lustre™ - Gold
Black Staz-On Inkpad
Westcott® Titanium Bonded Non-Stick scissors
Jute twine, ribbons or dyed fabric strips

Instructions:

1. Remove white clay from packaging and use Ultimate Clay Machine® to roll to approximately 1/8" thick.  Place on Multi-Mat™ (the non-stick, self-healing Multi-Mat™ is the perfect surface for working with the clay!).

2. Ink stamps with black Staz-On ink and stamp onto clay.

3. Use star cutters to cut around stamped images.

4. Use duck cutter to cut shape.

5. Ink "Faith Family Ducks" stamp with black ink.  Use Get-it-Straight™ Laser Square to align stamping and cover surface of duck shape.

6. Use straw to make holes for hanging ornaments.

7. Use fingertip to apply gold Metallic Lustre around outside edges of stars, allowing some to overlap onto ornament front, and apply sparingly over surface of duck ornament over stamped text.

8. Add jute twine, coordinating ribbons or dyed fabric strips (I dyed white cotton sheet fabric with Rit Dye to create these strips - I often use excess dye used for other projects to dye extra fabric to use for ribbon in future projects).


Wednesday, December 3, 2014

Peace in the Evergreens Etched Glass Votive Holder

When you light a candle in this etched glass votive holder embellished with real evergreens you’ll bring a warm holiday glow to your mantle. I found the original idea of adding evergreens to a candle holder in a Facebook post and decided to give it a try. My version features an etched glass votive with PEACE stenciled in metallic paint to soften the glow of the candle. The original post was just photos – I’ve included stepped-out instructions and some tips on what worked, and what didn’t, to make the process a bit easier for you to recreate.  
 

Materials: 

  • Glass votive holder 
  • etchall® Etching Cream 
  • DecoArt® Dazzling Metallics® paint – Shimmering Silver 
  • DecoArt® Americana® Gloss Enamels® Reusable Stick-On Stencils™ – Inspiration 
  • Design Master® Tack 2000 Spray Adhesive 
  • Westcott® Titanium Bonded Scissors 
  • Tea light candle, or battery operated tea light candle 
  • Fresh evergreens
  • Foam brush, fine paint brush
  • Silver ribbon 
 
Instructions: 


  1. Coat outside of votive holder with etchall® etching cream. Let set 15 minutes.  
  2. Use brush to return most of etching cream to the bottle. Rinse to remove remaining cream. Dry votive holder. 
  3. Use stencil to paint “PEACE” with silver paint onto etched votive. Let dry. 
  4. Break evergreens into small pieces.  In a well ventilated area, spray with Tack 2000 spray.   
  5. Place evergreens around votive surrounding PEACE.  TIP – To help evergreens stick to the votive, I found it helpful to place a piece of parchment paper or a transparency over the evergreens and press with my hand until they stuck. Another word of advice – I thought I’d try using quick grab tacky glue to mount the evergreens – this did not work – the spray adhesive made it much easier. 
  6. Trim bottoms of evergreens at base of votive.  Insert candle and watch the peaceful glow among the evergreens. TIP – the fire danger is minimal since the evergreens are on the outside of the glass votive holder, however, if you want to be even safer, use a battery operated tea light candle instead of a real candle.  
  7. BUT WAIT…. THERE’S MORE….. SO NOW FOR THE CRAFT FAIL PART…… I lit my candle
    and set this pretty votive holder on the mantle.    When I came back half an hour later, the heat from the candle had caused the evergreens to pull away from the glass. Drat!  On to plan B – a pretty piece of silver ribbon wrapped and tied around the evergreens to hold  them in place.  You still get the effect of the evergreens, but no worries about them falling off lol! The moral of the story….. the spray adhesive still makes it easier to hold the evergreens in place while you tie the ribbon – so step 4 is still worthwhile – just add some ribbon as a back-up.

Monday, December 1, 2014

Decoupaged Ornaments Cluster Swag

The theme for this month's Designer Craft Connection blog hop is "last minute" holiday decorations.  This simple cluster swag is easy to make with just a few materials.  You can use patterned paper, fabric, or decorative holiday napkins like these I found in the $1
bin at the local craft chain store!   

Be sure to click through the Designer Craft Connection link in the right column to see what other projects participating designers are sharing! 

Materials:

Three 4" Smoothfoam™ balls
FloraCraft SimpleStyle™ Burlap Garland
Beacon Adhesives® Fast Finish Decoupage 
Aleene's® Fast Grab Tacky Glue 
Jute 
Foam brush


Instructions: 

1) Tear decorative napkins into assorted pieces about 2".   Pour Fast Finish Decoupage in bowl and use foam brush to apply to each Smoothfoam™ ball, then apply napkin pieces to ball, leaving hole in ball open, overlapping to cover the balls.  Coat surface each covered ball with Fast Finish Decoupage to seal.  Let dry. 

2) Cut 3 strands of jute 16", 3 strands 13" and 3 strands 10".  
Squeeze Fast Grab Tacky Glue into hole in ball, twist ends of each group of jute strands, insert into hole (use tip of scissor if needed to push strands into hole).  Let dry. 


3) Make large bow from burlap garland.   Insert piece of wire through back of bow loop and twist to create hanger loop.  Tie ends of jute together and tie to wire loop on back of bow.   


Sunday, December 8, 2013

Flannel Yo-Yo Heart Ornament

Here's another quick holiday tree decoration I created for Cindi's Simple Solutions at
When Creativity Knocks!  Clover's heart yo-yo maker, and Blumenthal Lansing buttons made it easy! Find the instructions here.


Tuesday, December 3, 2013

Burlap & Twine Holiday Tree Decorations


This week I'm sharing two ornaments with a rustic, country Christmas feel.  You can find instructions for this first one on the Smoothfoam blog.     Instructions for the smaller twine ornament with the cute Blumenthal Lansing snowflake button can be found in Cindi's Simple Solutions at When Creativity Knocks.  


Friday, December 7, 2012

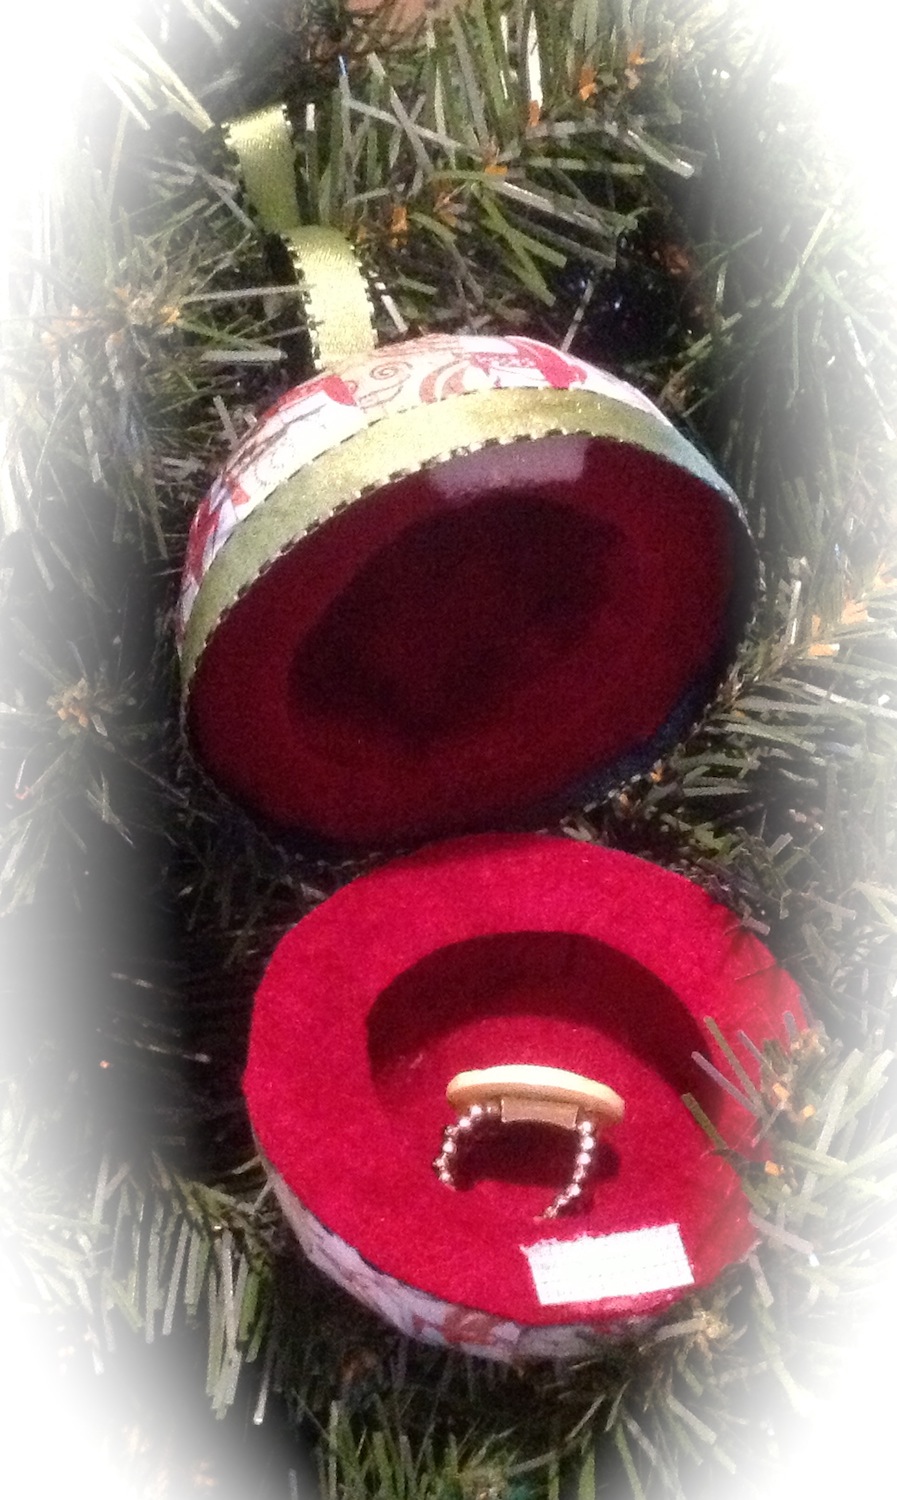
Holiday Ornament Gift Box


A 3” Smoothfoam ball is the base of this ornament which also serves as a gift box for a small treasure.

 Materials: 

Smoothfoam 3” ball
Plaid Mod Podge
Connie Crystals - blue, red
Silver wire
Foam brush
1/4” Ribbon
Spoon
Reindeer paper from BasicGrey Blitzen Collection
Westcott Premium TrimAir Titanium Paper Trimmer
Westcott Craft Titanium Bonded Non-Stick Scissors
Westcott Craft Hobby Knife
Red felt
Velcro Brand Sticky Back Fasteners

Instructions:


Carefully cut ball in half with craft knife.

Use a spoon (grapefruit spoon makes it easier as it has a grooved edge) to hollow out inside of both halves of ball.

Cut 1/2”  x 2” strips of patterned paper and Mod Podge onto top and bottom outsides of ball, overlapping each piece slightly.  Let dry. 

Cut 1 1/2” strip of wire, add small blue crystal bead and medium red crystal bead and insert through bottom center of ball.

Cut 4” strip of wire, add medium red crystal bead, medium green crystal bead, and small blue crystal bead.  Insert through top center of ornament.  Create loop at end to attach ribbon.

Cut felt to fit in bottom of both halves, mount.  Cut strips of felt to fit around inside of balls, mount against base piece of felt in each half.

Cut ribbon to wrap around center of ornament.  Glue ribbon in place on bottom of TOP of ornament,
extending downward so it will cover the edge of the bottom half when the ornament is “closed." 

Mount 1" strip of ribbon vertically along back center of ball (this will be your “hinge").


Mount small piece of sticky backed Velcro to inside center front of box to hold ornament closed. 


Creating hand-made ornaments each year is part of our family tradition - why not start your own tradition, and collection, this year? - Cindi

Wednesday, December 5, 2012

Snowflake Lights with JudiKins & Spellbinders

In the latest episode of WCK, we share how to use Spellbinders & JudiKins products to create sparkling snowflake lights for your holiday decorating - you can watch it here.

My newest product review is also live - JudiKins Diamond Glaze.

And finally, for today at least, here's my latest Cindi's Simple Solutions project for WCK - Countdown to Christmas night shirts or t-shirts featuring the KellyCraft Get-it-Straight Laser Square and Tulip Fabric Markers from I Love to Create! 

I hope you are inspired to Cre8time for a little holiday crafting soon! - Cindi

Sunday, November 18, 2012

Holiday Shopping List - The Stylish Way

The countdown to the holidays is on - and for many people the real mad rush of shopping kicks in this week as we approach the infamous "Black Friday" day after Thanksgiving.    This year, I decided that instead of bringing a piece of notebook paper with my holiday shopping list - I'd create a small, purse sized notebook that I could keep my list in, tuck receipts or coupons into, etc.  I can even use it from one year to the next until it's filled.   When I whip out this list, I'm hoping this festive little book will make me stop and reflect on the true joy of giving - or at least remind me that soon enough I'll be back in my studio busily creating, which is much less stressful than shopping to me personally, when the holidays are over!  


Materials:

Darice 3" x 4" notebook 
Theresa Collins Noel Collection patterned papers and chipboard embellishments 
Spellbinders™ Grand Calibur® & Spellbinders™ Shapeabilities® Poinsettia set
Red cardstock
JudiKins Diamond Glaze
Clearsnap ColorBox Archival Dye Cat's Eye inkpad - Red Devil
The Robin's Nest "Champagne" Dew Drops embellishments
ScraPerfect The Best Glue Ever
1/2" Gold Organza ribbon
Westcott Craft Titanium Bonded Non-Stick Scissors

Instructions: 

Following manufacturer instructions, cut and emboss poinsettia using Grand Calibur® & Spellbinders™ Shapeabilities® Poinsettia set.   Apply thin coat of JudiKins Diamond Glaze to each layer of petals before assembling flower. 

Determine how you'd like to layer the papers for cover and back of book.  The assortment of designs in the Theresa Collins Noel Collection all coordinate well so the hardest part is deciding which ones you want to use from the great assortment... Ink edges of all pieces with Clearsnap Red Devil inkpad.   Mount with Best Glue Ever.  Let dry.

Dovetail cut one end of gold organza ribbon, mount to bottom front of book, approximatley 1/2" from bottom edge, with dovetail extending slightly off edge.  Wrap around to back of book and mount.  

Mount chipboard "GIFTS" embellishment over gold ribbon.


Arrange poinsettia in bottom left front corner of book.  Mount, extending off book, and remove outer petals. 

Use JudiKins Diamond Glaze to mount gold Dew Drops embellishments as center of poinsettia, and layer over "GIFTS" chipboard embellishment.  Let dry.

Happy shopping and may you all take a moment to reflect on the joy of giving this season! - Cindi