1 Cindi Bisson McGee - Behind These Eyes : resin
Showing posts with label resin. Show all posts

Thursday, August 13, 2015

“STAY STRONG” Rhinoceros/Hercules Beetle Key Chain - ETI Blog Hop


“STAY STRONG” RHINOCEROS/HERCULES BEETLE 
RESIN KEY CHAIN 

This month, the Designer Craft Connection is holding an Environmental Technologies, Inc. - ETI - Blog Hop. Be sure to follow through the DCC link in the column on the right to see what other unique projects the participating designers are sharing.    

ETI is also offering a great Rafflecopter give-away package - enter below.  Readers have to comment on one or more blogs to enter. The more comments you post, the better chance you have to win.

a Rafflecopter giveaway

Jared Padalecki, star of the TV series Supernatural, has gotten a lot of press lately for his honesty and support of others who are suffering with anxiety, depression, thoughts of suicide, etc.  His message of ALWAYS KEEP FIGHTING (#alwayskeepfighting) is growing in popularity.  Facebook pages and Twitter accounts for STAY STRONG Jared Padalecki are growing in numbers as fans flock to support both Jared, and his message.  I think it's a 
wonderful thing when a celebrity chooses to share their own personal fight with depression and anxiety with the world in hopes of helping others.   I think Jared’s message has touched me in particular because in the past few months my own family faced a very frightening situation that drove home the importance of learning the signs of depression, always watching for those signs in those you love, and if you see any signs, or if they reach out to you for help - pay attention - help them in any way you possibly can.  Depression is a REAL illness, no one is immune, it can strike ANYONE of ANY AGE, and can lead to unimaginable circumstances if left untreated.  We were given a second chance, but not every family is that lucky.  

I made this key chain as a reminder of the importance of the message STAY STRONG.  To me, this Rhinoceros/Hercules Beetle is a symbol of strength - because he looks fierce, and his name itself brings to mind an animal of incredible strength.   When I first found him, (and yes, I know he’s a male because I Googled it to find out what exactly he WAS when I found him), he was a beautiful shade of pale blue/green/gray, much like the one in this photo I found on the National Wildlife Federation website when I was trying to find out more about this impressive insect.  Unfortunately, his beautiful shell seems to have had some reaction to the resin itself and darkened to almost black, but even without his color he is still an amazing example of natures diversity.   I hope the recipient will carry him with his keys in pride and will always remember to STAY STRONG himself. 

Materials:

ETI - Clear EasyCast® Resin
      - MC Poly Mold 2" x 1 1/2" x 1" deep
      - Mold Release Spray 
ImpressArt™ Newsprint Metal Stamp Set, Hammer, Steel Block 
MercArt® Pewter Sheet 
Rhinocerus/Hercules beetle (no beetles were harmed in the creation of this project - this big guy was found in our yard when he had already crossed the rainbow bridge - always let insects dry thoroughly, this guy was placed in a safe place and left to dry for about 3 weeks, before attempting to seal in resin
DecoArt® Americana® Multi-Surface Satin™ acrylic paint - Black Tie 
Paper towel
Small disposable paintbrush 
Emery board

Instructions:

Stamp “STAY STRONG” onto pewter sheet, trim around verse.  Apply black acrylic paint over stamped area, being sure paint gets into impressed letters.  Wipe with paper towel to remove paint from surface, allowing it to remain in stamped areas.  Let dry. 

Mix very small amount (I mixed about 1 tsp total) Clear Casting Resin according to manufacturer instructions. 

Use disposable paint brush to coat stamped metal piece, front and back, set aside to cure. 

Use disposable paint brush to coat beetle top an bottom.  Set aside to cure. 

When beetle and stamped metal are thoroughly dry, it’s time to immerse them into a block of resin.  


Begin by spraying the small rectangular mold with mold release spray.

Mix enough resin to fill your mold to about 1/3 full.  


Pour resin into mold. 

Carefully insert beetle, top down (the bottom of the 
mold will be the top of the finished piece).  Let
cure. 


Mix enough resin to fill your mold the remainder of the way. 

Carefully insert metal verse, face down (the bottom of the mold will be the top of the finished piece), adjacent to the beetle.  

Carefully pour in resin over metal piece and covering beetle.  Set aside to cure.  

When fully cured, remove from mold.  (This was a bit of a challenge for me - but after trying the "freezer" trick twice - place in the freezer then remove - and with a bit of "strong" persuasion, the resin released from the mold.) 

Lightly sand edges on top and bottom to remove any sharp edges.   I like to use emery boards for this type of delicate sanding as they are easy to hold and you can see exactly where you are sanding. 


Use a drill to make a hole large enough for metal bead chain through one end of the rectangle.  Insert bead chain, add keys and close bead chain.  That’s it!  Your keychain is now a permanent reminder to STAY STRONG to matter what the circumstances may be! 
A Permanent Reminder to Stay Strong - and Always Keep Fighting! 


Saturday, December 13, 2014

Floral Impressions Pendant and Earrings

I'm excited to be a part of the ETI® and Ann Butler Designs™ blog hop today!   I created this "Floral Impressions" pendant and earring set with a variety of ETI products, and the impressionistic flowers were "painted" with Ann Butler's Iridiescents from Earth Safe Finishes.


Please visit each blog and leave a comment to be entered for the blog candy prize (US Residents only due to the liquids included in the prize package.) YES, a comment on EACH blog gets you an entry for the prize package shown below!  Share the fun with your friends!  We will pick a winner on Saturday the 20th and announced on the Ann Butler and ETI blogs.  Again, be sure to visit all the sites and leave a comment.  The prize package includes EasyCast, Jewelry Resin, Mold, Resin Spray, 2 Colors, and all 4 1" Faux Quilting Stamp Sets! 


Materials:

EnviroTex® - Jewelry Resin
                   - Jewelry Clay®
                   - Castin Craft Mold Release Conditioner
                   - EasyCast Resin Jewelry Mold                 
Ann Butler Designs™ Earth Safe Finishes Iridescents - Skylar, Limelight, Lipgloss
DecoArt® Glass Paint Markers™ - Fuchsia, Citron 
JudiKins™ Floral Fabric Patterns Cube 
Silver jewelry findings 
Pink dyed silk ribbon 
Jewelry pliers, wax paper

Instructions:

1. Following manufacturer instructions, mix EnviroTex® Jewelry Clay®.  

2. Spray mold with release conditioner, place jewelry clay in large oval and 2 small ovals.  Press silver ring into top of each oval, with top extending over oval to act as hanging loop - clay will adhere and hold in place.  

3.  Before clay sets and hardens, carefully remove ovals from mold.  Paint with one coat of Skylar Iridescents.  

4. Apply Lipgloss and Limelight Iridescents directly to floral image on stamp.   Stamp into each oval, pressing lightly to transfer image and leave an impression of the image in the clay.  Let clay dry and cure. 

5. Use markers to add highlights to the stamped flowers and leaves.    

6. Mix approximately 5cc EnviroTex® jewelry resin according to manufacturer instructions.  Place pieces on wax paper, and coat with thin layer of resin.  Let dry. 

7. Add silk ribbon to pendant, and add jewelry closures.  Add jump rings and french wires to earrings.  


Wednesday, July 25, 2012

A Book Review, CHA's Hot 20 and More from WCK


This week on WCK I reviewed Kristen Robinson's Tales of Adornment - find out what I thought of here.

For my Simple Solutions article this week, I share my thoughts of CHA's Hot 20 from the Innovations Sneak Peek event. 

Ana shares a cute birdhouse project featuring Elmer's decorative tapes and foam board in the latest episode.   And she reviews episode 4 and 5 of TLC's Craft Wars.

Until next time.... remember to "Dare to be Different!" 
- Cindi

Wednesday, June 13, 2012

Cherry Blossoms in ICE Resin!

I've got a new project featured on the ICE Resin blog today featuring two of the most versatile mediums I enjoy designing with - ICE Resin and Makin's Clay.  I used a bezel and ribbons from the ART Mechanique line, combined with Makin's Clay cherry blossoms on a real twig, ICE Resin and Asian coins.

Saturday, May 12, 2012

ImpressArt® Metal Stamps - Designer Craft Blog Connection Hop


I am so excited to be a part of this ImpressArt® Metal Stamps Designer Craft Blog Connection hop!  I received my product from ImpressArt®, opened the box and became almost immediately obsessed.  I have been adding metal stamped accents to almost every creative project I've made since receiving my product.  Today I'm sharing three jewelry projects featuring the lowercase Newsprint set of metal stamps, and assorted stamping blanks.   There are 3 projects, and I've included instructions and supplies for each - so I appreciate your patience with this long post :0).   Also, ImpressArt is hosting a great opportunity for you to win a fantastic prize package - The Grand Prize is valued at up to $120.00 and contains: 


        1- ImpressArt alphabet set of the winner's choice
        1- ImpressArt Steel Stamping Block, small
        1- ImpressArt Metal Stamping Hammer
        1- ImpressArt Stamp Straight Tape
        An Assortment of metal discs

To enter the contest, you must go to the following link and follow the directions:
https://www.facebook.com/pages/ImpressArt/155664424487844?sk=app_194975693850063
                                                       
I can promise you'll be seeing a lot more of my projects with metal stamping.  In the meantime, be sure to follow the Designer Craft Blog Connection link at the right to see what other creative projects have been shared by fellow designers!


Cobalt and Copper Pendant
Featuring Metal Stamps and Copper Offset Oval Washer Blank from ImpressArt®  


Materials:

ImpressArt® Design Stamp, Whimsy Heart Metal Stamp - Item #SC158-K-3MM
ImpressArt® Metal Stamping Blank, Offset Oval Washer w/Ring, 2” - Copper - Item #IAD12261
ImpressArt® Brass Metal Stamping Hammer - Item #SC711
ImpressArt® Stamp Straight Tape™ - Item #BC21-1520
ImpressArt® Steel metal stamping block
Cobalt glass beads, brown glass beads
ART Glitter - Cobalt Vintage Glass Glitter
Copper jewelry wire
Lumiere 3D Dimensional Metallic Paint and Adhesive from Jacquard Products - #219 Blue
Jewelry pliers, wire cutters, copper colored fiber, copper necklace closure finding, soft cloth


Instructions:

Cut two small pieces of Stamp Straight Tape™ and align on bottom of Copper Offset Oval Washer.  Holding upside down, stamp Whimsy Heart Metal Stamp radiating out from center opening in space repeatedly between tape.  From there, move each piece of tape in a radiating fashion and repeat stamping heart “upside down”. 

Use fingertip to apply small amount of blue Lumiere 3D Dimensional Metallic Paint & Adhesive over metal stamped hearts.  While paint is still wet, gently rub surface of copper with soft cloth, allowing blue paint to enhance stamped hearts. 

Use round end of hammer to gently distress outside edge of metal and around inner opening.

Apply thin lines of blue Lumiere 3D Dimensional Metallic Paint & Adhesive between each row of stamped hearts.  While wet, add cobalt blue vintage glass glitter.  Let dry.

Measure and cut copper colored fiber to desired pendant length.  Loop through ring on top of oval to hold in place.  String large blue glass bead onto fibers and directly to ring, tie large knot in fiber over glass bead. Add copper necklace closure.   Add 3 smaller descending sizes of cobalt and brown glass beads  to a piece of copper wire.  Arrange in opening and wrap around ring to hold in place.

© All images - Cindi Bisson - Behind These Eyes™

And on to Project #2 -

BLOOM Ring
Featuring Metal Stamps and Floral Stamping Blanks from ImpressArt® 

Materials:

ImpressArt® Alphabet Stamp Set, Newsprint Lowercase Stamp Set  - Item #SC1316-3MM
ImpressArt® Metal Stamping Blank, 5 Petal Flower with Ring Stamping Blank - Brass:  IAD12130 - TWO
ImpressArt® Brass Metal Stamping Hammer - Item #SC711
ImpressArt® Steel metal stamping block
Black Sharpie Marker
We R Memory Keepers Cropo-A-Dile Punch
Pearl Dew Drop embellishment from The Robin’s Nest
Jewelry pliers, wire cutters, soft cloth, E-6000 adhesive

Instructions:

Use lowercase Newsprint metal stamps to stamp two brass flower blanks - one letter on each petal, spelling out “BLOOM”.

Use wire tool to cut hanging ring from each charm.

Color stamped lettering with black Sharpie marker.  Gently rub
from surface of brass with soft cloth, allowing black to enhance
stamped lettering


Use jewelry pliers to gently bend petals upward and outward on one flower.

Gently bend petals of second flower backward.

Trace ring back onto scrap paper.  Cut circle of paper to cover ring back, adhere.  This ensures the silver toned metal from ring back doesn't show around brass flower.

      Use E-6000  Adhesive to mount flower with petals bent backward onto ring base, then mount flower with upward bent petals so that all petals show.  

Add pearl Dew Drop accent for center of flower. 

© All images - Cindi Bisson - Behind These Eyes™


And lastly, at least for today - Project #3 -

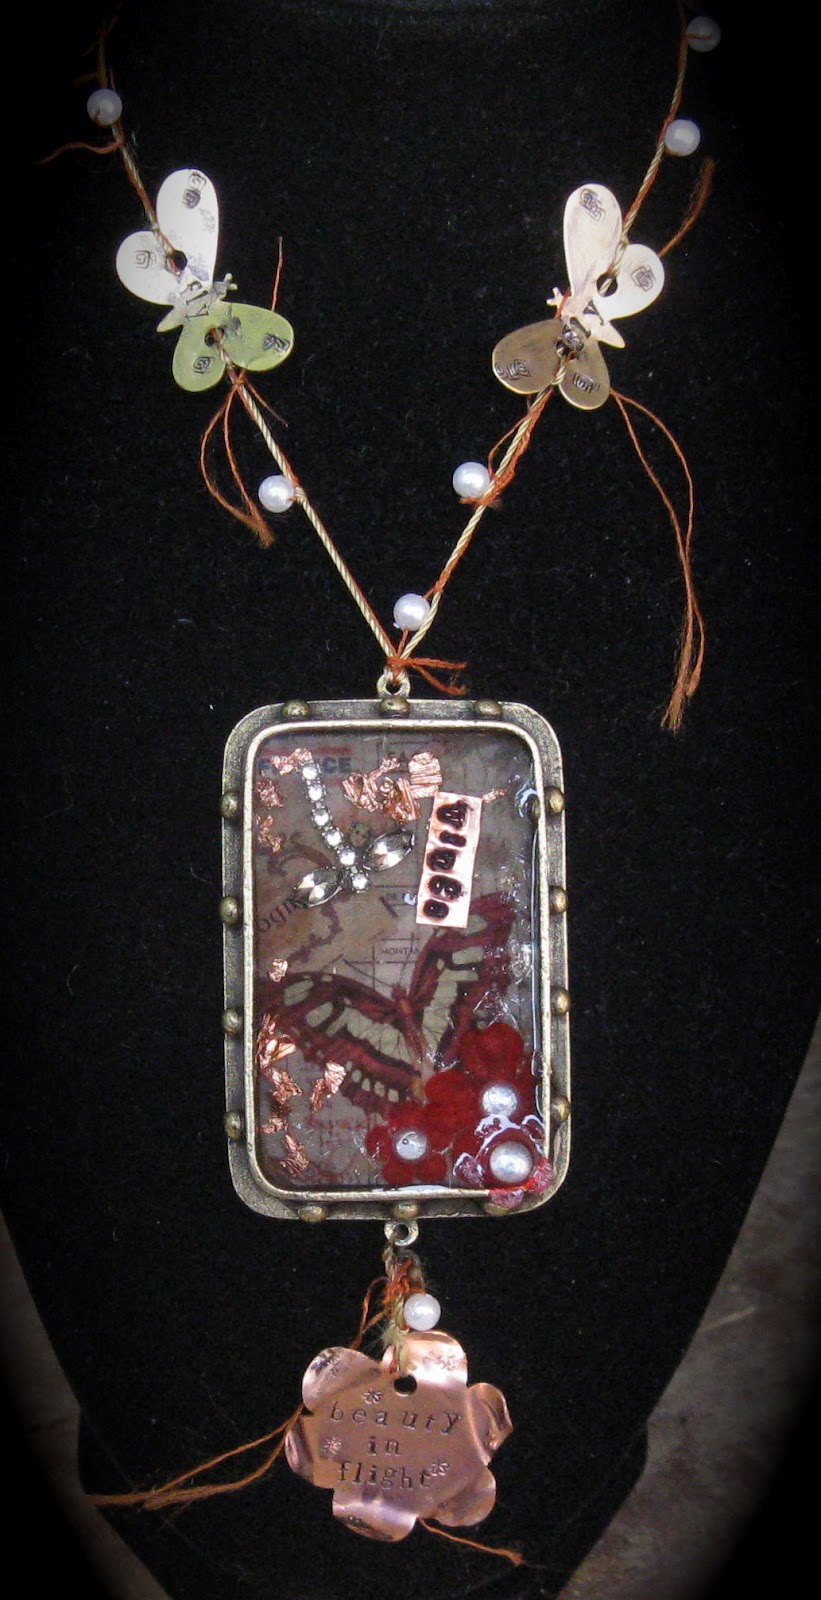
Take Flight Mixed-Media Pendant
Featuring Metal Stamps & Copper and Brass Stamping Blanks from ImpressArt® 

Materials:


ImpressArt® Alphabet Stamp Set, Newsprint Lowercase Stamp Set  - Item #SC1316-3MM
ImpressArt® Design Stamp, Square Swirl Stamp - Item #SC1510-P-3MM
ImpressArt® Design Stamp,  Whimsy Flower Stamp - Item #SC1514-K-3MM
ImpressArt® Metal Stamping Blank, Butterfly, 1 5/16” Brass - Item #IAD12142 - TWO
ImpressArt® Metal Stamping Blank, 6 Petal Flower, 1” Copper - Item #IAD12222
ImpressArt® Brass Metal Stamping Hammer - Item #SC711
ImpressArt® Steel metal stamping block
We R Memory Keepers Crop-A-Dile Punch
Black Sharpie Marker
Rectangular Brass Hobknob bezel from ICE Resin
ICE Resin
Pattered paper from Belles Dames Francaise flip book from ICE Resin
Pearl Dew Drops embellishments from The Robin’s Nest
Jewelry pliers, wire cutters, copper colored fibers, gold/brass toned floss/fibers, small pearl beads, repurposed rhinestones, mica flakes, copper flakes, small paper flowers, copper necklace closure finding, soft cloth

Instructions: 

Punch small hole near top of copper flower using Crop-A-Dile punch. 

Use lowercase Newsprint letter stamps to stamp “beauty in flight”, somewhat centered, onto copper flower.  Randomly stamp flower with Whimsy Flower stamp.

Punch two small holes approximately 1/4” apart, centered on each brass butterfly using Crop-A-Dile punch. 

Use lowercase Newsprint letter stamps to stamp “fly”, between punched holes.

On each butterfly top wing tip, stamp Square Swirl stamp three times in a row, radiating upward, allowing to overlap slightly.  Stamp each bottom wing once in lower corner.

Use black Sharpie to color each stamped blank, wipe with soft cloth to remove from face of blank, allowing black to enhance stamped areas.

Use jewelry pliers to gently bend the wings of each butterfly upward.  Also bend the petals of the copper flower randomly upward and downward to add depth.

Line rectangular bezel with patterned paper.  Sprinkle in copper flakes on left edge and mica flakes on right lower edge.  Arrange repurposed rhinestones into dragonfly shape above butterfly image on patterned paper.  Set two small paper flowers in lower right corner, with pearl Dew Drop centers.

On copper strip of metal, use lowercase Newsprint stamps to stamp “wings”.  Trim around word, color with black Sharpie and rub with soft cloth to remove ink from surface of copper strip.   Place into collaged bezel as shown.

Mix ICE Resin according to manufacturer instructions, pour into bezel.  While wet, add 3rd small paper flower, coated with resin, with Dew Drop center onto lower right outside corner of bezel, extending beyond the center. Cure overnight.

Measure and cut fibers to desired length.  String copper fiber with pearl bead accents approximately 1” apart, knotting to hold in place.  Add stamped butterfly accents to hanging fibers.  Add jewelry closure.  Measure and
cut fibers to hold copper flower beneath collaged pendant.  Add pearl bead, tie to stamped flower and tie to ring on filled bezel.

© All images - Cindi Bisson - Behind These Eyes™