1 Cindi Bisson McGee - Behind These Eyes : Craft Attitude
Showing posts with label Craft Attitude. Show all posts

Wednesday, February 18, 2015

Birdhouse Table & Chicken Wire Bird - FaveCrafts® Best Blogger Craft 2015 Challenge!


It was an honor to attend the recent FaveCrafts® Blogger Event at CHA in January!   When my box of swag from some of the event sponsors arrived, it was like Christmas all over again!  I received fabulous products from MD® Hobby & Craft - which are EXACTLY my style - a great assortment from Plaid®, items from Simplicity®, Clover®, and Prima® Bead.  

When I found out about this awesome Best Blogger Craft 2015 challenge to use products from one of the sponsors to create a unique creative project and submit it FaveCrafts - my mind instantly began to turn and churn and I knew I wanted to create something unique, and functional!

I love birds and birdhouses, so this Birdhouse Table & Chicken Wire Bird were a natural choice.    The table could be a functioning birdhouse, but it also works as a great side accent table for a plant, or on a porch next to a comfortable chair to hold a cool beverage, etc.  The little chicken wire bird is a totally unique accent piece to set on the table, or in pot with a pretty plant indoors or outside on a porch. 

I built this birdhouse from scratch and have included measurements - but of course you could buy a large pre-made birdhouse, cut the top off flat and create something similar for an easier option!  

Voting in this challenge/contest begins on February 25th and runs through March 4th.  I encourage you to visit the FaveCrafts site and vote for your favorite project - there are sure to be many amazing creative projects to choose from!!!   Here's the link - http://www.favecrafts.com/contest/Blogger-Contest

Materials: (items in GREEN were included in my swag package from FaveCrafts!)

Plaid® FolkArt® Home Decor Chalk Paint- Seaside Villa 
Plaid® Martha Stewart Crafts™ Multi-Surface Satin Acryilc Paint - Sandcastle 
Plaid® Outdoor Mod Podge®
EKSuccess® Inkadinkado® Stamp Set - Flower Icons 
Wrights® 5/8” Black ric-rac from Simplicity
MD® Hobby & Craft Metal Working Gloves 
MD® Hobby & Craft Brass Rolled Metal 
MD® Hobby & Craft Chicken Wire 
MD® Hobby & Craft Hobby Shears 
KellyCraft™ Get-it-Straight™ Laser Square & Multi-Mat™
Westcott® Titanium Bonded Non-Stick Scissors 
Craft Attitude™ Printable Craft Film 
Staz-On ink pad - Jet Black
Jax® Pewter Black 
Beacon® 527 Adhesive 
Repurposed wood 1/2” thick (I used old fence boards to create this birdhouse). 
Assorted carpentry tools - saw, staple gun, drill, safety glasses, large hammer, rag 
Paintbrushes 
Permanent glue stick

Instructions: 

Cut 4 pieces of repurposed wood (approximately 1/2” thick for all wood) 5” x 21”.  Nail
together to create center of birdhouse.  

Cut 2 pieces of repurposed wood 7” x 10”.

Cut 2 pieces of wood 4 1/2” x 5”.  

Cut 2 triangles 8” x 6 1/2” x 5.  Assemble  to create side portions of “roof”.  

Cut piece of wood 11” x 11”. 

Cut piece of brass metal 12” x 12” and 2 pieces 8” x 11”.
Place brass metal pieces on hard surface, hit with large hammer to distress.  

Apply Jax Pewter Black to all brass to add patina to age
distressed metal.   


Fold edges of each piece back 1/2” and use staple gun to mount to two slanted roof pieces. 

Mount 11” x 11” piece to top of birdhouse to create table top.  Fold edges of 12” x 12” metal piece back 1/2” and use staple gun to mount to flat 11” x 11” table top (staples on folded edge). 

Drill 3 evenly spaced 1 1/2” holes in center of birdhouse, and one in each slanted side roof piece. 

Drill 3/8” holes beneath each large hole.

Paint birdhouse with FolkArt® Home Decor Chalk paint.  Let dry. 

Paint 2 1/2” band of Sandcastle paint beneath each hole on
center of birdhouse.  Let dry.   


Ink birds on a branch stamp with permanent black ink.  Place Craft Attitude film onto Multi-Mat  and use Get-it-Straight™ Laser Square to help align separate rows of stamped bird images as shown.  

Cut into strips.  

Use permanent glue stick to mount stamped Craft Attitude to Sandcastle sections.


Cut black ric-rac and mount to top and bottom of each painted strip.  

Cut twigs and use Beacon 527 to mount in 3/8” holes.   

Coat all wood surfaces with outdoor Mod Podge.  


I first saw a chicken wire bird on Pinterest.  When I received the chicken wire from MD® Hobby & Crafts I knew I had to try to create
one myself.  I used several photos for reference, then hand molded/formed the bird. 


Friday, February 6, 2015

Smoothfoam™ Jumbo Conversation Hearts!

Everyone loves those little candy conversation hearts you can find everywhere around Valentine's Day (although the messages sure are different these days then when I was young lol!).  Learn how to make my jumbo version featuring DecoArt® Americana® Chalky Finish paint and Craft Attitude™ to decorate your home for Valentine's Day on the Smoothfoam™ blog here.

Monday, April 21, 2014

Craft Attitude™ Mother's Day Blog Hop - "Bee Happy"


I am thrilled to be a part of the Craft Attitude™ Mother's Day Blog Hop!  Be sure to follow the links below to see what other creative projects these amazing designers are sharing featuring Craft Attitude™ Film.   And now. let' me "bee-gin" sharing project ..

Remind mom to “Bee Happy” this Mother’s Day with this framed mixed-media home-decor accent featuring Craft Attitude™! 

Materials: 

Craft Attitude! Decor Attitude™ Printable Film 

Wooden picture frame 4” x 6”
Burlap 
Black & tan checked/gingham patterned paper 
Bee print cotton ribbon (Michael’s) 
Black paint, paintbrush 
Sandpaper 
Scissors 
Glue stick

Instructions: 

Paint frame with black paint and let dry. Lightly sand painted frame to achieve distressed/shabby chic effect.  (One of my favorite places to get picture frames to repurpose is my local Goodwill store - great assortment for great prices and  you are helping out those in need!) 

Cut 4” x 6” piece of black & tan checked paper. 


Cut 3 1/2” x 5” piece of burlap.  Gently remove some threads from left and right edges for a frayed effect. 


Download vintage bee image and size to 3 x 4 1/2”.  Follow manufacturer’s instructions and print onto Craft Attitude™ Decor Attitude™ film.  *Note - if printing text, be sure to reverse image before printing! Let dry 2 hours before proceeding to next step.

Coat printed image with glue stick, mount to center of burlap and let dry. 


Mount burlap with bee image to center of black & tan paper. 


Cut two strips of 4" bee ribbon. 

Mount bee ribbon at top and bottom of burlap, overlapping burlap, just above “Bee” and just below “Happy”.

Insert into distress painted frame. 

Check out more great projects featuring Craft Attitude™ from these Designers - 

Tues. April 22 - Amy Bowerman, http://pluckingdaisies.com 
Wed. April 23 - Lyneen Jesse, http://dreamingofcastles.blogspot.com
Thu. April 24 - Lindsay Obermeyer, http://loops.typepad.com/serendipity/
Fri. April 25 - Cheryl Boglioli, http://cherylswindow.com
Mon. April 28 - Debra Quartermaine, http://www.debraquartermain.com/ceoblog
Tue. April 29 - Jonathan Fong, http://jonathanfongstyle.com
An InLinkz Link-up

Monday, July 1, 2013

Designer Craft Blog Connection Hop - Celebrations!


It's July 1st!  Time for the Designer Craft Blog Connection Hop!  This month our theme was Celebrations - and although I originally shared these projects several days ago - they just fit so perfectly with this theme I just had to share them again here for new readers to discover!    Be sure to click the Designer Craft Connection blog hop button in the column on the right to see what the other talented participating designers are sharing with you this month!   Take time to CELEBRATE life! - Cindi


A PATRIOTIC CELEBRATION WITH
 CRAFT ATTITUDE™!

Creating a wide variety of patriotic themed serving pieces and decorations is easy with Craft Attitude™ products! 

I'm honored to be part of a group of amazing designers sharing their Patriotic creations featuring Craft Attitude™!   Here's a complete list with links of everyone participating, so be sure to check out what they've shared too!


Who & Where - Find Your Patriotic Craft Attitude™ Inspiration here!
 June 10: Jonathan Fong & Candie Cooper
www.jonathanfongstyle.com/blog/
http://candiecooper.typepad.com

June 13: Terri Sproul
http://terrisproul.blogspot.com

June 17: Eileen Hull
http://eileenhull.blogspot.com

June 20: Cindi Bisson
http://fatcatcreations.blogspot.com

June 24: Jen Goode
http://www.jgoode.com

June 27: Aunt Peaches
http://www.auntpeaches.com

July 1: Lorine Mason
http://lorinemason.com/blog/
Follow the Craft Attitude link in the right column of my blog to purchase Craft Attitude™
 products and get free shipping!

Materials:

Decor Attitude™!
Quilt Attitude™!
Scrapbooking Attitude™!
Inkjet printer
Basket
Plate
Muslin
Burlap
Jute
Blumenthal Lansing star buttons
Elmer's Craft Bond Spray Adhesive
Elmer's Craft Bond Glue Stick
Westcott Titanium Bonded scissors
Preprinted historical documents (optional)

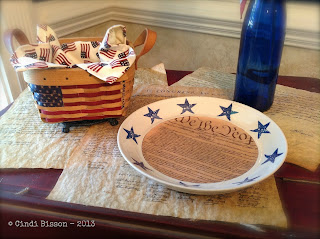
"America" Serving Basket


A plain, inexpensive basket gets some patriotic pizazz with Decor Attitude!   When I added this finished basket to my “collectable” brand name basics, it looked just as good!

Determine width of horizontal basket slats.   Size American flag image so that stripes are the same size as the basket slats.  Size lettering to spell out AMERICA with approximately 1/4” between letters.   REVERSE FLAG IMAGES AND TEXT and  print onto Decor Attitude! 

Note:  When designing this basket, I found it easier to work section by section, cutting as I went rather than cutting all pieces before beginning to mount. 

Beginning with stars, cut strips to fit each basket section, peel from backing, mount onto individual sections using glue stick.  Continue until blue area is desired size.   

Cut red stripes from flag image, cut into individual sections and mount to basket using glue stick.  

Cut AMERICA lettering and mount vertically to right of flag on individual basket slats using glue stick.


“We the People” Snack Plate 

Although this plate came with the blue stars already around the edges, a solid plate would work too. 

Determine circumference of area of plate you wish to cover with Declaration of Independence text.    For this plate, inner circle was 7 1/2” in diameter.

Size Declaration of Independence image to needed width.  REVERSE IMAGE and print onto Decor Attitude!

Trace plate, bowl or other round item the same circumference  as the area to be covered, cut out. 

Apply spray adhesive, peel from backing and mount to center of plate.


Vintage Flag Pennant Banner


Images of vintage flags, printed onto Quilt Attitude™!, and mounted onto muslin and burlap give this patriotic banner an old fashioned feel.

Choose flag images, size to desired size (flag images on this banner are 5" across top, and point is 5 1/2" from center of top.)
REVERSE IMAGES and print onto Quilt Attitude™! 

Create template for pennants, trace onto desired area of each flag image.  Cut out.

Cut muslin pennants approximately 1/2” larger on all sides than flag images.  Fray edges.

Cut burlap pennants approximately 1/2” larger on all sides than muslin pennant.  Fray edges.

Apply spray adhesive to flag pennants, peel from backing and mount onto muslin pieces.

Mount muslin pieces to burlap pieces. 

Carefully (I say carefully, because I did not follow this advice, and although blood coordinates nicely with the vintage colors of these flags, I don’t recommend adding it as an accent to your pennants...) use scissors to make holes approximately 1/2” from top left and right corners of each pennant.   Place jute through hole, tie knot in front.  Continue connecting pieces using jute, leaving approximately 1” space between each pennant.

To add “America” accents to alternating pennants, size text to desired size and type number needed for your banner.  REVERSE IMAGE and print onto Quilt Attitude™!

Cut each word and mount to piece of muslin.  Fray edges. Mount muslin with text onto piece of burlap, fray edges.  Mount to bottom center area of alternating pennants.   Add tan star button accents as shown.


Historical Documents Placemats or 
Table Runners

Use purchased copies of historical documents or print images (search Declaration of Independence, Abe Lincoln....) onto parchment vellum or lightweight parchment paper.  Mount unprinted sheets of Scrapbooking Attitude! over surface of each document, front and back, to protect against tearing, minor spills or stains.  Save your historical documents for future celebrations.

Tuesday, June 25, 2013

A Patriotic Celebration with Craft Attitude™!


A PATRIOTIC CELEBRATION WITH
 CRAFT ATTITUDE™!

Creating a wide variety of patriotic themed serving pieces and decorations is easy with Craft Attitude™ products! 

I'm honored to be part of a group of amazing designers sharing their Patriotic creations featuring Craft Attitude™!   Here's a complete list with links of everyone participating, so be sure to check out what they've shared too!


Who & Where - Find Your Patriotic Craft Attitude™ Inspiration here!

 June 10: Jonathan Fong & Candie Cooper
www.jonathanfongstyle.com/blog/
http://candiecooper.typepad.com

June 13: Terri Sproul
http://terrisproul.blogspot.com

June 17: Eileen Hull
http://eileenhull.blogspot.com

June 20: Cindi Bisson
http://fatcatcreations.blogspot.com

June 24: Jen Goode
http://www.jgoode.com

June 27: Aunt Peaches
http://www.auntpeaches.com

July 1: Lorine Mason
http://lorinemason.com/blog/

Follow the Craft Attitude link in the right column of my blog to purchase Craft Attitude™
 products and get free shipping!

Materials:

Decor Attitude™!
Quilt Attitude™!
Scrapbooking Attitude™!
Inkjet printer
Basket
Plate
Muslin
Burlap
Jute
Blumenthal Lansing star buttons
Elmer's Craft Bond Spray Adhesive
Elmer's Craft Bond Glue Stick
Westcott Titanium Bonded scissors
Preprinted historical documents (optional)

"America" Serving Basket


A plain, inexpensive basket gets some patriotic pizazz with Decor Attitude!   When I added this finished basket to my “collectable” brand name basics, it looked just as good!

Determine width of horizontal basket slats.   Size American flag image so that stripes are the same size as the basket slats.  Size lettering to spell out AMERICA with approximately 1/4” between letters.   REVERSE FLAG IMAGES AND TEXT and  print onto Decor Attitude! 

Note:  When designing this basket, I found it easier to work section by section, cutting as I went rather than cutting all pieces before beginning to mount. 

Beginning with stars, cut strips to fit each basket section, peel from backing, mount onto individual sections using glue stick.  Continue until blue area is desired size.   

Cut red stripes from flag image, cut into individual sections and mount to basket using glue stick.  

Cut AMERICA lettering and mount vertically to right of flag on individual basket slats using glue stick.


“We the People” Snack Plate 


Although this plate came with the blue stars already around the edges, a solid plate would work too. 

Determine circumference of area of plate you wish to cover with Declaration of Independence text.    For this plate, inner circle was 7 1/2” in diameter.

Size Declaration of Independence image to needed width.  REVERSE IMAGE and print onto Decor Attitude!

Trace plate, bowl or other round item the same circumference  as the area to be covered, cut out. 

Apply spray adhesive, peel from backing and mount to center of plate.


Vintage Flag Pennant Banner


Images of vintage flags, printed onto Quilt Attitude™!, and mounted onto muslin and burlap give this patriotic banner an old fashioned feel.

Choose flag images, size to desired size (flag images on this banner are 5" across top, and point is 5 1/2" from center of top.)
REVERSE IMAGES and print onto Quilt Attitude™! 

Create template for pennants, trace onto desired area of each flag image.  Cut out.

Cut muslin pennants approximately 1/2” larger on all sides than flag images.  Fray edges.

Cut burlap pennants approximately 1/2” larger on all sides than muslin pennant.  Fray edges.

Apply spray adhesive to flag pennants, peel from backing and mount onto muslin pieces.

Mount muslin pieces to burlap pieces. 

Carefully (I say carefully, because I did not follow this advice, and although blood coordinates nicely with the vintage colors of these flags, I don’t recommend adding it as an accent to your pennants...) use scissors to make holes approximately 1/2” from top left and right corners of each pennant.   Place jute through hole, tie knot in front.  Continue connecting pieces using jute, leaving approximately 1” space between each pennant.

To add “America” accents to alternating pennants, size text to desired size and type number needed for your banner.  REVERSE IMAGE and print onto Quilt Attitude™!

Cut each word and mount to piece of muslin.  Fray edges. Mount muslin with text onto piece of burlap, fray edges.  Mount to bottom center area of alternating pennants.   Add tan star button accents as shown.


Historical Documents Placemats or 
Table Runners

Use purchased copies of historical documents or print images (search (Declaration of Independence, Abe Lincoln....) onto parchment vellum or lightweight parchment paper.  Mount unprinted sheets of Scrapbooking Attitude! over surface of each document, front and back, to protect against tearing, minor spills or stains.  Save your historical documents for future celebrations.

Tuesday, June 11, 2013

Friends Are The Family We Choose for Ourselves - Mixed-Media Frame

My latest project for KellyCraft uses their amazing Get-it-Straight™ Laser Square and some of my other favorite crafting products - Craft Attitude (follow the link in the right column and get FREE SHIPPING on Craft Attitude products!) , Smoothfoam, Connie Crystal, and Graphic 45 papers!  Find the full instructions here on the KellyCraft blog: 

http://www.kellycraftblog.blogspot.com/2013/06/friends-are-family-mixed-media-frame.html

Wednesday, May 29, 2013

Getting It Straight & Catching Memories


I have a couple of new projects to share today - the first is a new KellyCraft Innovations video showing how the KellyCraft Get-it-Straight Laser Square makes scoring paper and cardstock super simple.

The second is this simple project featuring Connie Crystal & Craft Attitude - what I call "Memory Catchers" - instructions are featured here on the Connie Crystal Blog.

Cre8time to get crafty today! - Cindi